|
Tools tagged blogs
| Change and verify the NTP client in Windows |  |
|---|
|
In the command prompt running as administrator or in a bat file,
set the NTP client to fetch its time from for instance the following list of time servers(the example here is with Norwegian time servers):
			@echo off
			w32tm /config /manualpeerlist:0.no.pool.ntp.org,3.no.pool.ntp.org,2.no.pool.ntp.org /syncfromflags:manual /reliable:yes /update
			net stop w32time && net start w32time
			w32tm /resync
Optionally verify the configuration with the following set of commands:
			w32tm /query /configuration
			w32tm /query /status
Sources: Microsoft
Tagged as: Tools, Commands, HowTo |
| How to Clean up a Windows System Drive | |
|---|
|
-23rd February 2013
This is a list of steps that can be taken to clean up a system drive and thus save space. Make sure you have set up your folder view to show all hidden files and not hide system files. In addition to this list you might want to try ccleaner from Piriform. Ccleaner can be scripted as well.
1. Do you use shadow copies on the system drive? Do you need them? If not you can delete them with the following command: vssadmin delete shadows /for=%SystemDrive% /all /quiet
2. How much space is the shadow storage taking on your system drive? You can resize it here with the following command: vssadmin Resize ShadowStorage /For=%SystemDrive% /On=%SystemDrive% /MaxSize=4GB
3. Are there memory dumps stored on your system? You can safely delete them. If not specifically specified otherwise, you will find them at:
%SystemRoot%\MEMORY.DMP
%SystemRoot%\Minidump\*.*
4. Do you run IIS on your server or computer? You can compress the log files at %SystemDrive%\inetpub\logs\LogFiles using NTFS compression.
5. You can safely delete the following:
%SystemRoot%\installer\$PatchCache$
%SystemRoot%\$blabla$
%SystemDrive%\$Recycle.Bin
6. The following can be compressed with NTFS compression:
%SystemDrive%\PerfLogs
%SystemDrive%\MSOCache
7. If you are using Windows 7 or Windows Server 2008R2 you might want to try the command dism.exe /online /cleanup-image /spsuperseded to clean up the winsxs folder.
On Windows Vista or Windows Server 2008 Service Pack 2 the tool that does the same job is Compcln.exe.
On Windows Vista or Windows Server 2008 Service Pack 1 the tool that does the same job is VSP1CLN.EXE.
8. Finally - you can use cleanmgr.exe to clean up a whole lot more. If you want to script it, you can set it up first with the command cleanmgr.exe /sageset:101
After choosing what you want to clean up in the dialog box that appears, you cun run the same cleanupjob any time you want with the command cleanmgr.exe /sagerun:101
The setup for the cleaning job is stored in the registry in several keys under the following path:
HKEY_LOCAL_MACHINE\SOFTWARE\Microsoft\Windows\CurrentVersion\Explorer\VolumeCaches.
In our example, if we chose to clean up Active Setup Temp Folders, the key "StateFlags0101"=dword:00000002 will be created under
..\VolumeCaches\Active Setup Temp Folders indicating this as a part of the 101 cleanup job.
Thus if you wanted, you could set up a clean up job and export the keys from the registry that you want to constitute the same cleanup job on other computers without you having to go through the graphical user interface every time you want to create that same job. This makes a great opportunity for automating with scripts in large server environments.
|
This is not an attempt of a complete list.
Feel free to inform me if you have further suggestions.
Source: Information gathered over time.
Tagged as: Commands, Tools, HowTo |
| How to write C# code against UCS Central | |
|---|
|
-3rd of June 2014
This blog attempt will in short terms to try to describe how to write C# code against UCS Central. Visual Studio 2012 was used to write the code displayed here. It is assumed that you know programming already, and that you are able to fit these pieces of information to your own solution. Not every class and bit of code is shown here, only what is esssential to get the concept across.
When I first needed to use the UCS Centrals API for automating tasks against it, I had no access to any API documentation. UCS Central uses a web GUI to talk to its backend API through an HTTPS session. Using Fiddler to monitor what calls are being made to the API from the web page, you can record so that you can later tweak and recreate these calls from C# to do what you need to do even with missing documentation.
1. What is UCS Central and what are we trying to do?
The Cisco Unified Computing system is a system where profiles representining setups of server systems are deployed on to bare metal computer systems. All hardware specifics are fetched from pools or definitions in the UCS system and assigned to these profiles that in turn can be assigned and reassigned to different hardware servers/rack blades/bare metal servers. Take a look at the following video representation from Cisco for a good explanation and illustration of the concept.
The whole system is arranged into domains that are each administered by UCS Managers. These domains and theyr managers are then in turn administered by a central solution called the UCS Central. The documentation for the UCS Managers command line interface, API solutions and PowerShell support is at the time of writing very good. From what I can find at the time being, this is not the case for UCS Central, which leads us to this blog article.
We will be using Fiddler to get the information we need to talk to the UCS REST API, and then C# to code the talking. To have a real system to talk to and experiment with, I will be using Cisco UCS Platform Emulator and then Cisco UCS Central on top of that. These two are set up in a private VMWare lab for this emulation.
|

|
2. Using Fiddler
|
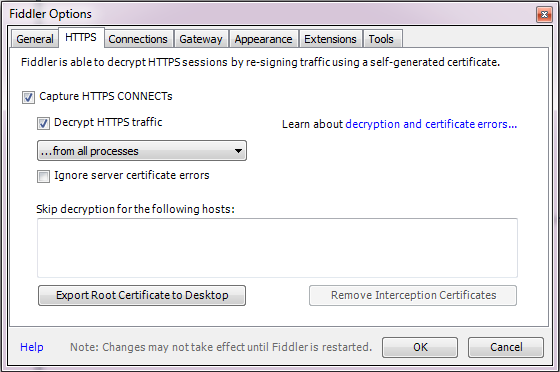
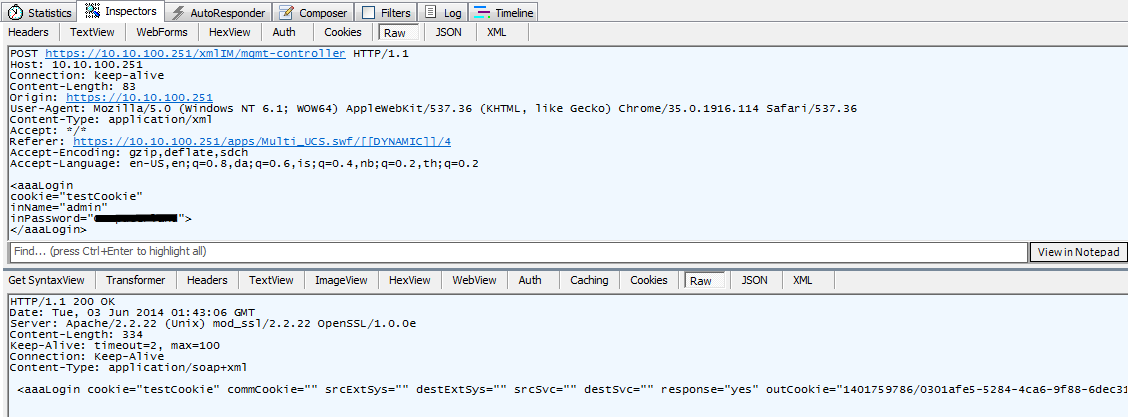
Fiddler can be fetched at http://www.telerik.com/download/fiddler and is our first step to get the information we need. Go ahead and download it, then take a look at this guide for more about Fiddler. In our setup we want to capture information going over HTTPS, so we will set the options for Fiddler to handle that traffic (figure 1 on the right). To exemplify the usage of Fiddler we log in to UCS Central and watch what calls are being made in Fiddler (figure 2 on the right). Here we can see the XML being sent to the API (the upper box), and the headers being used. We also see the reply we get (the lower box) with headers. We will be using both to make a login and check the reply. Here is what we are sending:
And we can see in the reply the outCookie that we will be using in further interaction with the UCS Central REST API to identify our session (figure 2 on the right).
|
|

|
3. Using the result from Fiddler
From experimenting with Fiddler we know we will be sending the following XML to the API as shown below. The first example does the login which in turn gives us the outCookie as an xml answer that we use in our next step. The other is for our next step to create a VLAN via UCS Central using the outCookie from step 1 to identify our authenticated session.
3.1 The login:
3.2 The creation of a VLAN named 999-XXX-TESTXX with VLAN ID 999:
In our C# code, we first need a piece of code that will send the request to the API and then another piece of code that will interpret the reply. The SendWebRequest class will be doing the sending and the XmlReaderLocal class will do the reply. The XmlReaderLocal class has actually been made to read an xml file which is not what is returned to us from the UCS Central API. I have because of that created a temporary file creator where there is code to create a a temporary file where the XML reply is stored so that the XmlReaderLocal class can read it. The code for the temporary file creator is not included here, but is used in section four 'The half-ready code.' You will have to write your own temporary file creator the way you see fits.
3.3 The SendWebRequest class to send our request:
					  class SendWebRequest {
					      private string __apiUrl;
					      private string __stringData;

					      public SendWebRequest(string apiUrl, string stringData) {
					         __apiUrl = apiUrl;
					         __stringData = stringData;
					      }
					      public HttpWebResponse execute() {
					         CookieContainer cookieJar = new CookieContainer();
					         HttpWebRequest firstRequest = (HttpWebRequest)WebRequest.Create(__apiUrl);

					         ASCIIEncoding encoding = new ASCIIEncoding();
					         byte[] data = encoding.GetBytes(__stringData);

					         firstRequest.CookieContainer = cookieJar;
					         firstRequest.KeepAlive = true;
					         firstRequest.Method = "POST";
					         firstRequest.ContentType = "application/xml";
					         firstRequest.ContentLength = data.Length;
					         firstRequest.Accept = "*/*";
					         firstRequest.Referer = "https://" + __apiUrl.Split('/')[2] + "/apps/Multi_UCS.swf/[[DYNAMIC]]/4";
					         firstRequest.UserAgent = "Mozilla/5.0 (Windows NT 6.1; WOW64) AppleWebKit/537.36 (KHTML, like Gecko) Chrome/35.0.1916.114 Safari/537.36";
					         firstRequest.Host = __apiUrl.Split('/')[2];

					         System.Net.ServicePointManager.ServerCertificateValidationCallback +=
					            delegate(object sender, System.Security.Cryptography.X509Certificates.X509Certificate certificate,
					                                    System.Security.Cryptography.X509Certificates.X509Chain chain,
					                                    System.Net.Security.SslPolicyErrors sslPolicyErrors) {
					                                       return true; // **** Always accept SSL Certificate
					                                    };

					         Stream newStream = firstRequest.GetRequestStream();
					         newStream.Write(data, 0, data.Length);
					         newStream.Close();
					         return (HttpWebResponse)firstRequest.GetResponse();
					      }
					   }
3.4 The XmlReaderLocal class to read the reply from UCS central and the AttributeCollection class to reply our answer:
Note: I see there are some syntax errors presented in the code by the syntax highlighter. Be sure to check this when you use the code.
public class AttributeCollection {
  public string NodeName { get; set; }
  public Dictionary Attributes { get; set;}

  public AttributeCollection(string nodeName) {
     this.NodeName = nodeName;
     Attributes = new Dictionary();
  }
}
public class XmlReaderLocal {
  XmlTextReader reader;
  String xmlFil;
  public XmlReaderLocal(String xmlFil) {
     this.xmlFil = xmlFil;
  }
  ///
  ///  Read all attributes occurrences of one named node taken as input
  ///
  public AttributeCollection ReadFirstNodeAttributes(String nodename) {
     reader = new XmlTextReader(xmlFil);
     AttributeCollection attrCollection = new AttributeCollection(reader.Name);
     while (reader.Read()) {
        switch (reader.NodeType) {
           case XmlNodeType.Element:
              if (reader.Name.ToString() == nodename) {
                 if (reader.HasAttributes) {
                    //Console.WriteLine("Attributes of <" + reader.Name + ">");
                    while (reader.MoveToNextAttribute()) {
                       attrCollection.Attributes.Add(reader.Name, reader.Value);
                    }
                    reader.MoveToElement();
                    reader.Close();
                 }
              }
              break;
           case XmlNodeType.Text:
              break;
           case XmlNodeType.EndElement:
              break;
        }
     }
     reader.Dispose();
     return attrCollection.Attributes.Count > 0 ? attrCollection : null;
  }
}
|
4. The half-ready code
Note: I see there are some syntax errors presented in the code by the syntax highlighter. Be sure to check this when you use the code. This seems to be some sort of bug in the highlighter.
Here is where we will use our code and knowledge that we have this far. First we demonstrate a login procedure, and then we demonstrate the creation of the VLAN we want to create. Have in mind that this code is not complete and is only intended to show a strain of thought. Simplified versions of the functions GetCookieString and SetUCSVLAN are displayed below, but the whole class is omitted and some depending classes are omitted. You will have to interpret your way through this code and the comments, then implement your own solution for these missing pieces. The strain of thought is still thought to be displayed for tutorial purposes in this article, and thus giving the value intended.
4.1 Authenticate with UCS Central:
						String errorStatus = "None";
						string outCookie = "";

						//This class holds the GetCookieString method that authenticates with UCS Central and gets the Cookie String we need for our next step:
						AuthenticateWithUCS awucs = new AuthenticateWithUCS();
						Dictionary returnAttributes = awucs.GetCookieString(uCSServer, username, password);
						status = returnAttributes.ContainsKey("status") ? returnAttributes["status"] : "None";
						errorStatus = returnAttributes.ContainsKey("errorStatus") ? returnAttributes["errorStatus"] : "None";
						outCookie = returnAttributes.ContainsKey("outCookie") ? returnAttributes["outCookie"] : "None";

						Console.WriteLine(Environment.NewLine + "**After authentication: ");
						Console.WriteLine("JobStatus: " + status);
						Console.WriteLine("ErrorStatus: " + errorStatus);
						Console.WriteLine("outCookie: " + outCookie);
4.2 Create VLAN in UCS Central:
						//This class holds the SetUCSVLAN method that creates a VLAN in UCS Central and reads the reply:
						CreateUCSVLAN cucsvlan = new CreateUCSVLAN();
			            returnAttributes = cucsvlan.SetUCSVLAN(uCSServer, vlanID, vlanName, outCookie);
			            status = returnAttributes.ContainsKey("status") ? returnAttributes["status"] : "None";
			            errorStatus = returnAttributes.ContainsKey("errorStatus") ? returnAttributes["errorStatus"] : "None";
			            var ucsStatus = returnAttributes.ContainsKey("ucsStatus") ? returnAttributes["ucsStatus"] : "None";

			            Console.WriteLine(Environment.NewLine + "**After VLAN Creation: ");
			            Console.WriteLine("JobStatus: " + status);
			            Console.WriteLine("ErrorStatus: " + errorStatus);
			            Console.WriteLine("ucsStatus: " + ucsStatus);
4.3 GetCookieString example code:
				public Dictionary GetCookieString(string uCSServer, string username, string password) {
					Dictionary returnAttributes = new Dictionary();
					var statusArray = Enum.GetValues(typeof(Status));
					Status status = (Status)statusArray.GetValue(2);
					string errorStatus = "None";
					string outCookie = "";
					string ucsStatus = "None";

					string loginUrl = "https://" + uCSServer + "/xmlIM/mgmt-controller";
					string stringData = "";

					try {
						//This is the SendWebRequest class in section 3.3 above:
						SendWebRequest swr = new SendWebRequest(loginUrl, stringData);
						//The ReadUCSWebResponse class is not shown in this article, but its usage is obvious:
						ReadUCSWebResponse rUcsWebRes = new ReadUCSWebResponse(swr, status, errorStatus, ucsStatus, "aaaLogin", "aaaLogin", "GetCookieString", "outCookie");
						Dictionary parseAttributes = rUcsWebRes.execute();
						status = parseAttributes.ContainsKey("status") ? (Status)Enum.Parse(typeof(Status), parseAttributes["status"]) : Status.error;
						errorStatus = parseAttributes.ContainsKey("errorStatus") ? parseAttributes["errorStatus"] : "None";
						outCookie = parseAttributes.ContainsKey("ucsStatus") ? parseAttributes["ucsStatus"] : "None";
					} catch (Exception ex) {
						status = (Status)statusArray.GetValue(6);
						errorStatus = "103 in GetCookieString(): " + ex.Message;
					}

					returnAttributes.Add("errorStatus", errorStatus);
					returnAttributes.Add("status", status.ToString());
					returnAttributes.Add("outCookie", outCookie);
					return returnAttributes;
			    }
4.4 SetUCSVLAN example code:
					public Dictionary SetUCSVLAN(string uCSServer, string vlanid, string vlanName, string cookieString) {
				         Dictionary returnAttributes = new Dictionary();
				         var statusArray = Enum.GetValues(typeof(Status));
				         Status status = (Status)statusArray.GetValue(2);
				         string errorStatus = "None";
				         string ucsStatus = "None";

				         string accessUrl = "https://" + uCSServer + "/xmlIM/resource-mgr";
				         string stringData =
				            "" +
				               "" +
				                  "" +
				                     "" +
				                  "" +
				               "" +
				            "";
				         try {
				         	//This is the SendWebRequest class in section 3.3 above:
				            SendWebRequest swr = new SendWebRequest(accessUrl, stringData);
				            //The ReadUCSWebResponse class is not shown in this article, but its usage is obvious:
				            ReadUCSWebResponse rUcsWebRes = new ReadUCSWebResponse(swr, status, errorStatus, ucsStatus, "fabricVlan", "configConfMos", "SetUCSVLAN", "status");
				            Dictionary parseAttributes = rUcsWebRes.execute();
				            status = parseAttributes.ContainsKey("status") ? (Status)Enum.Parse(typeof(Status), parseAttributes["status"]) : Status.error;
				            errorStatus = parseAttributes.ContainsKey("errorStatus") ? parseAttributes["errorStatus"] : "None";
				            ucsStatus = parseAttributes.ContainsKey("ucsStatus") ? parseAttributes["ucsStatus"] : "None";
				         } catch (Exception ex) {
				            status = (Status)statusArray.GetValue(6);
				            errorStatus = "103 in SetUCSVLAN(): " + ex.Message;
				         }
				         returnAttributes.Add("errorStatus", errorStatus);
				         returnAttributes.Add("status", status.ToString());
				         returnAttributes.Add("ucsStatus", ucsStatus);
				         return returnAttributes;
				    }
|
As mentioned earlier, not every bit of code is included here, but this should get you started. Note that some of the C# code does get displayed with syntax errors that are probably due to bugs in the syntax highlighter that is used on this web page.
Source: Fiddler and the imagination.
Tagged as: Scripts, Tools, HowTo |
| Copying Windows 7 to a new drive, using Linux | |
|---|
-26th of December 2014
Blog article coming..
Awaiting update..
dd if=/dev/sda of=/dev/sdb bs=446 count=1
|

|
|
Source: Manual pages
Tagged as: Linux, Tools, HowTo |
| How to Setup BDscan | |
|---|
-22nd of February 2013
Thought I would share my BDscan setup that I use on my Debian Linux computers.
Note: ># represents the command prompt and is not actually a part of the commands shown below:
1. First of all, set up your DEB repositories and install BDScan as is shown in the link.
2. Get a free license for BDScan. The license will last a year, after which you have to get a new one.
3. If you get an error stating segmentation fault when running BDScanner, execute the following line:
>#cat /opt/BitDefender-scanner/var/lib/scan/versions.dat.* |awk '/bdcore.so.linux/{print $3}'|while read bdcore_so;do touch /opt/BitDefender-scanner/var/lib/scan/$bdcore_so;bdscan --update;ln -s /opt/BitDefender-scanner/var/lib/scan/$bdcore_so /opt/BitDefender-scanner/var/lib/scan/bdcore.so;done
4. Set up a cron job that runs a scheduled job to scan your Linux system, as root:
>#vi /etc/cron.weekly/run-bdscan
5. Paste in the code in the box below and give root execute permissions:
>#chmod 744 /etc/cron.weekly/run-bdscan
|
Note: you will have to change the paths below to paths that
are relevant to your system.
#!/bin/bash
if [ -f /mnt/SDD1/bdscan.log ]; then
rm /mnt/SDD1/bdscan.log
fi
bdscan --update
bdscan --action=disinfect --log=/mnt/SDD1/bdscan.log /mnt/SDB2
bdscan --action=disinfect --log=/mnt/SDD1/bdscan.log /mnt/SDC1
bdscan --action=disinfect --log=/mnt/SDD1/bdscan.log /mnt/SDD1
if [ -f /mnt/SDD1/bdscan.log ]; then
grep infected /mnt/SDD1/bdscan.log >> /mnt/SDD1/infected.log
rm /mnt/SDD1/bdscan.log
fi
|
|
Several other options also exists when seting up a BitDefender scan in Linux. Consult the man pages for information:
>#man bdscan
bdscan [--action= disinfect | quarantine | delete | ignore] [--no-archive] [--no-mail] [--no-pack] [--no-recursive] [--follow-link] [--recur
sive-level=level] [--archive-level=level] [--ext[=ext1:ext2]] [--exclude-ext[=ext1:ext2]] [--suspect-copy] [--suspect-move] [--quarantine=quaran
tine_path] [--conf-file=conf_file] [--log[=file.log]] [--log-overwrite] [--no-list] [--no-warnings] [--verbose] [--update] [--virus-list] [--info]
[--version] [--help] [--encode=password] path-to-scan
In adition to this information, more can be found at the vendors website.
|
|
Sources: No real sources
Tagged as: Linux, HowTo, Tools |
|