|
Scripts tagged blogs
| SQL Joins |  |
|---|
|
-4th August 2012
This blog attempt will in short terms try to describe various joins available in Oracle.
Natural Join
			# Example:
			1. SELECT REGION_NAME FROM REGIONS NATURAL JOIN COUNTRIES WHERE COUNTRY_NAME='Canada';
			2. SELECT REGION_NAME FROM REGIONS JOIN COUNTRIES USING (REGION_ID) WHERE COUNTRY_NAME='Canada';
			3. SELECT COUNTRY_NAME FROM COUNTRIES JOIN REGIONS ON (COUNTRIES.REGION_ID=REGIONS.REGION_ID) WHERE REGION_NAME='Americas';
Query 1 joins the table REGION with the table COUNTRIES assuming a common relationship between the two(primary key->foreign key relationship).
Query 2 specifies specificly what common column those two tables should join on.
Query 3 specifies two columns, one in each table, that should be used in the join. Those need not have the same name.
|
Outer Joins
The examples below are for displaying syntax only. The data that is selected from is not checked to see if it is usable for this example.
			# Example:
			1. SELECT LAST_NAME, DEPARTMENT_NAME FROM EMPLOYEES, DEPARTMENTS WHERE EMPLOYEES.DEPARTMENT_ID (+) = DEPARTMENTS.DEPARTMENT_ID;
			2. SELECT LAST_NAME, DEPARTMENT_NAME FROM EMPLOYEES RIGHT OUTER JOIN DEPARTMENTS ON(EMPLOYEES.DEPARTMENT_ID = DEPARTMENTS.DEPARTMENT_ID);
			3. SELECT LAST_NAME, DEPARTMENT_NAME FROM EMPLOYEES, DEPARTMENTS WHERE EMPLOYEES.DEPARTMENT_ID = DEPARTMENTS.DEPARTMENT_ID (+);
			4. SELECT LAST_NAME, DEPARTMENT_NAME FROM EMPLOYEES LEFT OUTER JOIN DEPARTMENTS ON(EMPLOYEES.DEPARTMENT_ID = DEPARTMENTS.DEPARTMENT_ID);
			5. SELECT LAST_NAME, DEPARTMENT_NAME FROM EMPLOYEES FULL OUTER JOIN DEPARTMENTS ON(EMPLOYEES.DEPARTMENT_ID = DEPARTMENTS.DEPARTMENT_ID);
Query 1 retrieves all rows from the employees and departments tables with matching department_id's, and also includes those rows that do not match in the employees table.
Query 2 is the same as query 1. Retrieves all rows from the employees and departments tables with matching department_id's, and also includes those rows that do not match in the employees table
Query 3 retrieves all rows from the employees and departments tables with matching department_id's, and also includes those rows that do not match in the departments table.
Query 4 is the same as query 3. Retrieves all rows from the employees and departments tables with matching department_id's, and also includes those rows that do not match in the departments table
Query 5 retrieves all rows from the employees and departments tables with matching department_id's, and also includes those rows that do not match in the employees table and those who do not match in the departments table.
|
Cartesian Joins / Cross Joins
			# Example:
			1. SELECT * FROM REGIONS, COUNTRIES;
The above query will select all rows from the regions table and match them with all rows in the countries table without considering any match condition. If there are 10 rows in each table, the result will be 100 rows after the join.
This is done to simply perform a join, or to simulate a reasonable amount of data.
Self join
			# Example:
			1. SELECT f1.name Dad, f2.name child FROM family f1 JOIN family f2 ON (f1.id=f2.father_id)
The above query will join a table to itself, using the imaginary table family as en axample. The relationship between a father and a child can be displayed this way.
Semijoins
			# Example:
			SELECT * FROM departments
				WHERE EXISTS
				(SELECT * FROM employees
					WHERE departments.department_id = employees.department_id
					AND employees.salary > 2500)
			ORDER BY department_name;
Semijoins are joins that use EXISTS / IN in join as shown above.
Antijoins
		# Example:
		SELECT * FROM employees

			WHERE department_id NOT IN

			(SELECT department_id FROM departments

				WHERE location_id = 1700)

		ORDER BY last_name;
Antijoins are joins that use NOT IN / NOT EXISTS in join as shown above.
Source: OCA Oracle Database 11g SQL Fundamentals I Exam Guide. ISBN: 9780071597869
Tagged as: Scripts |
| Syntax Comparisons | |
|---|
|
-3rd August 2012
This short description displays a comparison of syntax between Bash, Perl and Powershell. Nice to have when scripting in multiple languages.
| | |
| if [ ! $A ]; then
echo "No A."
elif [ $A ]; then
echo "Theres an A."
else
echo "Dunno."
fi
| if (not exists $var) {
[...]
} elsif ($var){
[...]
} else {
[...]
} | If (!$var) {
[...]
} elseif ($var){
[...]
} else {
[...]
}
| for item in variabel
do
[...]
done
| foreach $i (@array) {
[...]
} | Foreach ($i in $array) {
[...]
}
| While [ $var –lt 4 ]
Do
[...]
done
| Do {
[...]
} While ($var); | Do
{
[...]
} While ($var)
| While [ ..betingelser.. ]
do
[...]
done
| While ($var ne $string) {
[...]
} | While ($var –ne $string) {
[...]
}
| for (( i = 1 ; i < 6 ; i++ ))
do
[...]
done
| For ($x =1; $<10; $x++) { [...]
} | for ( $x=0; $x -ne 10; $x++) {
[...]
}
| String comparisons:
Binary operator are used; > and > and <= etc, =
Binary comparisons:
Word operator are used; -lt and -gt and -eq etc.
| String comparisons:
Word operatosr are used; lt and gt and eq etc.
Binary comparisons:
Binary operators are used.
| String comparisons:
Word operator are used; -lt og -gt og -eq osv.
Binary comparisons:
Word operator are used; -lt og -gt og -eq osv.
| Declaration:
Function function_name() {}
Usage:
Function_name $var
| Declaration:
Sub function_name {}
Usage:
&function_name($var);
| Declaration:
Function function_name() {}
Usage:
Function_name $varName value
| Case “$var” in
Case_1)
;;&
Case_2)
;;
Case_3)
;;
*)
;;
esac
| SWITCH: for ($choice) {
$_ == 1 && die "You chose number one\n";
$_ == 2 && print "You chose number two\n";
$_ == 3 && do { "You chose number three\n";
Last SWITCH;
};
#Default
Warn ”message”;
}
| Switch ($var) {
Case_1 { [...] }
Case_2 { [...] }
Case_3 { [...] }
Default { [...] }
}
| Array = (one two three)
| %hash = (navn => "Atle Holm",adresse => "Skogveien 14");
@array = ("Atle Hom", "Skogvegen 14");
@array = qw(one two three);
| $hash = @{"navn" = "Atle Holm"; "adresse" = "Skogveien 14"};
$array = @("Atle Holm", "Skogvegen 14");
|
Various relevant informational links:
Source: Collection over time
Tagged as: Scripts |
| SQL Select Limiting | |
|---|
|
-14th September 2013
The following article is a collection of example queries and theyr explanations regarding select limiting. It is assumed that the reader has at least basic knowledge of SQL queries and how to use them before attempting to make use of this short form article.
Single row select limiting
		# Example:
		1. SELECT * FROM TABLE WHERE COLUMN1 = COLUMN2;
		2. SELECT * FROM TABLE WHERE COLUMN1 < COLUMN2;
		3. SELECT * FROM TABLE WHERE COLUMN1 BETWEEN 3000 AND 4000;
		4. SELECT * FROM TABLE WHERE COLUMN1 IN (1000, 2000, 3000);
		5. SELECT * FROM TABLE WHERE COLUMN1 = COLUMN2 AND COLUMN1 != 4000;
		6a. SELECT * FROM TABLE WHERE COLUMN1 = COLUMN2 AND COLUMN1 != 4000 OR COLUMN3 < 2000;
		6b.	Interpreted as: SELECT * FROM TABLE WHERE (COLUMN1 = COLUMN2 AND COLUMN1 != 4000) OR (COLUMN3 < 2000);
		7. SELECT * FROM TABLE WHERE COLUMN1 LIKE '%STRING%';
		8. SELECT * FROM TABLE WHERE COLUMN1 LIKE '%STRING_REST'; # character _ is a wildcard for one sign.
		9. SELECT * FROM TABLE WHERE COLUMN1 LIKE '%STRING\_REST' ESCAPE '\'; # character _ is now not a wild card.
		10. SELECT * FROM TABLE WHERE COLUMN1 IS NULL;
		11. SELECT * FROM TABLE WHERE COLUMN1 LIKE '%STRING%' OR NOT COLUMN2 < 0,35;
		12. SELECT * FROM TABLE WHERE COLUMN1 ORDER BY COLUMN2;

		13. SELECT * FROM TABLE WHERE COLUMN1 ORDER BY COLUMN2, 3 DESC, 4 NULLS FIRST | LAST; ASC ER DEFAULT
		14. SELECT * FROM TABLE WHERE &VARIABLE ORDER BY COLUMN2;
To handle variables:
		# Example:
		DEFINE VARIABLE='TEST';
		UNDEFINE VARIABLE;
Disallow defining: SET DEFINE OFF;
Allow defining: SE DEFINE ON;
Show input to variables on screen? SET VERIFY ON | OFF;
Query 1 selects everything from TABLE where COLUMN1 is the same as COLUMN2.
Query 2 selects everything from TABLE where COLUMN1 is less then COLUMN2.
Query 3 selects everything from TABLE where COLUMN1 is between the values 3000 and 4000.
Query 4 selects everything from TABLE where COLUMN1 is either 1000, 2000 or 3000.
Query 5 selects everything from TABLE where COLUMN1 is the same as COLUMN2, and COLUMN2 is not 4000.
Query 6 selects everything from TABLE where COLUMN1 is the same as COLUMN2 and COLUMN1 is not 4000. If that condition is no true, rows from the table will be selected if COLUMN3 is less then 3000.
Query 7 selects everything from TABLE where COLUMN1 has the word STRING in it.
Query 8 selects everything from TABLE where COLUMN1 has the word STRING in it, followed by an arbitrary character, followed by the word REST.
Query 9 selects everything from TABLE where COLUMN1 has the word STRING in it, followed by an underscore character, followed by the word REST.
Query 10 selects everything from TABLE where COLUMN1 is NULL.
Query 11 selects everything from TABLE where COLUMN1 contains the word STRING or where COLUMN2 is less then 0,35.
Query 12 selects everything from TABLE where COLUMN1 and orders the result by COLUMN2.
Query 13 selects everything from TABLE where COLUMN1 and orders the result by COLUMN2, sets third column in descending order and puts nulls first in fourth column.
Query 14 selects everything from TABLE where where predefined variable contains the cinditions and orders by COLUMN2.
|
Multiple row select limiting
1. HAVING and GROUP BY:
	# Examples:
	SELECT COUNT(*), SUM(LIST_PRICE), product_status FROM PRODUCT_INFORMATION
		WHERE LOWER(PRODUCT_STATUS) <> 'orderable'
		GROUP BY PRODUCT_STATUS HAVING SUM(LIST_PRICE) > 4000;
2. IN, NOT IN:
	# Examples:
	SELECT LAST_NAME FROM EMPLOYEES WHERE DEPARTMENT_ID IN
		(SELECT DEPARTMENT_ID FROM DEPARTMENTS WHERE DEPARTMENT_NAME LIKE 'IT%') AND
		SALARY > (SELECT AVG(SALARY) FROM EMPLOYEES);
3. ANY, ALL:
		# Example:
		SELECT LAST_NAME FROM EMPLOYEES WHERE SALARY > ALL
			(SELECT SALARY FROM EMPLOYEE WHERE LAST_NAME = 'Taylor') ORDER BY LAST_NAME;
Query 1: The functions COUNT() and SUM() are multiple row functions. GROUP BY PRODUCT_STATUS states that the multiples of rows fed to these functions are in groups of the column PRODUCT_STATUS. The HAVING clause limits these groups to only include rows where the SUM of LIST_PRICE is larger then 4000. Thus GROUP BY and HAVING are both used in multiple row limiting.
Query 2: This example shows a query with a subquery where the result is limited to contain only rows where DEPARTMENT_ID is IN the result of the subquery that follows the IN clause. The IN clause is used here because the subquery returns multiple rows.
Query 3: Here the result is limited by the clause '> ALL' followed by a subquery that returns multiple rows. This would select LAST_NAME from the EMPLOYEES table where the SALARY is more then the highest SALARY returned by the subquery.
|
Below is an explanation to the various forms of these clauses:
| < ANY | Less then the largest
| | > ANY | More then the smallest
| | = ANY | IN
| | < ALL | Less then the smalles - the opposite of "more then the smallest(> ANY)"
| | > ALL | More then the largest - the opposite of "less then the biggest(< ANY)"
|
Source: OCA Oracle Database 11g SQL Fundamentals I Exam Guide. ISBN: 9780071597869
Tagged as: Scripts |
| Upsert against MongoDB with PowerShell | |
|---|
|
-18th January 2014
The Story
It turned out that I needed to upsert to a MongoDB database. After a quick Google search I found Kristof Kowalski's blog article, that helped me out alot. However, upserting was not explained. How to upsert is no big-brainer, if you just know how to. And when you don't know how, you spend time searching for the solution. Here it is explained without further time needed to be spent.
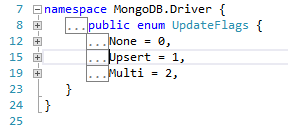
Upserting is done by adding the enum type MongoDB.Driver.UpdateFlags.Upsert when calling the update method as the third argument of the collection you have chosen. However, in PowerShell that would not work the way I tried to do it. To remedy that, I would need the values for the corresponding class. By using Visual Studio and creating a new solution, then adding references to the required DLLs I could browse through to the definitions (see picture on the right). As you can see, upsert is the equivalent to the value 1, so the value 1 is what I want to pass as the third optional argument. See the example code below for a demonstration.
|
|
		Add-Type -Path "C:\bin\MongoDB_Drivers\MongoDB.Bson.dll"
		Add-Type -Path "C:\bin\MongoDB_Drivers\MongoDB.Driver.dll"

		$databaseName = "database";
		$MONGO_URL = "mongodb://serverIPorDNS/$databaseName?safe=true;slaveok=true";
		$vmname="virtualServer"

		$db = [MongoDB.Driver.MongoDatabase]::Create($MONGO_URL)
		$collection = $db['ourCollection']

		[MongoDB.Bson.BsonDocument] $doc = @{
			"_id"= [MongoDB.Bson.ObjectId]::GenerateNewId();
		    "ServerName"= "$vmname";
		};

		#We are not doing an insert, we are doing an upsert - the following would be an insert:
		#$collection.Insert($doc);

		#Here we get ready for the upsert:
		$updates = @{'$set' = @{'ServerName'= "$vmname"}};
		$query = @{"ServerName"= $doc['ServerName']}
		try {
			#This is where we do the upsert, notice the value 1 at the end of the method call:
			$collection.Update([MongoDB.Driver.QueryDocument]$query, [MongoDb.Driver.UpdateDocument]$updates, 1);
		} catch {
			#Some error handling here
		}
		#Example - To remove the vm with that name:
		#$collection.Remove([MongoDB.Driver.QueryDocument]@{"ServerName"= "$vmname"});

		#Example - o Test the values
		#$collection.FindAll();
|
There is also a PowerShell provider for MongoDB.
Source: Kristof Kowalski, MongoDB C# Documentation.
Tagged as: Scripts, HowTo |
| SQL 2008 Performing an SQL Server Performance Trace | |
|---|
					/****************************************************/
					/* Created by: SQL Server 2008 R2 Profiler          */
					/****************************************************/

					-- Create a Queue
					declare @rc int
					declare @TraceID int
					declare @maxfilesize bigint
					set @maxfilesize = 500

					-- Please replace the text InsertFileNameHere, with an appropriate
					-- filename prefixed by a path, e.g., c:\MyFolder\MyTrace. The .trc extension
					-- will be appended to the filename automatically. If you are writing from
					-- remote server to local drive, please use UNC path and make sure server has
					-- write access to your network share

					exec @rc = sp_trace_create @TraceID output, 0, N'F:\MSSQL\InsertFileNameHere', @maxfilesize, NULL
					if (@rc != 0) goto error

					-- Client side File and Table cannot be scripted

					-- Set the events
					declare @on bit
					set @on = 1
					exec sp_trace_setevent @TraceID, 10, 1, @on
					exec sp_trace_setevent @TraceID, 10, 3, @on
					exec sp_trace_setevent @TraceID, 10, 11, @on
					exec sp_trace_setevent @TraceID, 10, 35, @on
					exec sp_trace_setevent @TraceID, 10, 12, @on
					exec sp_trace_setevent @TraceID, 10, 13, @on
					exec sp_trace_setevent @TraceID, 45, 1, @on
					exec sp_trace_setevent @TraceID, 45, 3, @on
					exec sp_trace_setevent @TraceID, 45, 11, @on
					exec sp_trace_setevent @TraceID, 45, 35, @on
					exec sp_trace_setevent @TraceID, 45, 12, @on
					exec sp_trace_setevent @TraceID, 45, 28, @on
					exec sp_trace_setevent @TraceID, 45, 13, @on
					exec sp_trace_setevent @TraceID, 12, 1, @on
					exec sp_trace_setevent @TraceID, 12, 3, @on
					exec sp_trace_setevent @TraceID, 12, 11, @on
					exec sp_trace_setevent @TraceID, 12, 35, @on
					exec sp_trace_setevent @TraceID, 12, 12, @on
					exec sp_trace_setevent @TraceID, 12, 13, @on


					-- Set the Filters
					declare @intfilter int
					declare @bigintfilter bigint

					set @bigintfilter = 50000
					exec sp_trace_setfilter @TraceID, 13, 0, 4, @bigintfilter

					exec sp_trace_setfilter @TraceID, 35, 0, 6, N'tmsng'
					-- Set the trace status to start
					exec sp_trace_setstatus @TraceID, 1

					-- display trace id for future references
					select TraceID=@TraceID
					goto finish

					error:
					select ErrorCode=@rc

					finish:
					go
|
					-- To stop the trace, here with Id 2:
					exec sp_trace_setstatus 2, 0
					-- To find traceID if is unknown:
					-- SELECT traceid FROM fn_trace_getinfo(default)
					--				where traceid > 1
|
				-- To deleta a trace race:
				exec sp_trace_setstatus 2, 2
				-- To delete the trace you first have to stop it.
				-- This will close the trace file being written to.
|
				-- As an alternative to the above commands the
				-- 		following code will also work:
				declare @tracenr int
				SELECT @tracenr = MAX(traceid)
					FROM fn_trace_getinfo(default) where traceid > 1
				exec sp_trace_setstatus @tracenr, 0
				exec sp_trace_setstatus @tracenr, 2
|
Firstly we need start our trace and store the results in a file that we can analyze later. Use the script on the left hand side created by SQL Server 2008 R2 Profiler and change the path and filename in 'InsertFileNameHere' to a real path on your system. You can run it in SQL Server Management Studio, this will start the trace that collects the data we need. See comments in the script for further instructions.
Let the trace run for a day or two, or at least a few hours where you know the system is under strain. To stop the trace use the stored procedure shown in the first box at the top of this column on the right hand side. The trace Id was returned to you when you started the trace, but if you have forgotten or missed it, you will find a query to find it for you in the same box at the top of this column.
When you are all done, it might be a good idea to clean up after yourself and delete the trace you created from the system. You will find commands to do that in the second box fron the top in this column. Alternatively you can use the code in the third box from the top of this column to make your day.
Now that you have your data collected in the trace file you created, you can start Database Engine Tuning Advisor and load the trace in there for analysis. Specify the file name and the database you want to evaluate as shown in figure 1, and start the analysis with the "Start Analysis" button.
Figure 1:
|
This blog article will be updated later with more information on Database Engine Tuning Advisor and how to use it with what you have seen so far. In the meanwhile, you are off to a start with this small guide. The next steps should be intuitive. For a closer look take a look at Ken Lassesen's guide and jump down to the "Apply the Recommendations" section. You have already performed all the rest above that section when reading and following this guide, thus simplifying the process of doing this greatly.
|
Sources: Gurus at my work
Tagged as: Scripts, SQL 2008 |
| How to write C# code against UCS Central | |
|---|
|
-3rd of June 2014
This blog attempt will in short terms to try to describe how to write C# code against UCS Central. Visual Studio 2012 was used to write the code displayed here. It is assumed that you know programming already, and that you are able to fit these pieces of information to your own solution. Not every class and bit of code is shown here, only what is esssential to get the concept across.
When I first needed to use the UCS Centrals API for automating tasks against it, I had no access to any API documentation. UCS Central uses a web GUI to talk to its backend API through an HTTPS session. Using Fiddler to monitor what calls are being made to the API from the web page, you can record so that you can later tweak and recreate these calls from C# to do what you need to do even with missing documentation.
1. What is UCS Central and what are we trying to do?
The Cisco Unified Computing system is a system where profiles representining setups of server systems are deployed on to bare metal computer systems. All hardware specifics are fetched from pools or definitions in the UCS system and assigned to these profiles that in turn can be assigned and reassigned to different hardware servers/rack blades/bare metal servers. Take a look at the following video representation from Cisco for a good explanation and illustration of the concept.
The whole system is arranged into domains that are each administered by UCS Managers. These domains and theyr managers are then in turn administered by a central solution called the UCS Central. The documentation for the UCS Managers command line interface, API solutions and PowerShell support is at the time of writing very good. From what I can find at the time being, this is not the case for UCS Central, which leads us to this blog article.
We will be using Fiddler to get the information we need to talk to the UCS REST API, and then C# to code the talking. To have a real system to talk to and experiment with, I will be using Cisco UCS Platform Emulator and then Cisco UCS Central on top of that. These two are set up in a private VMWare lab for this emulation.
|

|
2. Using Fiddler
|
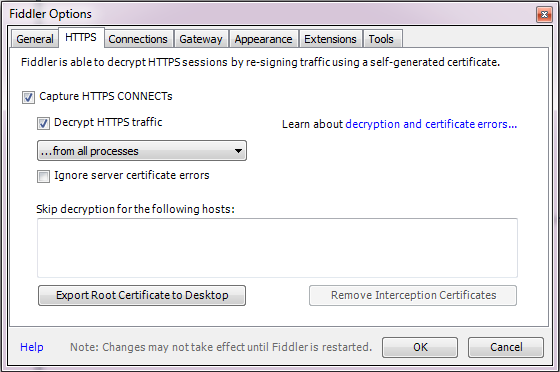
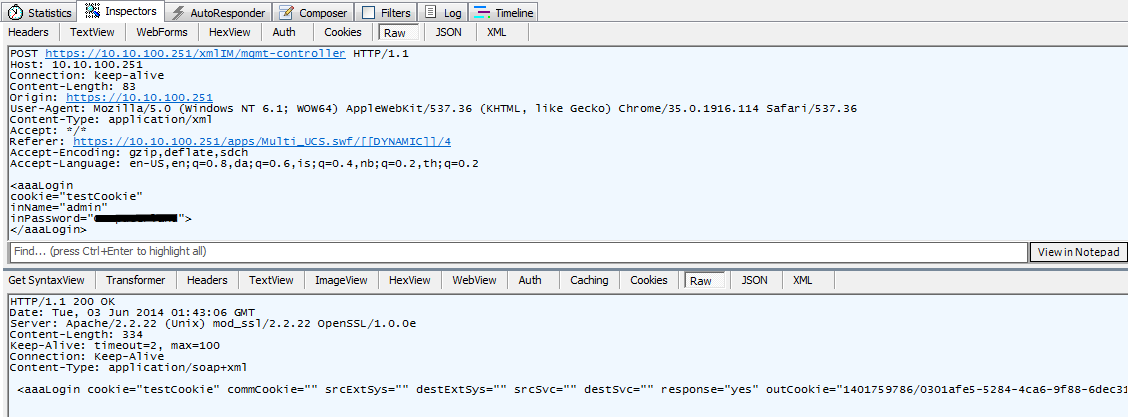
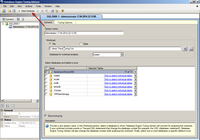
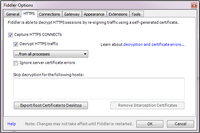
Fiddler can be fetched at http://www.telerik.com/download/fiddler and is our first step to get the information we need. Go ahead and download it, then take a look at this guide for more about Fiddler. In our setup we want to capture information going over HTTPS, so we will set the options for Fiddler to handle that traffic (figure 1 on the right). To exemplify the usage of Fiddler we log in to UCS Central and watch what calls are being made in Fiddler (figure 2 on the right). Here we can see the XML being sent to the API (the upper box), and the headers being used. We also see the reply we get (the lower box) with headers. We will be using both to make a login and check the reply. Here is what we are sending:
And we can see in the reply the outCookie that we will be using in further interaction with the UCS Central REST API to identify our session (figure 2 on the right).
|
|

|
3. Using the result from Fiddler
From experimenting with Fiddler we know we will be sending the following XML to the API as shown below. The first example does the login which in turn gives us the outCookie as an xml answer that we use in our next step. The other is for our next step to create a VLAN via UCS Central using the outCookie from step 1 to identify our authenticated session.
3.1 The login:
3.2 The creation of a VLAN named 999-XXX-TESTXX with VLAN ID 999:
In our C# code, we first need a piece of code that will send the request to the API and then another piece of code that will interpret the reply. The SendWebRequest class will be doing the sending and the XmlReaderLocal class will do the reply. The XmlReaderLocal class has actually been made to read an xml file which is not what is returned to us from the UCS Central API. I have because of that created a temporary file creator where there is code to create a a temporary file where the XML reply is stored so that the XmlReaderLocal class can read it. The code for the temporary file creator is not included here, but is used in section four 'The half-ready code.' You will have to write your own temporary file creator the way you see fits.
3.3 The SendWebRequest class to send our request:
					  class SendWebRequest {
					      private string __apiUrl;
					      private string __stringData;

					      public SendWebRequest(string apiUrl, string stringData) {
					         __apiUrl = apiUrl;
					         __stringData = stringData;
					      }
					      public HttpWebResponse execute() {
					         CookieContainer cookieJar = new CookieContainer();
					         HttpWebRequest firstRequest = (HttpWebRequest)WebRequest.Create(__apiUrl);

					         ASCIIEncoding encoding = new ASCIIEncoding();
					         byte[] data = encoding.GetBytes(__stringData);

					         firstRequest.CookieContainer = cookieJar;
					         firstRequest.KeepAlive = true;
					         firstRequest.Method = "POST";
					         firstRequest.ContentType = "application/xml";
					         firstRequest.ContentLength = data.Length;
					         firstRequest.Accept = "*/*";
					         firstRequest.Referer = "https://" + __apiUrl.Split('/')[2] + "/apps/Multi_UCS.swf/[[DYNAMIC]]/4";
					         firstRequest.UserAgent = "Mozilla/5.0 (Windows NT 6.1; WOW64) AppleWebKit/537.36 (KHTML, like Gecko) Chrome/35.0.1916.114 Safari/537.36";
					         firstRequest.Host = __apiUrl.Split('/')[2];

					         System.Net.ServicePointManager.ServerCertificateValidationCallback +=
					            delegate(object sender, System.Security.Cryptography.X509Certificates.X509Certificate certificate,
					                                    System.Security.Cryptography.X509Certificates.X509Chain chain,
					                                    System.Net.Security.SslPolicyErrors sslPolicyErrors) {
					                                       return true; // **** Always accept SSL Certificate
					                                    };

					         Stream newStream = firstRequest.GetRequestStream();
					         newStream.Write(data, 0, data.Length);
					         newStream.Close();
					         return (HttpWebResponse)firstRequest.GetResponse();
					      }
					   }
3.4 The XmlReaderLocal class to read the reply from UCS central and the AttributeCollection class to reply our answer:
Note: I see there are some syntax errors presented in the code by the syntax highlighter. Be sure to check this when you use the code.
public class AttributeCollection {
  public string NodeName { get; set; }
  public Dictionary Attributes { get; set;}

  public AttributeCollection(string nodeName) {
     this.NodeName = nodeName;
     Attributes = new Dictionary();
  }
}
public class XmlReaderLocal {
  XmlTextReader reader;
  String xmlFil;
  public XmlReaderLocal(String xmlFil) {
     this.xmlFil = xmlFil;
  }
  ///
  ///  Read all attributes occurrences of one named node taken as input
  ///
  public AttributeCollection ReadFirstNodeAttributes(String nodename) {
     reader = new XmlTextReader(xmlFil);
     AttributeCollection attrCollection = new AttributeCollection(reader.Name);
     while (reader.Read()) {
        switch (reader.NodeType) {
           case XmlNodeType.Element:
              if (reader.Name.ToString() == nodename) {
                 if (reader.HasAttributes) {
                    //Console.WriteLine("Attributes of <" + reader.Name + ">");
                    while (reader.MoveToNextAttribute()) {
                       attrCollection.Attributes.Add(reader.Name, reader.Value);
                    }
                    reader.MoveToElement();
                    reader.Close();
                 }
              }
              break;
           case XmlNodeType.Text:
              break;
           case XmlNodeType.EndElement:
              break;
        }
     }
     reader.Dispose();
     return attrCollection.Attributes.Count > 0 ? attrCollection : null;
  }
}
|
4. The half-ready code
Note: I see there are some syntax errors presented in the code by the syntax highlighter. Be sure to check this when you use the code. This seems to be some sort of bug in the highlighter.
Here is where we will use our code and knowledge that we have this far. First we demonstrate a login procedure, and then we demonstrate the creation of the VLAN we want to create. Have in mind that this code is not complete and is only intended to show a strain of thought. Simplified versions of the functions GetCookieString and SetUCSVLAN are displayed below, but the whole class is omitted and some depending classes are omitted. You will have to interpret your way through this code and the comments, then implement your own solution for these missing pieces. The strain of thought is still thought to be displayed for tutorial purposes in this article, and thus giving the value intended.
4.1 Authenticate with UCS Central:
						String errorStatus = "None";
						string outCookie = "";

						//This class holds the GetCookieString method that authenticates with UCS Central and gets the Cookie String we need for our next step:
						AuthenticateWithUCS awucs = new AuthenticateWithUCS();
						Dictionary returnAttributes = awucs.GetCookieString(uCSServer, username, password);
						status = returnAttributes.ContainsKey("status") ? returnAttributes["status"] : "None";
						errorStatus = returnAttributes.ContainsKey("errorStatus") ? returnAttributes["errorStatus"] : "None";
						outCookie = returnAttributes.ContainsKey("outCookie") ? returnAttributes["outCookie"] : "None";

						Console.WriteLine(Environment.NewLine + "**After authentication: ");
						Console.WriteLine("JobStatus: " + status);
						Console.WriteLine("ErrorStatus: " + errorStatus);
						Console.WriteLine("outCookie: " + outCookie);
4.2 Create VLAN in UCS Central:
						//This class holds the SetUCSVLAN method that creates a VLAN in UCS Central and reads the reply:
						CreateUCSVLAN cucsvlan = new CreateUCSVLAN();
			            returnAttributes = cucsvlan.SetUCSVLAN(uCSServer, vlanID, vlanName, outCookie);
			            status = returnAttributes.ContainsKey("status") ? returnAttributes["status"] : "None";
			            errorStatus = returnAttributes.ContainsKey("errorStatus") ? returnAttributes["errorStatus"] : "None";
			            var ucsStatus = returnAttributes.ContainsKey("ucsStatus") ? returnAttributes["ucsStatus"] : "None";

			            Console.WriteLine(Environment.NewLine + "**After VLAN Creation: ");
			            Console.WriteLine("JobStatus: " + status);
			            Console.WriteLine("ErrorStatus: " + errorStatus);
			            Console.WriteLine("ucsStatus: " + ucsStatus);
4.3 GetCookieString example code:
				public Dictionary GetCookieString(string uCSServer, string username, string password) {
					Dictionary returnAttributes = new Dictionary();
					var statusArray = Enum.GetValues(typeof(Status));
					Status status = (Status)statusArray.GetValue(2);
					string errorStatus = "None";
					string outCookie = "";
					string ucsStatus = "None";

					string loginUrl = "https://" + uCSServer + "/xmlIM/mgmt-controller";
					string stringData = "";

					try {
						//This is the SendWebRequest class in section 3.3 above:
						SendWebRequest swr = new SendWebRequest(loginUrl, stringData);
						//The ReadUCSWebResponse class is not shown in this article, but its usage is obvious:
						ReadUCSWebResponse rUcsWebRes = new ReadUCSWebResponse(swr, status, errorStatus, ucsStatus, "aaaLogin", "aaaLogin", "GetCookieString", "outCookie");
						Dictionary parseAttributes = rUcsWebRes.execute();
						status = parseAttributes.ContainsKey("status") ? (Status)Enum.Parse(typeof(Status), parseAttributes["status"]) : Status.error;
						errorStatus = parseAttributes.ContainsKey("errorStatus") ? parseAttributes["errorStatus"] : "None";
						outCookie = parseAttributes.ContainsKey("ucsStatus") ? parseAttributes["ucsStatus"] : "None";
					} catch (Exception ex) {
						status = (Status)statusArray.GetValue(6);
						errorStatus = "103 in GetCookieString(): " + ex.Message;
					}

					returnAttributes.Add("errorStatus", errorStatus);
					returnAttributes.Add("status", status.ToString());
					returnAttributes.Add("outCookie", outCookie);
					return returnAttributes;
			    }
4.4 SetUCSVLAN example code:
					public Dictionary SetUCSVLAN(string uCSServer, string vlanid, string vlanName, string cookieString) {
				         Dictionary returnAttributes = new Dictionary();
				         var statusArray = Enum.GetValues(typeof(Status));
				         Status status = (Status)statusArray.GetValue(2);
				         string errorStatus = "None";
				         string ucsStatus = "None";

				         string accessUrl = "https://" + uCSServer + "/xmlIM/resource-mgr";
				         string stringData =
				            "" +
				               "" +
				                  "" +
				                     "" +
				                  "" +
				               "" +
				            "";
				         try {
				         	//This is the SendWebRequest class in section 3.3 above:
				            SendWebRequest swr = new SendWebRequest(accessUrl, stringData);
				            //The ReadUCSWebResponse class is not shown in this article, but its usage is obvious:
				            ReadUCSWebResponse rUcsWebRes = new ReadUCSWebResponse(swr, status, errorStatus, ucsStatus, "fabricVlan", "configConfMos", "SetUCSVLAN", "status");
				            Dictionary parseAttributes = rUcsWebRes.execute();
				            status = parseAttributes.ContainsKey("status") ? (Status)Enum.Parse(typeof(Status), parseAttributes["status"]) : Status.error;
				            errorStatus = parseAttributes.ContainsKey("errorStatus") ? parseAttributes["errorStatus"] : "None";
				            ucsStatus = parseAttributes.ContainsKey("ucsStatus") ? parseAttributes["ucsStatus"] : "None";
				         } catch (Exception ex) {
				            status = (Status)statusArray.GetValue(6);
				            errorStatus = "103 in SetUCSVLAN(): " + ex.Message;
				         }
				         returnAttributes.Add("errorStatus", errorStatus);
				         returnAttributes.Add("status", status.ToString());
				         returnAttributes.Add("ucsStatus", ucsStatus);
				         return returnAttributes;
				    }
|
As mentioned earlier, not every bit of code is included here, but this should get you started. Note that some of the C# code does get displayed with syntax errors that are probably due to bugs in the syntax highlighter that is used on this web page.
Source: Fiddler and the imagination.
Tagged as: Scripts, Tools, HowTo |
| JavaScript Essentials | |
|---|
|
-24th July 2014
Here follows some simple fiddles on jsfiddle.net that display some basics in JavaScript.
On the first row, first cell, we see an example of an custom error handler and examples on how numbers are treated in comparison to numbers as text. Read the comments for more infomation.
Forward to the the second cell on the right, first row, shows how to create custom exceptions, use them to validate input and throw them as a response to invalid values.
On the second row, first cell to the left, we see object oriented JavaScript being examplified. To the right on the second row, we see object oriented JavaScript again, this time testing the scope and availability of variables.
You can edit these fiddles in JsFiddle if you want to test and play around with them.
Source: Collection over time
Tagged as: Scripts |
| SQL 2008 How to trunc a log file | |
|---|
|
-23rd July 2013
How to truncate a log file with TSQL:
Every once in a while log files can grow too large and need to be truncated and/or shrinked in order to save valuable disk space. The steps below will guide you, given that you know the database name and log name. These can be found via the database properties and then selecting "Files."
Normally, taking transaction log backups will truncate the transaction log. The space used on the disk will not shrink, but more space inside the log file is freed to be available for future use. Transaction logs should be handled as a part of the backup routine. To actually shrink the log file, the steps below will make that happen.
1. The following code will set TestDb to simple recovery mode, then shrink it, and finally set it back to full recovery mode:
USE [TestDb]
GO
ALTER DATABASE [TestDb] SET RECOVERY SIMPLE WITH NO_WAIT
DBCC SHRINKFILE(TestDbLog, 1)
ALTER DATABASE [TestDb] SET RECOVERY FULL WITH NO_WAIT
GO
|
2a. To list the placement of all instance databases for viewing, then the following SQL query might be of use:
|
SELECT DB_NAME(dbid),* FROM sys.sysaltfiles;
|
2b. Alternatively, this query wich also lists all the instance log file locations might be of use:
|
SELECT name, physical_name AS current_file_location FROM sys.master_files;
|
|
|
Source: N/A
Tagged as: SQL 2008, Scripts, HowTo |
| SQL 2008 Useful TSQL queries | |
|---|
|
-19th of October 2013
Below is a collection of TSQL queries that I find useful. The list will be updated when seen appropriate.
| List all files in all databases in current instance: |
|---|
SELECT name, physical_name AS current_file_location
FROM sys.master_files;
|
| Find what database a given mdf file belongs to: |
|---|
SELECT name FROM master..sysdatabases
WHERE filename LIKE '%your_mdf_file%';
|
| Find the size of a given database: |
|---|
SELECT DB_NAME(database_id) AS DatabaseName,
Name AS Logical_Name,
Physical_Name, (size*8)/1024 SizeMB
FROM sys.master_files
WHERE DB_NAME(database_id) = 'AdventureWorks'
GO
|
|
| Find how long the current instance has been up: |
|---|
SELECT login_time FROM sys.dm_exec_sessions
WHERE session_id = 1;
|
| Find what database a given mdf file belongs to: |
|---|
SELECT name FROM master..sysdatabases
WHERE filename LIKE '%your_mdf_file%';
|
| Kill the most CPU intensive process: |
|---|
SELECT * FROM sys.dm_exec_requests
ORDER BY cpu_time DESC;
The process on the top of the list has session_id 9,
thus we kill session_id 9.
KILL 9;
|
|
Source: Useful stuff
Tagged as: SQL 2008, Scripts |
| Report last logged in users on VDI | |
|---|
|
-18th October 2014
To create a report over all VDI users last login and reconnect time, you can use the following correlated query against the ViewEvent database of the VDI environment. This might be useful
if you are trying to get an overview of actual VDI usage in case they are still left running and not used/re-used.
The SQL query for the VDI report:
		SELECT a.[ModuleAndEventText]
			  ,a.[Time]
			  ,a.[EventType]
			  ,a.[Source]
			  ,a.[Severity]
			  ,a.[Node]
			  ,a.[UserSID]
			  ,a.[DesktopId]
			  ,a.[MachineId]
			  FROM [ViewEvent].[dbo].[VE_event] AS a
		WHERE a.[Time] =
			  (SELECT MAX(b.[Time]) FROM [ViewEvent].[dbo].[VE_event] AS b WHERE b.[ModuleAndEventText] = a.[ModuleAndEventText])
		AND
			  (a.[EventType] = 'BROKER_USERLOGGEDIN' OR a.[EventType] = 'AGENT_RECONNECTED')
		ORDER BY a.[ModuleAndEventText], a.[Time];
After this query is executed, the result can be copied and pasted into an excel spreadsheet, and in turn formatted nicely for presentation.
Source: My job
Tagged as: VMWare, Scripts, HowTo |
| ESXi Scripted USB Install | |
|---|
|
-31st of December 2015
Getting started
This article will contain a technical description of creating, and auto-creating scripted ESXi installs from USB. The USB drive we will be using for the install will be partitioned into three partitions labeled INSTALL, CONFIG and SETUP.
The first partition (INSTALL) will be a FAT32 partition and contain the ESXi installer files, the scripts to automate the installer, syslinux bootloader and a tftp client to download configuration we need to automatically set up our ESXi host.
The second parttion (CONFIG) will be a FAT16 partition that contains patches that we will use to patch our installation automatically (ESXi only mounts FAT16 partitions locally), log files from the installation will be stored here, and a configuration file downloaded from our TFTP server will be placed here.
The third and last partition (SETUP) will be a NTFS partition that will contain any script files or setup installers that we might need for later usage when working with our ESXi server that we have auto-installed.
The setup procdure will be described as performed in Linux, by using BASH scripts. This can also be done in Windows, but will require other technical expertise to acquire this, and is not described here. The whole automation is performed for VMware ESXi 5.5. Be aware that usage of the scripts shown here and the information given here, is at own risk. The writer assumes that the reader has the necessary skills to perform this safely, without the loss of data.
|
1. Downloading the TFTP client source code and compiling it for use
To make our TFTP client work in an ESXi environment, we need to compile it statically in an OS environment that is as similar to an ESXi as we can get it.
Even though ESXi is not Linux, the closest we will get is with Centos 6.x. In this example we will use Centos 6.7 for i386 architecture for compiling the code. Compiling the code statically makes linked libraries included
in the compiled result, which makes us able to run the compiled code on the ESXi even if a needed code library might be missing there. This is true to a certain degree. Some TFTP clients depend heavily on
code frameworks and other libraries, that don't get included in the compiled code even when we compile the code statically. This is why we want to find a light-weight TFTP client that depends mostly on its own code
and uses only standard C-libraries as much as possible. In the search of such an client, I have picked a TFTP client writte by Ian Foster.
To improve the client as I wanted, I rewrote it as shown here. The improvements made to the client are described in the readme and the comments in the code.
Clone the code from Ian Foster, and replace tftpclient.c with my altered code found here.
After installing and setting up Cento 6.x and downloading the TFTP client code on to it, you will need to install the builder tools needed to compile the TFTP client:
yum install build-essential gcc make
Then head on over to the folder where you have placed the TFTP source code and compile it:
make CFLAGS="-static" EXEEXT="-static"
Now you will have the compiled tftp client (a file without a filename extension) in the same folder as where you compiled the code. We now need to create a compressed tar ball and convert that into a t00 file that we will include in the ESXi installer to be installed with the rest of the system. Please see the example script below. Read through it, it does contain more actions then you need. I kept these there for inspiration of possible technical solutions. Edit the scrpt for your own needs.
					#! /bin/bash

					mkdir -p /tmp/ovf/files
					mkdir -p /tmp/ovf/tools
					mkdir -p /tmp/ovf/bin
					mkdir -p /tmp/ovf/bin/tftp

					rm -rf /tmp/tftp
					mkdir -p /tmp/tftp
					cd /tmp/tftp
					#We have our compiled TFTP code in tftp-compiled.tar.gz, copy it here:
					cp /usr/arbitrarylocation/tftp-compiled.tar.gz .
					tar xzvf tftp-compiled.tar.gz
					rsync -au /tmp/tftp/* /tmp/ovf/bin/tftp/

					#We are including ovf-tool with our ESXi installer:
					rsync -au /usr/lib/vmware-ovftool/* /tmp/ovf/tools/
					sed -i 's/bash/sh/' /tmp/ovf/tools/ovftool

					#We are including a private and public key for use with automatic SSH authentication:
					cp /usr/arbitrarylocation/deployment_rsa /tmp/ovf/files/deployment_rsa
					cp /usr/arbitrarylocation/esxi/deployment_rsa.pub /tmp/ovf/files/deployment_rsa.pub

					#Now create the t00 file:
					cd /tmp
					tar cf ovf.tar ovf
					gzip -9 ovf.tar
Here /mnt/usb/ovf-00.t00 is the file we are going to include in our VMware ESXi installer. We will later copy that file to the INSTALL partition that we have made, and later we will refer to it via boot.cfg. This same file also refers to ks.cfg, which will be our kickstart installer script to setup the ESXi.
|
2. Partitioning the disk and installing Syslinux on the INSTALL(boot) partition
The following BASH script will partition your USB disk for you. Be aware that will will wipe everythig on it. To run it, paste the code in a textfile and make it executeable:
chmod 755 nameOfScript.sh
The script to do the partitioning is as follows:
					#!/bin/bash
					DISKPARTITION=$1

					if [ -z "$DISKPARTITION" ]; then
						echo -e "\e[31mError: Invalid arguments $0 \e[0m"
						echo -e "Example usage: $0 sdc"
						echo -e "First argument is disk to partition."
						exit 1
					fi
					if mount | grep -E '(^| )/mnt/usb( |$)' > /dev/null; then
						umount /mnt/usb
					fi

					echo -e "\e[35m **Wiping out all partitions on /dev/$DISKPARTITION .. \e[0m"
					dd if=/dev/zero of=/dev/$DISKPARTITION  bs=512  count=1
					echo -e "\e[35m **Creating three new partitions on $DISKPARTITION \e[0m"
					echo -e "d\nn\np\n1\n2048\n+1GB\nn\np\n2\n\n+1GB\nn\np\n3\n\n\nt\n1\nb\nt\n2\n6\nt\n3\n7\nw\n" | fdisk /dev/$DISKPARTITION > /dev/null

					echo -e "\e[35m **Formatting partitions .. \e[0m"
					/sbin/mkfs.vfat -F 32 -n INSTALL /dev/${DISKPARTITION}1
					/sbin/mkfs.vfat -F 16 -n CONFIG /dev/${DISKPARTITION}2
					mkfs.ntfs -L SETUP -f /dev/${DISKPARTITION}3
Next we need to install our bootloader, Syslinux to our USB disk. This will make it bootable. Please note that the version of VMware ESXi you are using might only support certain versions of Syslinux. In this example, Syslinux 4.05 was used for usage with ESXi 5.5.
					#!/bin/bash
					DISKPARTITION=$1
					if [ -z "$DISKPARTITION" ]; then
						echo -e "\e[31mError: Did not receive argument for disk partition in $0 \e[0m"
						echo -e "Example usage: $0 sdc"
						exit 1
					fi
					echo -e "\e[35m **Removing any possible GPT data on /dev/$DISKPARTITION.. \e[0m"
					sgdisk --zap /dev/$DISKPARTITION
					echo -e "\e[35m **Installing syslinux to /dev/${DISKPARTITION}1.. \e[0m"
					syslinux -i /dev/${DISKPARTITION}1
					echo -e "\e[35m **Copying in mbr to /dev/$DISKPARTITION.. \e[0m"
					dd conv=notrunc bs=440 if=/usr/lib/syslinux/mbr.bin of=/dev/$DISKPARTITION
					echo -e "\e[35m **Setting bootflag on parted /dev/$DISKPARTITION.. \e[0m"
					parted /dev/$DISKPARTITION set 1 boot on
|
3. Set up scripts and configuration files for an automated bootable installation
The following script will copy in all files from the VMware ESXi ISO, provided that it is available under /dev/cdrom (a mounted iso in a virtual machine, for instance). When this is done, we create syslinux.cfg to tell Syslinux how to and what to boot.
					#!/bin/bash
					echo -e "\e[35m **Starting section where we copy in from ESXi ISO to ESXI USB.. \e[0m"
					DISKPARTITION=$1
					if [ -z "$DISKPARTITION" ]; then
						echo -e "\e[31mError: Did not receive argument for disk partition in $0 \e[0m"
						echo -e "Example usage: $0 sdc"
						exit 1
					fi

					if [ ! -z "$DISKPARTITION" ]; then
						if [ ! -d "/mnt/usb" ]; then
							mkdir -p /mnt/usb
						fi
						if mount | grep -E '(^| )/mnt/usb( |$)' > /dev/null; then
							umount /mnt/usb
						fi
						mount -t vfat /dev/${DISKPARTITION}1 /mnt/usb
						if mount | grep -E '(^| )/mnt/usb( |$)' > /dev/null; then
							echo -e "\e[35m **Usb successfully mounted, starting copy..\e[0m"
							if mount | grep /mnt/cdrom > /dev/null; then
								umount /mnt/cdrom
							fi
							mount /dev/cdrom /mnt/cdrom
							rsync -au /mnt/cdrom/ /mnt/usb/
							echo -e "\e[35m **Copy done, setting up syslinux.cfg..\e[0m"
							cp /mnt/cdrom/isolinux.cfg /mnt/usb/syslinux.cfg
							sed -i 's|menu.c32|mboot.c32|' /mnt/usb/syslinux.cfg
							#Place the t00 file we created earlier, on the INSTALL partition:
							mv /tmp/ovf.tar.gz /mnt/usb/ovf-00.t00
							chmod 777 /mnt/usb/ovf-00.t00
						fi
						if mount | grep -E '(^| )/mnt/usb( |$)' > /dev/null; then
							umount /mnt/usb
						fi
						if mount | grep /mnt/cdrom > /dev/null; then
							umount /mnt/cdrom
						fi
					fi
Here below is a script that places our custom BOOT.CFG and KS.CFG at the usb installation media. BOOT.CFG is pointed to by syslinux.cfg and contains information about the installer we are going to use, what files it will load and with what settings. It is in BOOT.CFG we will place the name of the t00 package we created with our TFTP client after copying the file to the USB disk. BOOT.CFG also points to KS.CFG which is the script that performs the ESXi installation, uses the TFTP client we compiled and sets up the ESXi server.
					#!/bin/bash
					echo -e "\e[35m **Copying ESXi kickstart files.. \e[0m"
					DISKPARTITION=$1

					if [ -z "$DISKPARTITION" ]; then
						echo -e "\e[31mError: invalid arguments in $0 \e[0m"
						echo -e "Example usage: $0 sdc"
						exit 1
					fi
					if mount | grep -E '(^| )/mnt/usb( |$)' > /dev/null; then
						umount /mnt/usb
					fi
					mount -t vfat /dev/${DISKPARTITION}1 /mnt/usb

					echo -e "\e[35m       HP setup files are being copied..\e[0m"
					cp /usr/arbitraryLocation/BOOT.CFG /mnt/usb/BOOT.CFG
					cp /usr/arbitraryLocation/KS.CFG /mnt/usb/KS.CFG
The following example of BOOT.CFG is from the HP custom ESXi 5.5 ISO. We have added our t00 file to the modules list, specified our kickstart script, and added initial IP-address configuration to the host. This configuration is then repeated in KS.CFG, and is the configuration first needed to talk to the TFTP server on our network to fetch a text file with information regarding the final IP-address configuration of the host. You should not copy the BOOT.CFG file below, but use it as an example on how to configure your own BOOT.CFG from the ISO you are automating your installation. The modules list might be different for different versions of ESXi, or different vendor builds.
					bootstate=0
					title=Automated ESXi Installer
					kernel=/tboot.b00
					kernelopt=runweasel ks=usb:/KS.CFG bootProto=static addvmportgroup=0 netdevice=vmnic0 ip=172.10.12.12 netmask=255.255.0.0
						gateway=172.10.15.20 hostname=ESXiHost1 vlanid=100 nameserver=8.8.8.8
					modules=/b.b00 --- /jumpstrt.gz --- /useropts.gz --- /k.b00 --- /chardevs.b00 --- /a.b00 --- /user.b00 --- /sb.v00 --- /s.v00
						--- /misc_cni.v00 --- /net_bnx2.v00 --- /net_bnx2.v01 --- /net_cnic.v00 --- /net_tg3.v00 --- /scsi_bnx.v00 --- /scsi_bnx.v01
						--- /scsi_bfa.v00 --- /elxnet.v00 --- /ima_be2i.v00 --- /lpfc.v00 --- /scsi_be2.v00 --- /char_hpc.v00 --- /char_hpi.v00
						--- /hp_ams.v00 --- /hp_build.v00 --- /hp_conre.v00 --- /hp_esxi_.v00 --- /hp_smx_p.v00 --- /hpbootcf.v00 --- /hpnmi.v00
						--- /hponcfg.v00
						--- /hpssacli.v00 --- /hptestev.v00 --- /scsi_hpd.v00 --- /scsi_hps.v00 --- /scsi_hpv.v00 --- /net_igb.v00 --- /net_ixgb.v00
						--- /scsi_mpt.v00 --- /net_mlx4.v00 --- /net_mlx4.v01 --- /net_mst.v00 --- /ima_qla4.v00 --- /net_nx_n.v00 --- /net_qlcn.v00
						--- /qlnative.v00 --- /scsi_qla.v00 --- /ata_pata.v00 --- /ata_pata.v01 --- /ata_pata.v02 --- /ata_pata.v03 --- /ata_pata.v04
						--- /ata_pata.v05 --- /ata_pata.v06 --- /ata_pata.v07 --- /block_cc.v00 --- /ehci_ehc.v00 --- /weaselin.t00 --- /esx_dvfi.v00
						--- /xlibs.v00 --- /ipmi_ipm.v00 --- /ipmi_ipm.v01 --- /ipmi_ipm.v02 --- /lsi_mr3.v00 --- /lsi_msgp.v00 --- /misc_dri.v00
						--- /mtip32xx.v00
						--- /net_be2n.v00 --- /net_e100.v00 --- /net_e100.v01 --- /net_enic.v00 --- /net_forc.v00 --- /net_vmxn.v00 --- /ohci_usb.v00
						--- /rste.v00 --- /sata_ahc.v00 --- /sata_ata.v00 --- /sata_sat.v00 --- /sata_sat.v01 --- /sata_sat.v02 --- /sata_sat.v03
						--- /sata_sat.v04 --- /scsi_aac.v00 --- /scsi_adp.v00 --- /scsi_aic.v00 --- /scsi_fni.v00 --- /scsi_ips.v00 --- /scsi_lpf.v00
						--- /scsi_meg.v00 --- /scsi_meg.v01 --- /scsi_meg.v02 --- /scsi_mpt.v01 --- /scsi_mpt.v02 --- /scsi_qla.v01 --- /uhci_usb.v00
						--- /tools.t00 --- /xorg.v00 --- /ovf-00.t00 --- /imgdb.tgz --- /imgpayld.tgz
					build=
					updated=0
Below is the last script for the automation. It partitions the disks of a HP GEN 8 server (different commands might be correct for a different server, test your own setup for the setup you need), sets the password, the initial IP configuration, decides what path our CONFIG partition is using, copies over patches and logs, performs the patching, downloads IP configuration from TFTP, sets the final IP configuration, and also assigns a license to the ESXi host. As you may imagine, a lot more can be done with these scripts. For instance creating standard switches and port groups with esxcli commands, amongst other things. The localcli command is used instead of esxcli when the ESXi server is not fully started yet.
					###############PRE INSTALL SECTION##############################################################
					accepteula
					clearpart --firstdisk='HP iLO' --overwritevmfs
					clearpart --firstdisk=HP --overwritevmfs
					partition datastore1 --onfirstdisk=HP
					install --firstdisk='HP iLO' --novmfsondisk --overwritevmfs
					rootpw passord1
					network --bootproto=static --addvmportgroup=0 --device=vmnic0 --ip=172.10.12.12 --netmask=255.255.0.0
						--gateway=172.10.15.20 --hostname=ESXiHost1 --vlanid=100 --nameserver=8.8.8.8

					###############POST INSTALL SECTION#############################################################
					%post --interpreter=busybox --ignorefailure=true
					POSTLOG="/vmfs/volumes/datastore1/postInstallKickStartLog.log"
					PATCHFILE="ESXI550-201505002.ZIP"

					echo "# Copying the ovf tool and custom tftp client to the correct location.." >> $POSTLOG 2>> $POSTLOG
					cp -R /ovf /vmfs/volumes/datastore1/ >> $POSTLOG 2>> $POSTLOG

					echo "#Stopping usbarbitrator and rescaning for storage.." >> $POSTLOG 2>> $POSTLOG
					/etc/init.d/usbarbitrator stop >> $POSTLOG 2>> $POSTLOG

					echo "#Disabling the firewall, neeed for TFTP client to work.." >> $POSTLOG 2>> $POSTLOG
					localcli network firewall set --enabled false  >> $POSTLOG 2>> $POSTLOG

					if [ -d "/vmfs/volumes/NO NAME/" ]; then
						USBDIRECTORY="/vmfs/volumes/NO NAME"
					else
						USBDIRECTORY="/vmfs/volumes/CONFIG"
					fi

					echo "Decided to use $USBDIRECTORY as path to the USB Device" >> $POSTLOG 2>> $POSTLOG

					echo "#Getting the config file from the TFTP server to datastore.." >> $POSTLOG 2>> $POSTLOG
					cd /vmfs/volumes/datastore1/ovf
					/vmfs/volumes/datastore1/ovf/bin/tftp/tftpclient -h 172.10.15.20 -p 69 -r servers.txt >> $POSTLOG 2>> $POSTLOG

					echo "#Getting the config file from the tftp server to FAT16 storage.." >> $POSTLOG 2>> $POSTLOG
					cd "$USBDIRECTORY/"
					/vmfs/volumes/datastore1/ovf/bin/tftp/tftpclient -h 172.10.15.20 -p 69 -r servers.txt >> $POSTLOG 2>> $POSTLOG

					echo "#Copying in servers.txt from USB to datastore, to make the version saved on USB disk the one with presedence.." >> $POSTLOG 2>> $POSTLOG
					echo "#If this fails, we hope that the previous download from the TFTP server to datastore will have done the trick.." >> $POSTLOG 2>> $POSTLOG
					cp "$USBDIRECTORY/SERVERS.TXT" /vmfs/volumes/datastore1/ovf/SERVERS.TXT >> $POSTLOG 2>> $POSTLOG

					echo "#Copying in patch to datastore.." >> $POSTLOG 2>> $POSTLOG
					cp "$USBDIRECTORY/PATCHES/$PATCHFILE" /vmfs/volumes/datastore1/ovf/files/$PATCHFILE >> $POSTLOG 2>> $POSTLOG

					echo "#Copying in weasel.log to USB disk and datastore1.." >> $POSTLOG 2>> $POSTLOG
					cp /var/log/weasel.log "$USBDIRECTORY/LOGS/weasel.log" >> $POSTLOG 2>> $POSTLOG
					cp /var/log/weasel.log /vmfs/volumes/datastore1/weasel.log >> $POSTLOG 2>> $POSTLOG

					echo "#Copying in POSTLOG to USB disk.." >> $POSTLOG 2>> $POSTLOG
					cp $POSTLOG "$USBDIRECTORY/LOGS/postInstallKickStartLog.log" >> $POSTLOG 2>> $POSTLOG
					cp /tmp/*.txt "$USBDIRECTORY/LOGS/" >> $POSTLOG 2>> $POSTLOG
					cp /var/log/*.log "$USBDIRECTORY/LOGS/" >> $POSTLOG 2>> $POSTLOG

					echo "#Rebooting the host..." >> $POSTLOG 2>> $POSTLOG
					reboot

					###############FIRSTBOOT SECTION##############################################################
					%firstboot --interpreter=busybox
					sleep 30
					echo "# Ensure hostd is ready" >> $FIRSTBOOTLOG 2>> $FIRSTBOOTLOG
					while ! vim-cmd hostsvc/runtimeinfo; do
					sleep 10
					done

					echo "#Stopping usbarbitrator and rescaning for storage.." >> $FIRSTBOOTLOG 2>> $FIRSTBOOTLOG
					/etc/init.d/usbarbitrator stop >> $FIRSTBOOTLOG 2>> $FIRSTBOOTLOG

					FIRSTBOOTLOG="/vmfs/volumes/datastore1/firstBootKickStartLog.log"
					PATCHFILE="ESXI550-201505002.ZIP"

					echo "#Enabling & starting the ESXi Shell.." >> $FIRSTBOOTLOG 2>> $FIRSTBOOTLOG
					vim-cmd hostsvc/enable_esx_shell >> $FIRSTBOOTLOG 2>> $FIRSTBOOTLOG
					vim-cmd hostsvc/start_esx_shell  >> $FIRSTBOOTLOG 2>> $FIRSTBOOTLOG

					if [ -d "/vmfs/volumes/NO NAME/" ]; then
						USBDIRECTORY="/vmfs/volumes/NO NAME"
					else
						USBDIRECTORY="/vmfs/volumes/CONFIG"
					fi

					echo "Decided to use $USBDIRECTORY as path to the USB Device" >> $FIRSTBOOTLOG 2>> $FIRSTBOOTLOG

					echo "#Assigning license.." >> $FIRSTBOOTLOG 2>> $FIRSTBOOTLOG
					vim-cmd vimsvc/license --set 00000-520EQ-00000-01DR0-00000  >> $FIRSTBOOTLOG 2>> $FIRSTBOOTLOG

					echo "#Gathering information from configuration file.." >> $FIRSTBOOTLOG 2>> $FIRSTBOOTLOG
					ESXiHostname=`more /vmfs/volumes/datastore1/ovf/servers.txt | grep esx1 | cut -d';' -f1`
					ESXiIpAddress=`more /vmfs/volumes/datastore1/ovf/servers.txt | grep esx1 | cut -d';' -f2`
					ESXiSubnet=`more /vmfs/volumes/datastore1/ovf/servers.txt | grep esx1 | cut -d';' -f3`
					ESXiGateway=`more /vmfs/volumes/datastore1/ovf/servers.txt | grep esx1 | cut -d';' -f4`
					ESXiSubnetID=`more /vmfs/volumes/datastore1/ovf/servers.txt | grep esx1 | cut -d';' -f5`
					ESXiVLAN=`more /vmfs/volumes/datastore1/ovf/servers.txt | grep esx1 | cut -d';' -f6`

					echo "Acquired ESXiHostname: $ESXiHostname" >> $FIRSTBOOTLOG 2>> $FIRSTBOOTLOG
					echo "Acquired ESXiIpAddress: $ESXiIpAddress" >> $FIRSTBOOTLOG 2>> $FIRSTBOOTLOG
					echo "Acquired ESXiSubnet: $ESXiSubnet" >> $FIRSTBOOTLOG 2>> $FIRSTBOOTLOG
					echo "Acquired ESXiGateway: $ESXiGateway" >> $FIRSTBOOTLOG 2>> $FIRSTBOOTLOG
					echo "Acquired ESXiSubnetID: $ESXiSubnetID" >> $FIRSTBOOTLOG 2>> $FIRSTBOOTLOG
					echo "Acquired ESXiVLAN: $ESXiVLAN" >> $FIRSTBOOTLOG 2>> $FIRSTBOOTLOG

					echo "#Setting the IP address configuration on the host.." >> $FIRSTBOOTLOG 2>> $FIRSTBOOTLOG
					esxcli system hostname set --host=$ESXiHostname  >> $FIRSTBOOTLOG 2>> $FIRSTBOOTLOG
					esxcli network ip interface ipv4 set --interface-name vmk0 --type static --ipv4 $ESXiIpAddress --netmask $ESXiSubnet  >> $FIRSTBOOTLOG 2>> $FIRSTBOOTLOG
					esxcli network vswitch standard portgroup set -p "Management Network" --vlan-id $ESXiVLAN  >> $FIRSTBOOTLOG 2>> $FIRSTBOOTLOG
					esxcli network ip set --ipv6-enabled false >> $FIRSTBOOTLOG 2>> $FIRSTBOOTLOG

					echo "#Patching the host.."  >> $FIRSTBOOTLOG 2>> $FIRSTBOOTLOG
					esxcli software vib install -d "/vmfs/volumes/datastore1/ovf/files/$PATCHFILE" >> $FIRSTBOOTLOG 2>> $FIRSTBOOTLOG

					echo "#Cleaning up the patch source when we are done.."
					rm -f /vmfs/volumes/datastore1/ovf/files/$PATCHFILE

					echo "#Backup ESXi configuration to persist changes" >> $FIRSTBOOTLOG 2>> $FIRSTBOOTLOG
					/sbin/auto-backup.sh >> $FIRSTBOOTLOG 2>> $FIRSTBOOTLOG

					echo "#Copy %first boot script logs to persisted datastore" >> $FIRSTBOOTLOG 2>> $FIRSTBOOTLOG
					cp /var/log/hostd.log "/vmfs/volumes/datastore1/firstboot-hostd.log" >> $FIRSTBOOTLOG 2>> $FIRSTBOOTLOG
					cp /var/log/esxi_install.log "/vmfs/volumes/datastore1/firstboot-esxi_install.log" >> $FIRSTBOOTLOG 2>> $FIRSTBOOTLOG

					echo "#Attempting to copy %first boot script logs to USB if the USB disk is available.." >> $FIRSTBOOTLOG 2>> $FIRSTBOOTLOG
					cp /var/log/hostd.log "$USBDIRECTORY/LOGS/firstboot-hostd.log" >> $FIRSTBOOTLOG 2>> $FIRSTBOOTLOG
					cp /var/log/esxi_install.log "$USBDIRECTORY/LOGS/firstboot-esxi_install.log" >> $FIRSTBOOTLOG 2>> $FIRSTBOOTLOG

					echo "#Attempting to copy FIRSTBOOTLOG to USB if the USB disk is available.." >> $FIRSTBOOTLOG 2>> $FIRSTBOOTLOG
					cp $FIRSTBOOTLOG "$USBDIRECTORY/LOGS/firstBootKickStartLog.log" >> $FIRSTBOOTLOG 2>> $FIRSTBOOTLOG

					echo "#Host configuration done! Rebooting.." >> $FIRSTBOOTLOG 2>> $FIRSTBOOTLOG
					sleep 180
					reboot -n -f  >> $FIRSTBOOTLOG 2>> $FIRSTBOOTLOG
|
4. Copy in any tools needed to the SETUP partition
The setup patition may contain any ovf images you would need to deploy on your host.
These may be ovf-tools, PowerCli, Powershell scripts or other tools needed for the last touch of the host that you just deployed automatcally.
This partition is a NTFS partition that fills up the rest of the USB disk. Populating this partition with content would be up to the administrator that is going to use it.
|
All these sections will sum up an automated USB based deployment. Please comment your experiences with this setup below.
Source: VMware and github.
Tagged as: VMWare, Scripts, Routers |
| Getting started with Hyper-V for the VMWare Admin | |
|---|
|
-16th of December 2014
B. Nice to know:
1. How to search for a VM guest based on its IP or MAC address:
Get-Vm |Get-VirtualNetworkAdapter |Where {$_.IPv4Addresses -like "192.168.123*"} | Select Name, IPv4Addresses
Get-Vm |Get-VirtualNetworkAdapter |Where {$_.MACAddress -like "00:15:5D:*"} | Select Name, MACAddress
It seems not to be possible to search for VM guests based on theyr IP address ussing the graphical user interface in VMM.
And getting host names based on MAC address:
Get-VMHost | %{ get-scvmhostnetworkadapter -VMHost $_ | where-object {$_.PhysicalAddress -like "00:25:B5*" }} | Select VMHost, PhysicalAddress
2. How register an existing Hyper-V virtual machine on to a Hyper-V host:
				$VMHost = Get-SCVMHost -ComputerName "HyperVHostName"
				Register-SCVirtualMachine -VMHost $VMHost -Path "C:\ClusterStorage\MyVM"
It seems not to be possible to search for VM guests based on theyr IP address ussing the graphical user interface in VMM.
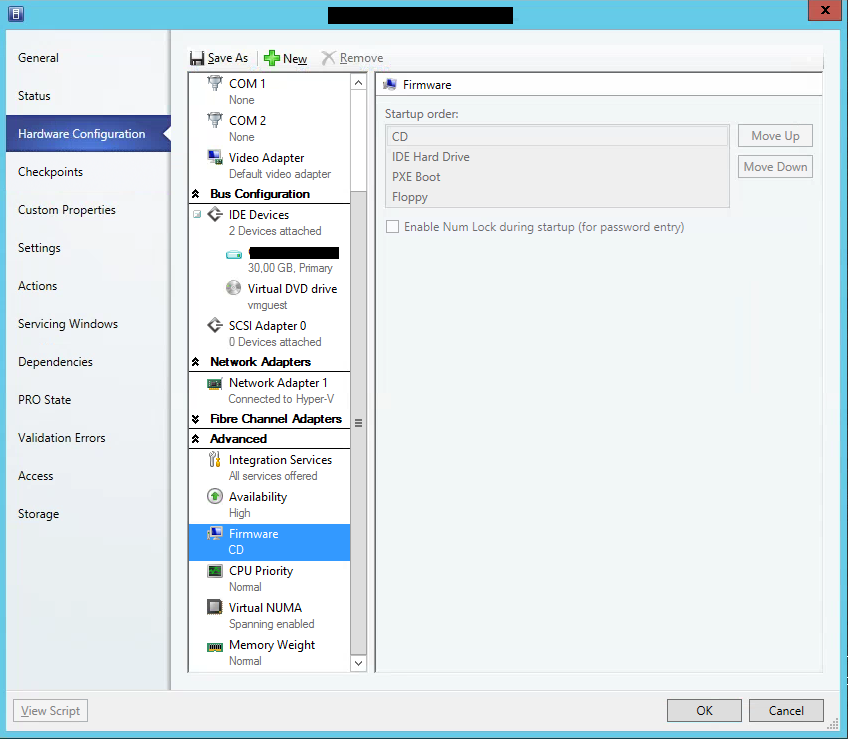
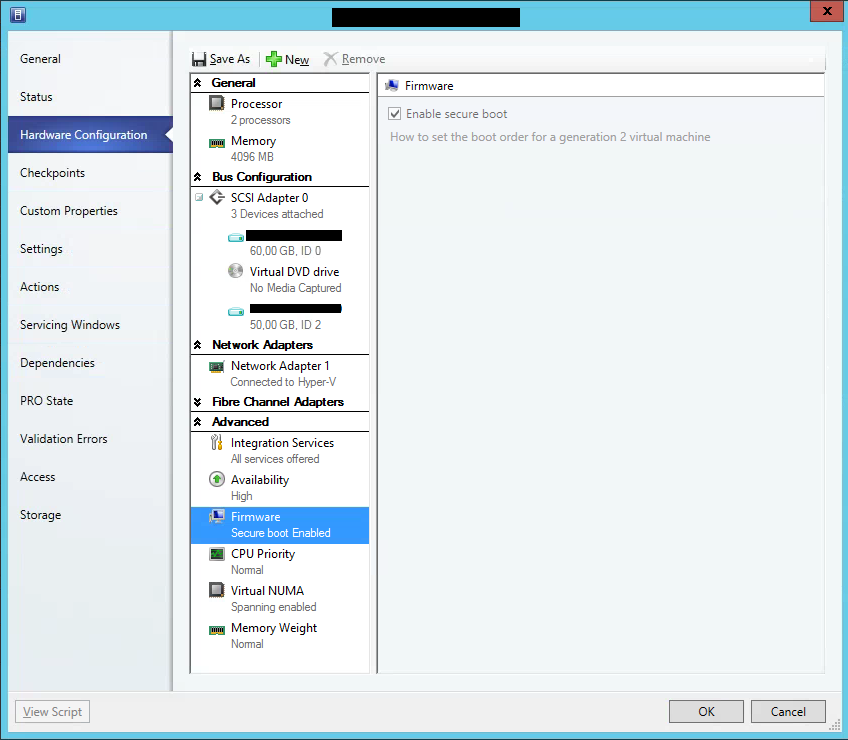
3. How to set the first boot device(here the CD-ROM) on Generation 2 VM guests:
4. How to create NIC on VM and also set static IP-adress from a static IP-Pool defined in VMM:
			$VMNetwork = Get-SCVMNetwork -VMMServer vmmServerFQDN -Name "VLAN 127 Network"
			$VMSubnet = Get-SCVMSubnet -VMMServer vmmServerFQDN -Name "VLAN 127 Network_Subnet"

			New-SCVirtualNetworkAdapter -VM "VMNameHere" -MACAddress "00:00:00:00:00:00" -MACAddressType Static `
			-Synthetic -EnableVMNetworkOptimization $false -EnableMACAddressSpoofing $false `
			-EnableGuestIPNetworkVirtualizationUpdates $false -IPv4AddressType Static -IPv6AddressType Dynamic `
			-VMSubnet $VMSubnet -VMNetwork $VMNetwork

			#Then choose either alternative 1 or alternative 2:
			#Alternative 1:
			$IPPool = Get-SCStaticIPAddressPool | where-object {$_.VMSubnet.name -eq $VMSubnet.Name}
			Grant-SCIPAddress -StaticIPAddressPool $IPPool -GrantToObjectType VirtualNetworkAdapter  `
			-GrantToObjectID ((Get-SCVirtualNetworkAdapter -VM "VMNameHere"))[0].ID

			#Alternative 2:
			$Adapter =(Get-SCVirtualNetworkAdapter -VM "VMNameHere" | where  {$_.VLanID -eq "127"})
			Set-SCVirtualNetworkAdapter -IPv4AddressType Static -VirtualNetworkAdapter $Adapter -IPv4Addresses "IPv4 Adresse Her"
			#In alternative 2 VMM will automatically findthe IP pool for $VMNetwork if it exists
5. How to find addresses in a IP-Pool:
Find used/assigned addresses:
Get-SCIPAddress -Assigned -StaticIPAddressPool (Get-SCStaticIPAddressPool -Name "AddressPoolName")
Find all assigned addresses that are not in use any more:
Get-SCIPAddress -UnAssigned -StaticIPAddressPool (Get-SCStaticIPAddressPool -Name "AddressPoolName")
Unassigne all IP's from a IP-pool:
Revoke-SCIPAddress -AllocatedIPAddress (Get-SCIPAddress -Assigned -StaticIPAddressPool (Get-SCStaticIPAddressPool -Name "IP Pool Name"))
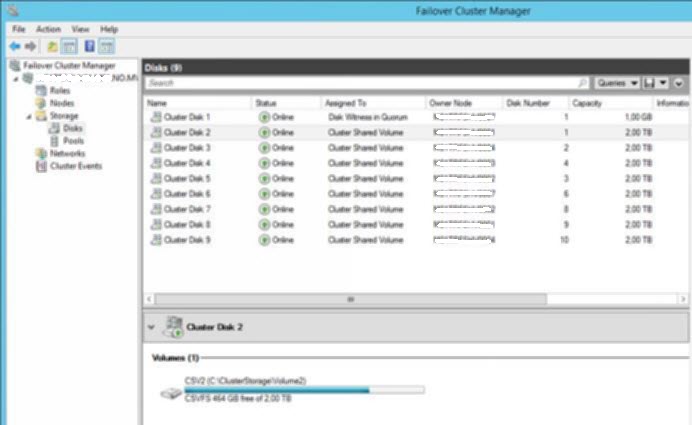
The same thing can also be done in Failover Cluster Manager:
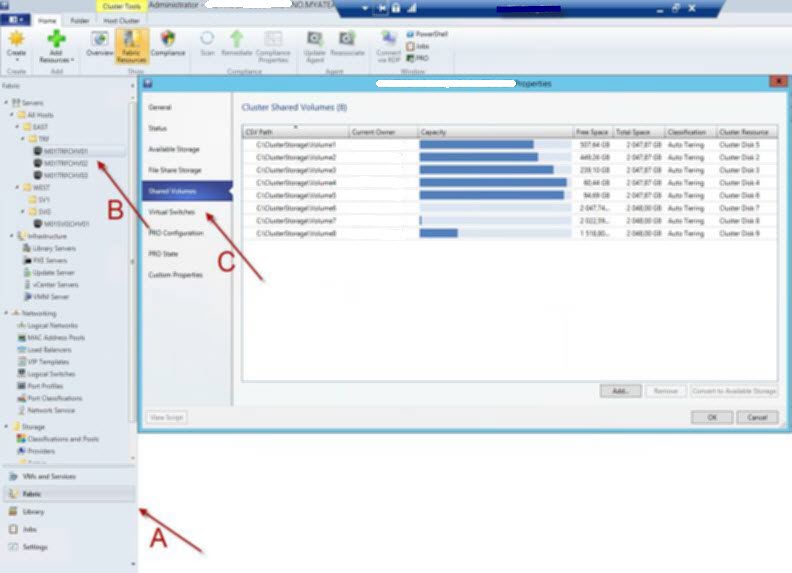
7. How to find what VM's are running on a datastore:
Get-Cluster "ClusterName" | Get-ClusterNode | Foreach {Get-VM -ComputerName $_.Name | Where {$_.Path -match "Volume1"}}
8. How to find orphaned disks:
Paste the following into a ps1 file and run it after switching "ClusterNameHere" with the correct name of the cluster.
			[CmdletBinding(ConfirmImpact='High',SupportsShouldProcess=$true)]
			PARAM (
				   [string]$ClusterName = "ClusterNameHere",
				   [string]$LocalClusterStoragePath = "C:\\ClusterStorage",
				   [string]$ClusterStorageUNCTail = "C$\ClusterStorage",
				   [string[]]$Extensions = @( '*.vhdx', '*.vhd', '*.iso' )
			)

			BEGIN {
				   #Get all disks registered in Hyper-V:
				   if ($host.Name -eq "ConsoleHost") {Write-Host -Foregroundcolor Yellow "Using the following parameters: "}
				   $baseHost = (get-VMHostGroup | % {$_.AllChildClusters | where-object {$_.ClusterName -eq $ClusterName}  `
				   		| get-vmhost})[0];
				   if ($host.Name -eq "ConsoleHost") {Write-Host -Foregroundcolor Yellow "   baseHost: $baseHost"}
				   $baseHostname = $baseHost.Name.Split(".")[0];
				   if ($host.Name -eq "ConsoleHost") {Write-Host -Foregroundcolor Yellow "   baseHostname: $baseHostname"}
				   $baseCluster = (get-VMHostGroup | % {$_.AllChildClusters | where-object {$_.ClusterName -eq $ClusterName}});
				   if ($host.Name -eq "ConsoleHost") {Write-Host -Foregroundcolor Yellow "   baseCluster: $baseCluster"}
				   $uncBase = [string]$("\\"+$baseHostname+"\"+$ClusterStorageUNCTail);
				   if ($host.Name -eq "ConsoleHost") {Write-Host -Foregroundcolor Yellow "   uncBase: $uncBase"}
				   $disks = $baseCluster | get-vmhost | Get-Vm | `
				   Foreach-Object {$_.virtualdiskdrives | % {[String]($_.VirtualHardDisk.Location) `
				      -replace $LocalClusterStoragePath, $uncBase}}

				   $List = @($Extensions | ForEach-Object {
						 $extension = $_;
						 if ($host.Name -eq "ConsoleHost") {Write-Host -Foregroundcolor Yellow "- Filtering extension: $extension"}
						 dir -Path $uncBase | % {
								dir -Path $uncBase\$_ | %{
									   dir -Path $($uncBase+"\"+($_).Parent.Name+"\"+$_) -Filter $extension | `
									   		Select-Object -ExpandProperty FullName
								}
						 }
				   }) | Where-Object {
						 $_ -notin $disks
				   } | Select-Object -Unique
				   if ($host.Name -eq "ConsoleHost") {Write-Host -Foregroundcolor Yellow $("`n**Found " + $List.count + " files..")}
				   $List
			}
Distributed Resource Scheduler in VMWare os "Dynamic Optimization" in System Center Virtual Machine Manager 2012 R2.
Choose the fabric pane in VMM and right click the site where yoiu want to adjust the settings, and choose properties.

Requires to create a Tenant Administrator or Application Administrator in a Private Cloud.
1. Settings -> Create User Role:
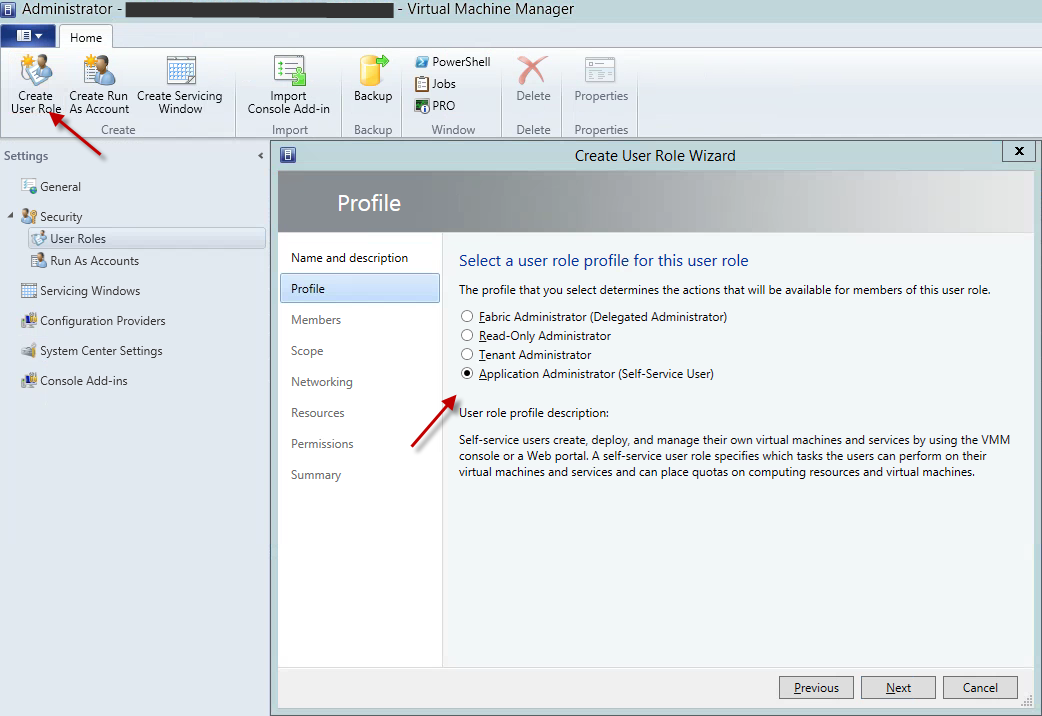
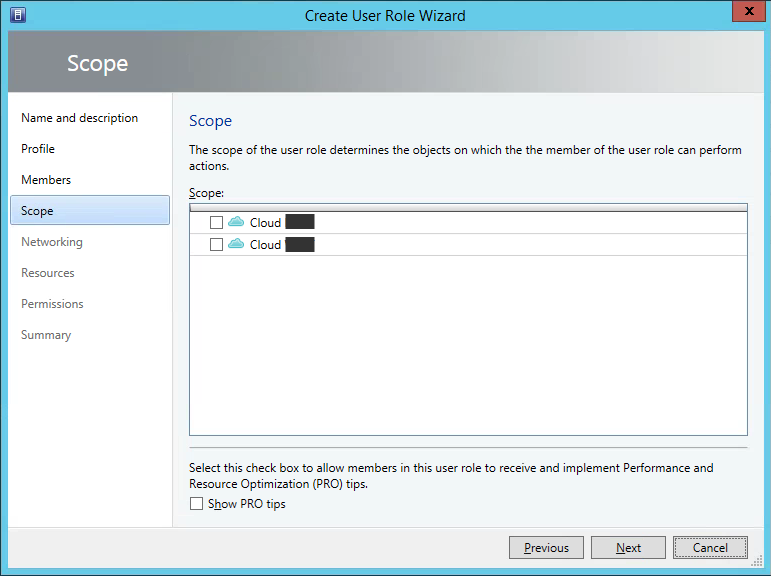
2. Attach the role to a Private Cloud and delegate what objects can be administrated.
11. Hyper-V vs VMWare vSphere:
Drawbacks with Hyper-V compared to VMWare vSphere:
It is not possible to list what virtual machines are on a storage device via the GUI.
A virtual guest has to be powered off so that a NIC can be added to it.
The IP-addresses of the hosts are not shown in VMM. Powershell has to be used.
The handeling of access rights is not as granulated and straight forward to handle as in VMWare.
VMWare vSphere has more GUI options for doing various administrative tasks easily.
Hyper-V and SCVMM do not have a full equivalent to VMware's Storage DRS.
Live migrations of storage in SCVMM seems to way too often not to be able to clean up after itself, resulting in orphaned files.
Benefits with Hyper-V in regards to VMWare:
Licenses and costs
Hyper-V has a practical networking model(see 'System Center VMM Networking' below)
12. More on Hyper-V and VMM:
|
Source: System Center Virtual Machine Manager 2012 R2
Tagged as: Hyper-V, HowTo, Scripts |
|