|
HowTo tagged blogs
| Software RAID - Howto |  |
|---|
|
-15th of August 2011
This short article describes how to set up an software RAID in Linux. The command that we will use is:
# mdadm [mode] raid-device [options] component-devices
1. To build a mirrored RAID 1, we will issue for instance this command:
# mdadm --create /dev/md0 --level=1 --raid-devices=2 /dev/sdb1 /dev/sdc1
2. After this is done, you have to create a filesystem on the raid array:
# mkfs -t ext4 /dev/md0
You can now mount the filesystem as you normally would(mount /dev/md0 /mnt/raidDisk or mount via /etc/fstab). Further more you can treat the RAID device as a normal disk, for instance using fdisk to subdivide the RAID further.
Source: LPIC-2 Study Guide. ISBN: 978-1-118-00015-1 Tagged as: Linux, HowTo |
| SQL 2008 Discovering Database Deadlocks | |
|---|
|
-12th January 2013
Discovering database deadlocks and how to fix them:
First of all, it is worth mentioning that SQL 2008 monitors locks in the database and resolves them automatically. If you however would like to investigate locking further, detect theyr presence, or suspect a lock for not being properly handeled by MS SQL, then the following steps can be taken:
1. Open a new query window and execute the following query:
SELECT session_id, blocking_session_id
FROM sys.dm_exec_requests
WHERE blocking_session_id > 0
|
2. If a lock is found, the results should look something similar to the following:
3. To identify the processes and the user running them, execute:
sp_who2 'processnumber'
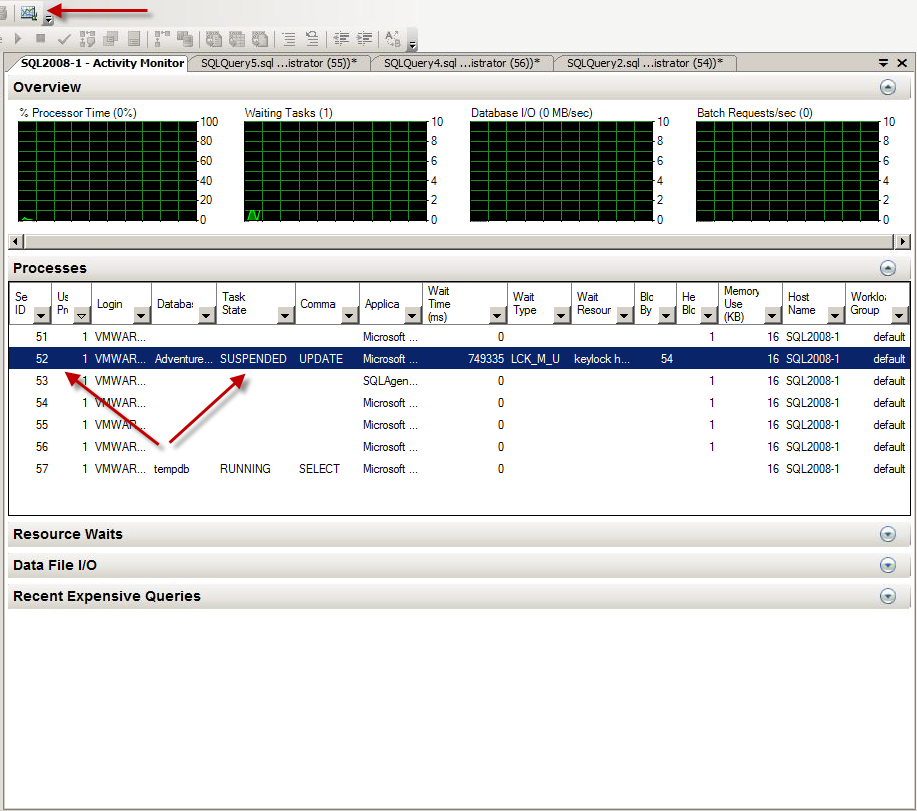
For instance: sp_who2 52 |
The result may yield:
4. The conflicting process can also be found in Activity Monitor:
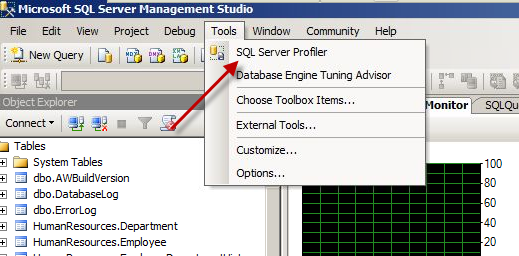
5. SQL Profiler can also be used to detect a deadlock:
5a. Start Profiler and select a new trace:
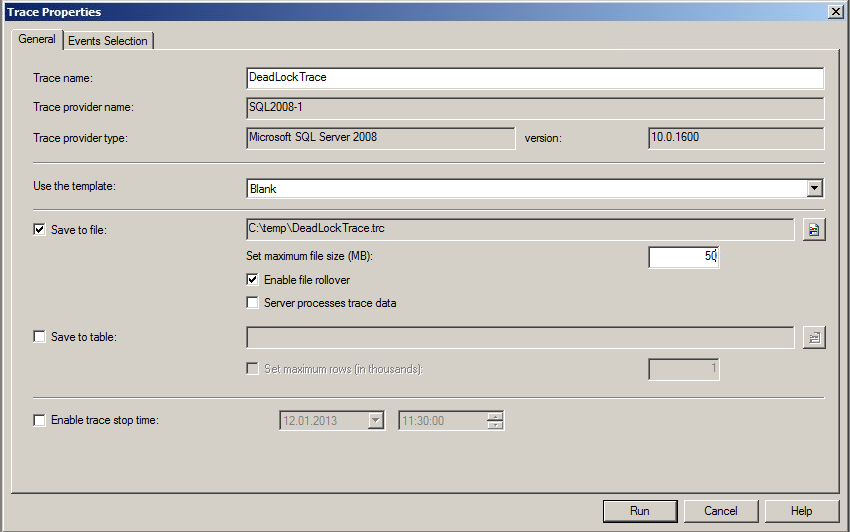
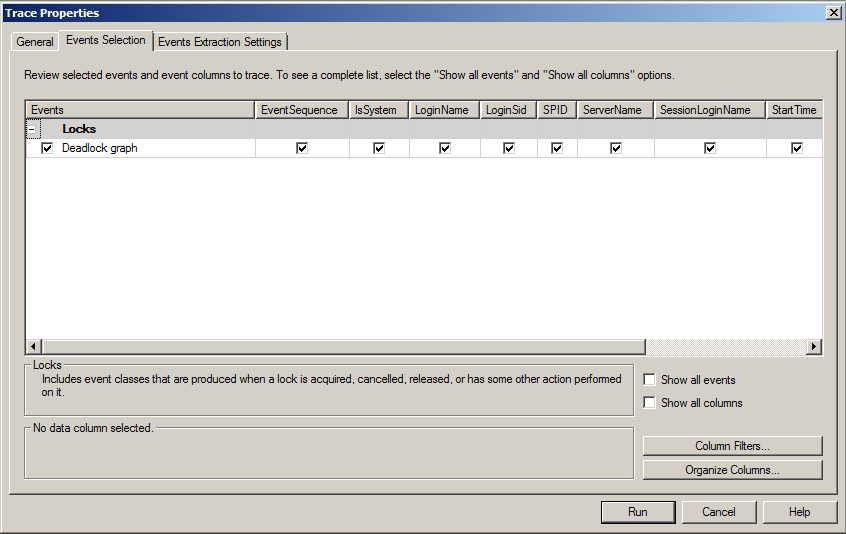
5b. Setup the trace as shown pictured below(both the 'General' tab and the 'Events Selection' tab):
5c. Press Run
5d. View the deadlock in SQL profiler:
6. The processes can be dealt with by issuing the kill kommand in the query window:
Kill 'processnumber'
For instance: kill 52 |
For more information on deadlocking, this article might be of interest.
Sources: SQL 2008 Administration. ISBN: 978-0-470-55420-3
Microsoft SQL Server 2008 - Implementation and Maintenance. ISBN-13: 978-0-7356-2605-8
Tagged as: SQL 2008, HowTo |
| SQL 2008 Troubleshooting and Diagnosing Service Failures | |
|---|
|
-19th January 2013
Troubleshooting and Diagnosing Service Failures:
In order to troubleshoot service failures, a clear picture of what prerequisites a successfully running service needs to be made.
1. The SQL Server service account's password should not be changed directly but through SQL Server Configuration Manager. The service master key is encrypted by the service account and password, and both are only updated via the Configuration Manager.
2. Make sure the service is in the right startup mode. It should always be set to manual for clustered installations. Service start failures should be troubleshooted firstly via Event Viewer and the SQL server error logs. The location of the SQL Server error logs can be found by running the following TSQL in a query window:
|
SELECT SERVERPROPERTY(‘ErrorLogFileName’);
|
It should output something like the following:
C:\Program Files\Microsoft SQL Server\MSSQL.1\MSSQL\LOG\ERRORLOG
|
3. The SQL server service account specified to run the service must not be locked out, deleted, disabled, expired or the service set with a wrong password.
4. The SQL server service account must have read and write access to folders that hold data/log files and system databases, R/W permissions to SQL server registry keys, have Log on As Service authority, and Sysadmin authority inside the SQL Server instance.
5. The storage system holding the system databases must be online, the folder holding the system database exist and path to it has to be correct. Check the service in configuration manager to see what startup parameters it is configured with. This will tell you where the system databases are placed, an thus where to check paths and permissions.
6. The Master database for the instance must not be corrupt. It can be repaired via the SQL server setup -> Maintenance Page -> Repair Wizard. The Master database can be checked with the TSQL command DBCC CHECKDB.
|
|
PS. If your instance is up and running and you want to list the placement of all its databases for troubleshooting theyr location, then the following SQL Query might be of use:
|
SELECT DB_NAME(dbid),* FROM sys.sysaltfiles;
|
Sources: SQL 2008 Administration. ISBN: 978-0-470-55420-3
Tagged as: SQL 2008, HowTo |
| Configuring and Checking HA Slot Size | |
|---|
|
-20th of January 2013
The HA slot size determines the amount of VMs that can fail over to a host using High Availability. When all slots are used, the host is considered occupied in regard to the resources the slot size determines as minimum for the guests on it.
The HA slot size is calculated as the largest CPU reservation and the highest memory reservation of any given guest. This number divided by the total amount of resources available on the host, picking out the lowest outcome from either the CPU or memory division becomes the amount of slots that the host gets configured with.
If admission control is enabled on the cluster, VMWare will honor the amount of slots available on a host and not power on any guests if the slots are all full. To determine the amount of slots available for a cluster, select the cluster in the Hosts and Clusters overview, then select the Summary tab, then the Advanced Runtime Info link.
To set a custom slot size you can either manually set a reservation to one of the guests that is larger then the other reservations on the host, or you can use the advanced configuration options das.slotMemInMB and das.slotCpuInMHz that are set under Advanced Options under vSphere HA Cluster settings.
|
|
Source: VMWare 5.1
Tagged as: VMWare, HowTo |
| Monitoring Virtual Machine Performance | |
|---|
|
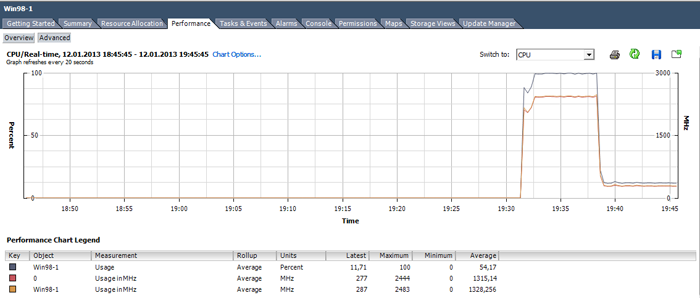
-13th of January 2013
If you need to simulate CPU load on a VM, this can be done with CPUBusy.vbs.
1. First of all, open the vSphere Client and connect to your vCenter Server:
2. Choose a VM in the inventory list under 'Home>Inventory>Hosts and Clusters' and click the Performance tab.
3. Choose Advanced, then CPU and then Chart Options.
4. Set up your chart as you like, here usage and CPU ready time have been chosen for real time data:
5. Click OK
6. View the performance data unfold on the graph:
Source: VMWare 5.1
Tagged as: VMWare, HowTo |
| How to Setup BDscan | |
|---|
-22nd of February 2013
Thought I would share my BDscan setup that I use on my Debian Linux computers.
Note: ># represents the command prompt and is not actually a part of the commands shown below:
1. First of all, set up your DEB repositories and install BDScan as is shown in the link.
2. Get a free license for BDScan. The license will last a year, after which you have to get a new one.
3. If you get an error stating segmentation fault when running BDScanner, execute the following line:
>#cat /opt/BitDefender-scanner/var/lib/scan/versions.dat.* |awk '/bdcore.so.linux/{print $3}'|while read bdcore_so;do touch /opt/BitDefender-scanner/var/lib/scan/$bdcore_so;bdscan --update;ln -s /opt/BitDefender-scanner/var/lib/scan/$bdcore_so /opt/BitDefender-scanner/var/lib/scan/bdcore.so;done
4. Set up a cron job that runs a scheduled job to scan your Linux system, as root:
>#vi /etc/cron.weekly/run-bdscan
5. Paste in the code in the box below and give root execute permissions:
>#chmod 744 /etc/cron.weekly/run-bdscan
|
Note: you will have to change the paths below to paths that
are relevant to your system.
#!/bin/bash
if [ -f /mnt/SDD1/bdscan.log ]; then
rm /mnt/SDD1/bdscan.log
fi
bdscan --update
bdscan --action=disinfect --log=/mnt/SDD1/bdscan.log /mnt/SDB2
bdscan --action=disinfect --log=/mnt/SDD1/bdscan.log /mnt/SDC1
bdscan --action=disinfect --log=/mnt/SDD1/bdscan.log /mnt/SDD1
if [ -f /mnt/SDD1/bdscan.log ]; then
grep infected /mnt/SDD1/bdscan.log >> /mnt/SDD1/infected.log
rm /mnt/SDD1/bdscan.log
fi
|
|
Several other options also exists when seting up a BitDefender scan in Linux. Consult the man pages for information:
>#man bdscan
bdscan [--action= disinfect | quarantine | delete | ignore] [--no-archive] [--no-mail] [--no-pack] [--no-recursive] [--follow-link] [--recur
sive-level=level] [--archive-level=level] [--ext[=ext1:ext2]] [--exclude-ext[=ext1:ext2]] [--suspect-copy] [--suspect-move] [--quarantine=quaran
tine_path] [--conf-file=conf_file] [--log[=file.log]] [--log-overwrite] [--no-list] [--no-warnings] [--verbose] [--update] [--virus-list] [--info]
[--version] [--help] [--encode=password] path-to-scan
In adition to this information, more can be found at the vendors website.
|
|
Sources: No real sources
Tagged as: Linux, HowTo, Tools |
| How to convert IMG to ISO | |
|---|
Thought I would share my notes on converting IMG files to ISO in Linux.
Note: ># represents the command prompt and is not
actually a part of the commands shown below:
Option 1. >#ccd2iso file.img file.iso
Option 2. >#mount -o loop <img file> <mountpoint>
>#mkisofs -dvd-video -o <iso output file> <mountpoint>
mkisofs is the same as genisoimage in Debian.
Option 3. Just rename the img file to an iso file :)
|
|
IMG and ISO file formats is usually a file image of a CD, DVD or BD. The entire contents of the disk is contained within the ISO or IMG file.
With various tools, an ISO can be set to contain any set of files to later be used as a image for the creation of CD's, DVD's or such. Both the
ISO and IMG files need to be mounted on a mountpoint or virtual drive to be read and used by the operating system. When mounted, they will act as a real CD, DVD or such to the operating system.
|

|
Sources: No real sources
Tagged as: Linux, HowTo, Commands |
| Deep Security Virtual Patching | |
|---|
|
-29th of June 2013
Virtual Patching
In Deep Security IPS is what makes up Virtual Patching.
See page 74 in the Deep Security Administration guide. DPI will inspect the traffic to the guest system and use IPS to block any
traffic that might be exploiting known vulnerabilities that are fixed in patches not yet applied to the guest system.
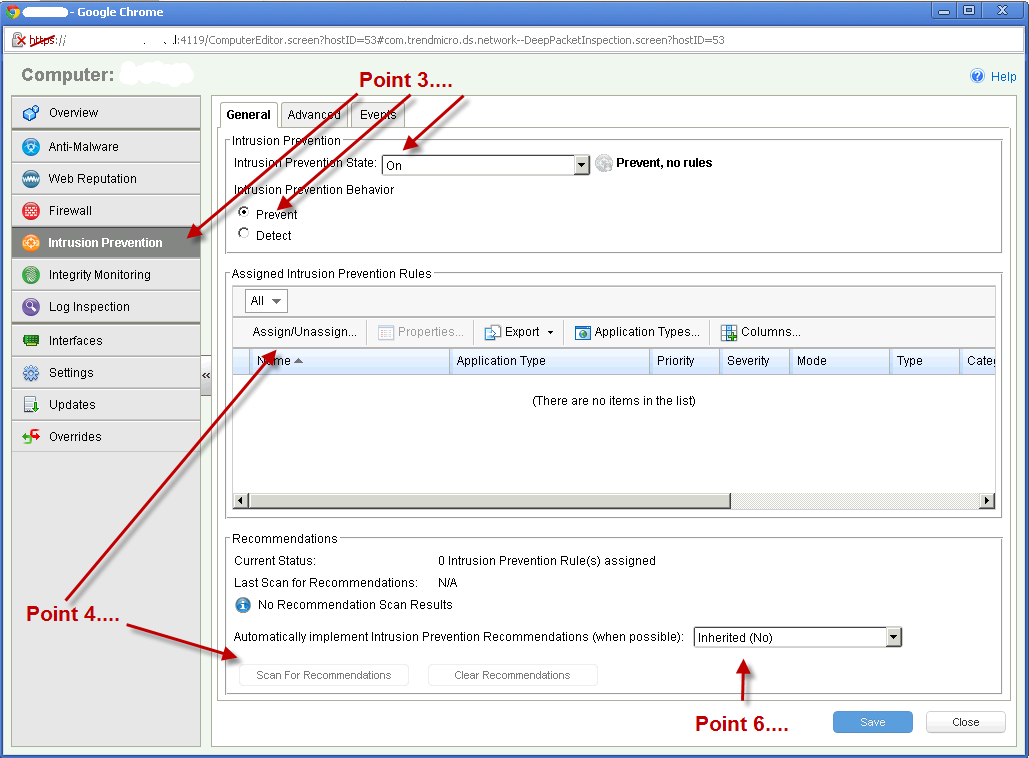
1. In the Deep Security Console, go to computers.
2. Choose a test machine and double click it.
3. Choose 'Intrusion prevention' and choose ON, then decide if you want 'Detect' or 'Prevent'.
4. Choose to add rules manually (Assign/Unassign button) or choose to get recommendations (then press the button 'Scan for Recommendataions').
5. If you choose the manual method, then just check off the rules you want and right click so that you can choose 'Assign rules -> to all interfaces'
6. If you choose 'Scan for Recommendations' you can either choose to let the rules automatically be added or see what is recommended.
7. Usually it is adviceable to choose under Assign/Unassign -> 'Recommended for assignment.'
8. Then right click 'select all' - right click and 'Assign rules -> to all interfaces.'
Please see the illustration on the right.
For further information, please see the administration manual.
|
|
Source: Deep Security 9 Administration Manual
Tagged as: VMWare, HowTo, Network |
| Expand logical volume - LVM | |
|---|
-18th of October 2013
This article will briefly describe how to expand a logical volume that is part of a LVM.
Note: ># represents the command prompt and is not actually a part of the commands shown below:
Before we start the following needs to be summarized:
a. A partition on a disk is made a 'Physical Volume.'
b. This 'Physical Volume.' will then be added to a 'Volume Group.'
c. In the end we have a 'Logical Volume' that the 'Volume Group' is a part of, and that is mounted to the file system.
|
Notes:
This howto can be performed on most Linux distributions. It will have to be done by issuing the commands in order on a terminal command prompt. You will most likely need root privileges, either by sudo or by logging in as root. How to use the terminal, sudo or login as root will not be explained here.
For extending swap space, use the guide below and see here.
|
So here we go:
1. Add the disk to the physical computer or virtual machine(if that is the case).
2. Boot the machine. Some say a rescan will be enough, I had to boot.
3. List the disk with: fdisk -l
Disk /dev/sdc: 8589 MB, 8589934592 bytes
255 heads, 63 sectors/track, 1044 cylinders
Units = cylinders of 16065 * 512 = 8225280 bytes
Sector size (logical/physical): 512 bytes / 512 bytes
I/O size (minimum/optimal): 512 bytes / 512 bytes
Disk identifier: 0x00000000
|
4. Make a partition on this disk:
# fdisk /dev/sdc
> Then press 'n' to add a new partition.
> Then press 't' change the partition type. Choose 8e(Linux LVM).
> Then press 'w' to write the partition table.
5. List the disk again with: fdisk -l
Disk /dev/sdc: 8589 MB, 8589934592 bytes
255 heads, 63 sectors/track, 1044 cylinders
Units = cylinders of 16065 * 512 = 8225280 bytes
Sector size (logical/physical): 512 bytes / 512 bytes
I/O size (minimum/optimal): 512 bytes / 512 bytes
Disk identifier: 0xa0d940fd
Device Boot Start End Blocks Id System
/dev/sdc1 1 1044 8385898+ 8e Linux LVM
|
6. Make a Physical Volume out of /dev/sdc1:
# pvcreate /dev/sdc1
After this is done, I would want to know what Volume Group to place my Physical Volume. To find that, I would start by finding the name of the Logical Volume that is mounted on the filesystem, and see what Volume Group it is using. In my case the mount point /mnt/syslogs is full, so I type mount in the console to get a list of mounts on the filesystem and see what is mounted on /mnt/syslog:
/dev/mapper/vgLogDisks-lvSysLogs on /mnt/syslogs type ext4 (rw)
|
From this I know that the Logical Volume I am looking for is 'lvSysLogs.' I will then use the command lvdisplay to list information about logical volumes on the system. By this I find '/dev/vgLogDisks/lvSysLogs', with:
VG Name vgLogDisks
I can verify the existence of this group by using the command vgdisplay.
7. I will add our Physical Volume to vgLogDisks judging by the information above:
# vgextend vgLogDisks /dev/sdc1
Volume group "vgLogDisks" successfully extended
|
8. Our Logical Volume that makes out /mnt/syslog is still no larger despite its Volume Group getting a new disk. We therefore ectend our Logical Volume by the new disk:
# lvextend /dev/vgLogDisks/lvSysLogs /dev/sdc1
Extending logical volume lvSysLogs to 17.99 GiB
Logical volume lvSysLogs successfully resized
|
9. After this is done it is time to extend the filesystem to fit the Logical Volume:
# resize2fs /dev/vgLogDisks/lvSysLogs
resize2fs 1.41.12 (17-May-2010)
Filesystem at /dev/vgLogDisks/lvSysLogs is mounted on /mnt/syslogs; on-line resizing required
old desc_blocks = 1, new_desc_blocks = 2
Performing an on-line resize of /dev/vgLogDisks/lvSysLogs to 4715520 (4k) blocks.
The filesystem on /dev/vgLogDisks/lvSysLogs is now 4715520 blocks long.
|
10. Finally, we verify that the disk has all its new space:
# df
Filesystem 1K-blocks Used Available Use% Mounted on
/dev/mapper/vgSystem-lvRoot 10014648 1967016 7538912 21% /
tmpfs 1962520 0 1962520 0% /dev/shm
/dev/sda1 297485 67833 214292 25% /boot
/dev/mapper/vgSystem-lvLog 2064208 85584 1873768 5% /var/log
/dev/mapper/vgLogDisks-lvSysLogs 18565884 9709504 7913792 56% /mnt/syslogs
|
|
Sources: LPIC-2 Study Guide: ISBN: 978-1-118-00015-1
Tagged as: Linux, HowTo, Commands |
| How to shrink a disk | |
|---|
|
-19th of October 2013
This small collection of notes will act as a guide to shrink a thin disk in VMWare vSphere, and also as a guide on shrinking thick disks.
Case; reclaim the space usage of a thin provisioned disk:
1. Find the host that the VM with the disk you want to shrink is located on.
2. If the disk is thick, you have to convert it to a thin disk, which is possible in the process of storage vMotion before you continue.
3. Enable SSH on the host via its Configuration Tab -> Security Profile -> Properties in the services section when connected to the host or vCenter with the vSphere Client.
4. Log on the host with SSH (Putty is a good tool for such).
5. Navigate to the location of the virtual machine. In my case it is located under the path /vmfs/volumes/525ba385-79c0fb05-ea04-ac162d78a13c/ROUTER1
6. Find the vmdk (virtual disk file) that you want to shrink by issuing the 'ls' command. In my case it is ROUTER1-flat.vmdk.
7. Make sure the guest VM is turned off and then issue the command:
# vmkfstools --punchzero ROUTER1-flat.vmdk
vmfsDisk: 1, rdmDisk: 0, blockSize: 1048576
Hole Punching: 100% done.
|
Note: you may need to issue the sDelete command in the guest operating system before you issue the command above. See this article for more details.
Case; Shrink a thick provisioned disk:
1. To shrink a thick provisioned disk, you first have to shrink the filesystem on the disk to a size slightly smaller then what you plan the vmdk file to be.
This is important! If you do not resize the filesystem first, the end result will be unusable. You can do this with for instance Gparted which can be booted from live.
2. After this is done you have to edit the descriptor file for the disk via ssh on the host with the new size - in my case ROUTER1.vmdk:
RW 26214400 "VMFS ROUTER1-flat.vmdk"
The number 26214400 is 26214400 * 512 = 13421772800 bytes = 12.5 GB. If you want a 10GB disk, the the number to write there is 10737418240 bytes / 512 = 20971520.
3. Save the file and issue the following command:
# vmkfstools -i ROUTER1.vmdk ROUTER1_2.vmdk
Destination disk format: VMFS thick
Cloning disk ‘ROUTER1.vmdk’…
Clone: 100% done.
|
NB! Use this technique at your own risk!
4. Detach the first disk from the virtual machine and then attach the new clone with the new size. Then boot the VM.
5. Thats it! Now you can check the new file size by issuing the command 'ls -al' or browsing to the datastore with the vSphere Client.
Source: VMWare 5.1
Tagged as: VMWare, HowTo |
| SQL 2008 How to reset lost SA account password | |
|---|
|
-19th of October 2013
Here is an easy to follow guide on how to reset a lost SA account password in Microsoft SQL Server:
1. Stop SQL Service: on the command line type: net stop MSSQLServer
2. Start the SQL Server in Management mode: on the command line type: net start MSSQLServer /m
3. Open the SQL Server management studio, cancel the login dialog
4. Open new sql server engine query window: from the menu, Click file->new->Database engine query
5. Enable SA account if not enabled: in the query window type: Alter login sa enable
6. Set the password of the sa account: alter login sa with password='my password'
7. Stop the SQL server from the command line: net stop MSSQlServer
8. Start SQL Service from the command line: net start mssqlserver
9. Start the SQL Management studio and connect to the server using sa account
10. Add you domain administrator as sysadmin
11. Disable the sa account when you finish
Source: Useful stuff
Tagged as: SQL 2008, HowTo |
| Active Directory Trust Relationships | |
|---|
|
-26th of October 2013
| Configure DNS before setting up trusts. |
|---|
For the two forests to be able to trust each other, they have to be able to resolve each others domain names. Here follows a quick simplified quide on how to set this up.
1. Open up DNS manager in the first domain controller in the first domain(sccmlab.local here).
2. Right click forward lookup zones and choose new zone.
3. In the wizard that appears("Welcome to The New Zone Wizard"):
a) choose Stub Zone for Zone Type
b) the dns suffix for the other domain to trust under the Zone Name page (ad4.local here)
c) and the IP-address of the Master DNS Server(192.168.1.10 here).
4. Select the "Use The Above List Of Servers To Create A Local List of Master Servers" check box when that option appears.
|
On the other domain controller in the other domain(ad4.local here):
1. Open up DNS manager.
2. Right click the Conditional Forwarders folder, and choose New Conditional Forwarder.
3. In the wizard that appears;
a) type the domain name of the first domain in the DNS Domain box(here sccmlab.local)
b) add the IP of the DNS Server/AD Controller where this is applicable
c) then select "Store this Conditional Forwarder in Active Directory, And Replicate It As Follows." Choose "All DNS Servers in Forest" and then click OK.
|
| Create a Trust Relationship |
|---|
1. Open up Active Directory Domains and Trusts in the first domain controller in the first domain(here sccmlab.local).
2. Right click sccmlab.local and choose properties. Then click the Trusts tab, New Trust, Next, in the Name Box enter "AD4.local."
3. Select Forest Trust, click Next,
a) select "Two-way" and click next,
b) select "Both this domain and the specified domain" and click next,
c) fill in the credentials to authenticate to the other domain and click next,
d) select "Forest-wide authentication" and click next,
e) select "Forest-wide authentication" again and click next,
f) continue the wizard until you can choose "Yes, Confirm the outgoing trust" and click next,
g) select "Yes, Confirm the incoming trust" and click next,
h) then click Finish.
i) You can now see the new trust in the sccmlab.local Properties box.
4. You can now see the new trust in the ad4.local Properties box in Active Directory Domains and Trusts on the ad4.local domain controller as well.
|
Source: Configuring Windows Server 2008 Active Directory. ISBN: 978-0-470-22509-7
Tagged as: Active Directory, HowTo |
| Upsert against MongoDB with PowerShell | |
|---|
|
-18th January 2014
The Story
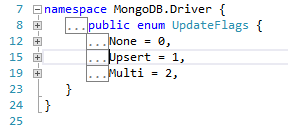
It turned out that I needed to upsert to a MongoDB database. After a quick Google search I found Kristof Kowalski's blog article, that helped me out alot. However, upserting was not explained. How to upsert is no big-brainer, if you just know how to. And when you don't know how, you spend time searching for the solution. Here it is explained without further time needed to be spent.
Upserting is done by adding the enum type MongoDB.Driver.UpdateFlags.Upsert when calling the update method as the third argument of the collection you have chosen. However, in PowerShell that would not work the way I tried to do it. To remedy that, I would need the values for the corresponding class. By using Visual Studio and creating a new solution, then adding references to the required DLLs I could browse through to the definitions (see picture on the right). As you can see, upsert is the equivalent to the value 1, so the value 1 is what I want to pass as the third optional argument. See the example code below for a demonstration.
|
|
		Add-Type -Path "C:\bin\MongoDB_Drivers\MongoDB.Bson.dll"
		Add-Type -Path "C:\bin\MongoDB_Drivers\MongoDB.Driver.dll"

		$databaseName = "database";
		$MONGO_URL = "mongodb://serverIPorDNS/$databaseName?safe=true;slaveok=true";
		$vmname="virtualServer"

		$db = [MongoDB.Driver.MongoDatabase]::Create($MONGO_URL)
		$collection = $db['ourCollection']

		[MongoDB.Bson.BsonDocument] $doc = @{
			"_id"= [MongoDB.Bson.ObjectId]::GenerateNewId();
		    "ServerName"= "$vmname";
		};

		#We are not doing an insert, we are doing an upsert - the following would be an insert:
		#$collection.Insert($doc);

		#Here we get ready for the upsert:
		$updates = @{'$set' = @{'ServerName'= "$vmname"}};
		$query = @{"ServerName"= $doc['ServerName']}
		try {
			#This is where we do the upsert, notice the value 1 at the end of the method call:
			$collection.Update([MongoDB.Driver.QueryDocument]$query, [MongoDb.Driver.UpdateDocument]$updates, 1);
		} catch {
			#Some error handling here
		}
		#Example - To remove the vm with that name:
		#$collection.Remove([MongoDB.Driver.QueryDocument]@{"ServerName"= "$vmname"});

		#Example - o Test the values
		#$collection.FindAll();
|
There is also a PowerShell provider for MongoDB.
Source: Kristof Kowalski, MongoDB C# Documentation.
Tagged as: Scripts, HowTo |
| Getting started with Hyper-V for the VMWare Admin | |
|---|
|
-16th of December 2014
B. Nice to know:
1. How to search for a VM guest based on its IP or MAC address:
Get-Vm |Get-VirtualNetworkAdapter |Where {$_.IPv4Addresses -like "192.168.123*"} | Select Name, IPv4Addresses
Get-Vm |Get-VirtualNetworkAdapter |Where {$_.MACAddress -like "00:15:5D:*"} | Select Name, MACAddress
It seems not to be possible to search for VM guests based on theyr IP address ussing the graphical user interface in VMM.
And getting host names based on MAC address:
Get-VMHost | %{ get-scvmhostnetworkadapter -VMHost $_ | where-object {$_.PhysicalAddress -like "00:25:B5*" }} | Select VMHost, PhysicalAddress
2. How register an existing Hyper-V virtual machine on to a Hyper-V host:
				$VMHost = Get-SCVMHost -ComputerName "HyperVHostName"
				Register-SCVirtualMachine -VMHost $VMHost -Path "C:\ClusterStorage\MyVM"
It seems not to be possible to search for VM guests based on theyr IP address ussing the graphical user interface in VMM.
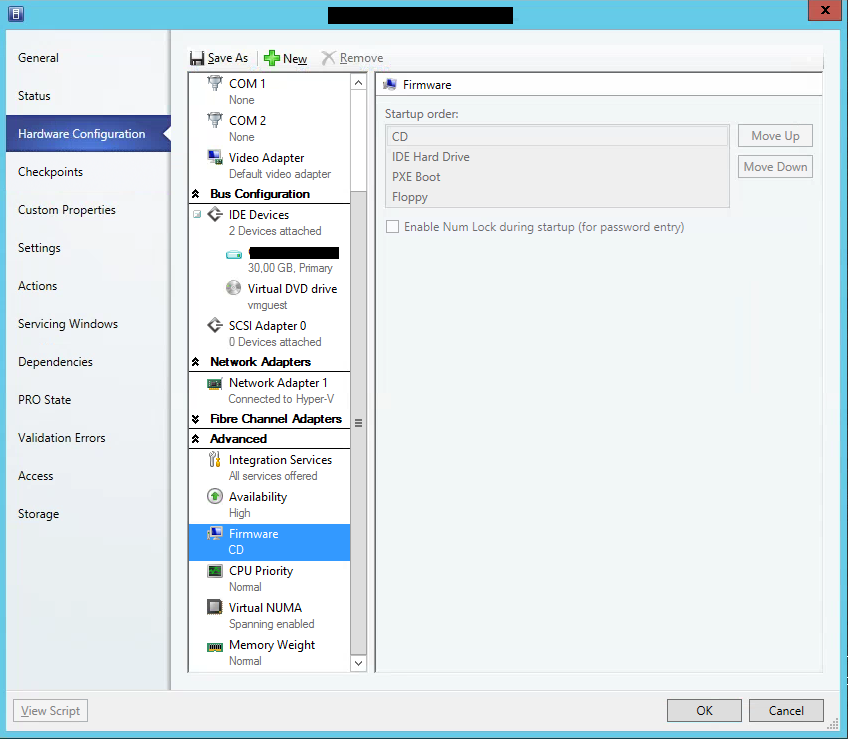
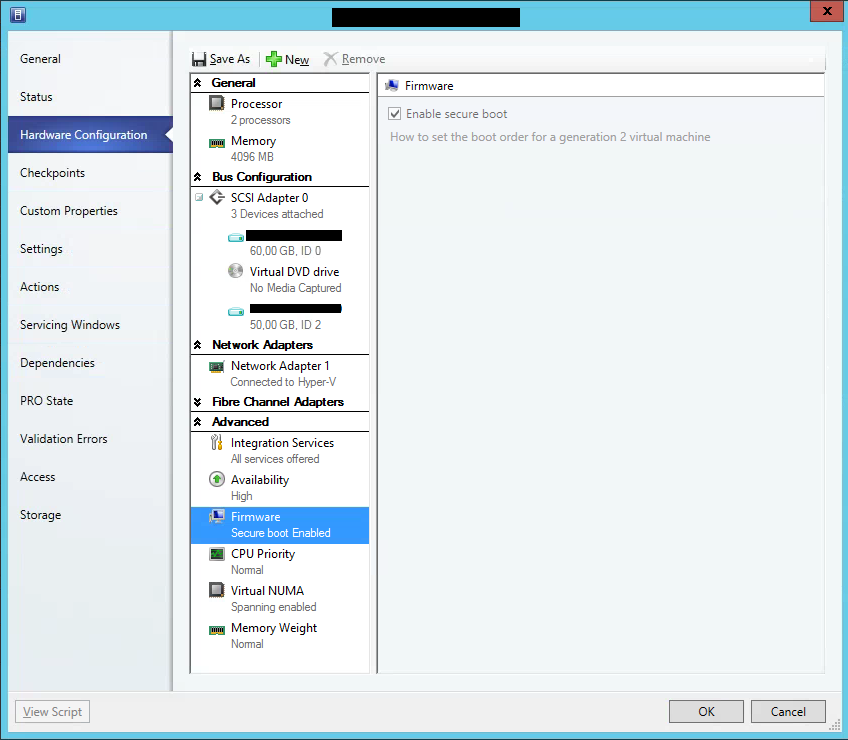
3. How to set the first boot device(here the CD-ROM) on Generation 2 VM guests:
4. How to create NIC on VM and also set static IP-adress from a static IP-Pool defined in VMM:
			$VMNetwork = Get-SCVMNetwork -VMMServer vmmServerFQDN -Name "VLAN 127 Network"
			$VMSubnet = Get-SCVMSubnet -VMMServer vmmServerFQDN -Name "VLAN 127 Network_Subnet"

			New-SCVirtualNetworkAdapter -VM "VMNameHere" -MACAddress "00:00:00:00:00:00" -MACAddressType Static `
			-Synthetic -EnableVMNetworkOptimization $false -EnableMACAddressSpoofing $false `
			-EnableGuestIPNetworkVirtualizationUpdates $false -IPv4AddressType Static -IPv6AddressType Dynamic `
			-VMSubnet $VMSubnet -VMNetwork $VMNetwork

			#Then choose either alternative 1 or alternative 2:
			#Alternative 1:
			$IPPool = Get-SCStaticIPAddressPool | where-object {$_.VMSubnet.name -eq $VMSubnet.Name}
			Grant-SCIPAddress -StaticIPAddressPool $IPPool -GrantToObjectType VirtualNetworkAdapter  `
			-GrantToObjectID ((Get-SCVirtualNetworkAdapter -VM "VMNameHere"))[0].ID

			#Alternative 2:
			$Adapter =(Get-SCVirtualNetworkAdapter -VM "VMNameHere" | where  {$_.VLanID -eq "127"})
			Set-SCVirtualNetworkAdapter -IPv4AddressType Static -VirtualNetworkAdapter $Adapter -IPv4Addresses "IPv4 Adresse Her"
			#In alternative 2 VMM will automatically findthe IP pool for $VMNetwork if it exists
5. How to find addresses in a IP-Pool:
Find used/assigned addresses:
Get-SCIPAddress -Assigned -StaticIPAddressPool (Get-SCStaticIPAddressPool -Name "AddressPoolName")
Find all assigned addresses that are not in use any more:
Get-SCIPAddress -UnAssigned -StaticIPAddressPool (Get-SCStaticIPAddressPool -Name "AddressPoolName")
Unassigne all IP's from a IP-pool:
Revoke-SCIPAddress -AllocatedIPAddress (Get-SCIPAddress -Assigned -StaticIPAddressPool (Get-SCStaticIPAddressPool -Name "IP Pool Name"))
The same thing can also be done in Failover Cluster Manager:
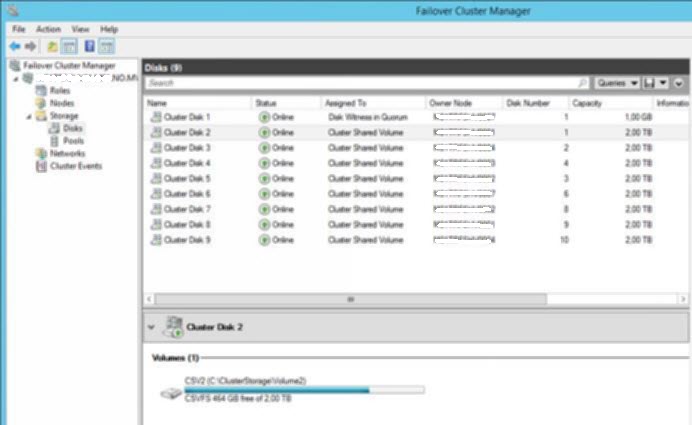
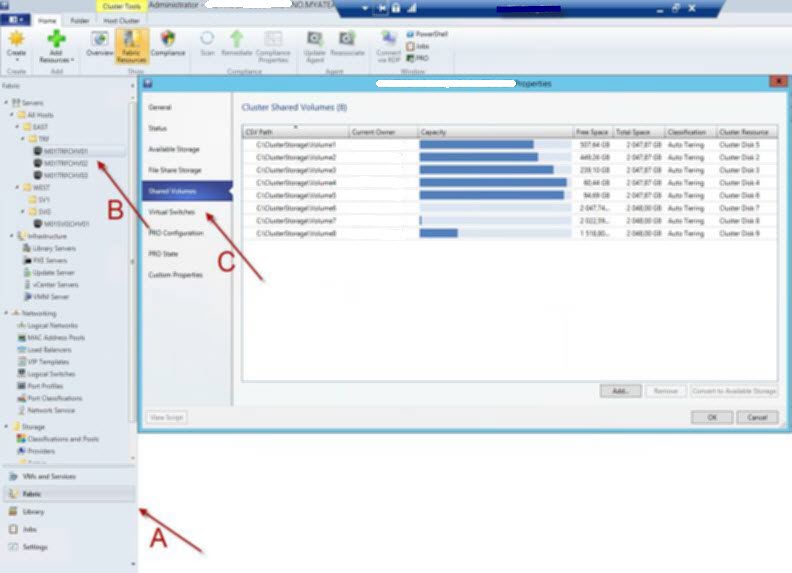
7. How to find what VM's are running on a datastore:
Get-Cluster "ClusterName" | Get-ClusterNode | Foreach {Get-VM -ComputerName $_.Name | Where {$_.Path -match "Volume1"}}
8. How to find orphaned disks:
Paste the following into a ps1 file and run it after switching "ClusterNameHere" with the correct name of the cluster.
			[CmdletBinding(ConfirmImpact='High',SupportsShouldProcess=$true)]
			PARAM (
				   [string]$ClusterName = "ClusterNameHere",
				   [string]$LocalClusterStoragePath = "C:\\ClusterStorage",
				   [string]$ClusterStorageUNCTail = "C$\ClusterStorage",
				   [string[]]$Extensions = @( '*.vhdx', '*.vhd', '*.iso' )
			)

			BEGIN {
				   #Get all disks registered in Hyper-V:
				   if ($host.Name -eq "ConsoleHost") {Write-Host -Foregroundcolor Yellow "Using the following parameters: "}
				   $baseHost = (get-VMHostGroup | % {$_.AllChildClusters | where-object {$_.ClusterName -eq $ClusterName}  `
				   		| get-vmhost})[0];
				   if ($host.Name -eq "ConsoleHost") {Write-Host -Foregroundcolor Yellow "   baseHost: $baseHost"}
				   $baseHostname = $baseHost.Name.Split(".")[0];
				   if ($host.Name -eq "ConsoleHost") {Write-Host -Foregroundcolor Yellow "   baseHostname: $baseHostname"}
				   $baseCluster = (get-VMHostGroup | % {$_.AllChildClusters | where-object {$_.ClusterName -eq $ClusterName}});
				   if ($host.Name -eq "ConsoleHost") {Write-Host -Foregroundcolor Yellow "   baseCluster: $baseCluster"}
				   $uncBase = [string]$("\\"+$baseHostname+"\"+$ClusterStorageUNCTail);
				   if ($host.Name -eq "ConsoleHost") {Write-Host -Foregroundcolor Yellow "   uncBase: $uncBase"}
				   $disks = $baseCluster | get-vmhost | Get-Vm | `
				   Foreach-Object {$_.virtualdiskdrives | % {[String]($_.VirtualHardDisk.Location) `
				      -replace $LocalClusterStoragePath, $uncBase}}

				   $List = @($Extensions | ForEach-Object {
						 $extension = $_;
						 if ($host.Name -eq "ConsoleHost") {Write-Host -Foregroundcolor Yellow "- Filtering extension: $extension"}
						 dir -Path $uncBase | % {
								dir -Path $uncBase\$_ | %{
									   dir -Path $($uncBase+"\"+($_).Parent.Name+"\"+$_) -Filter $extension | `
									   		Select-Object -ExpandProperty FullName
								}
						 }
				   }) | Where-Object {
						 $_ -notin $disks
				   } | Select-Object -Unique
				   if ($host.Name -eq "ConsoleHost") {Write-Host -Foregroundcolor Yellow $("`n**Found " + $List.count + " files..")}
				   $List
			}
Distributed Resource Scheduler in VMWare os "Dynamic Optimization" in System Center Virtual Machine Manager 2012 R2.
Choose the fabric pane in VMM and right click the site where yoiu want to adjust the settings, and choose properties.

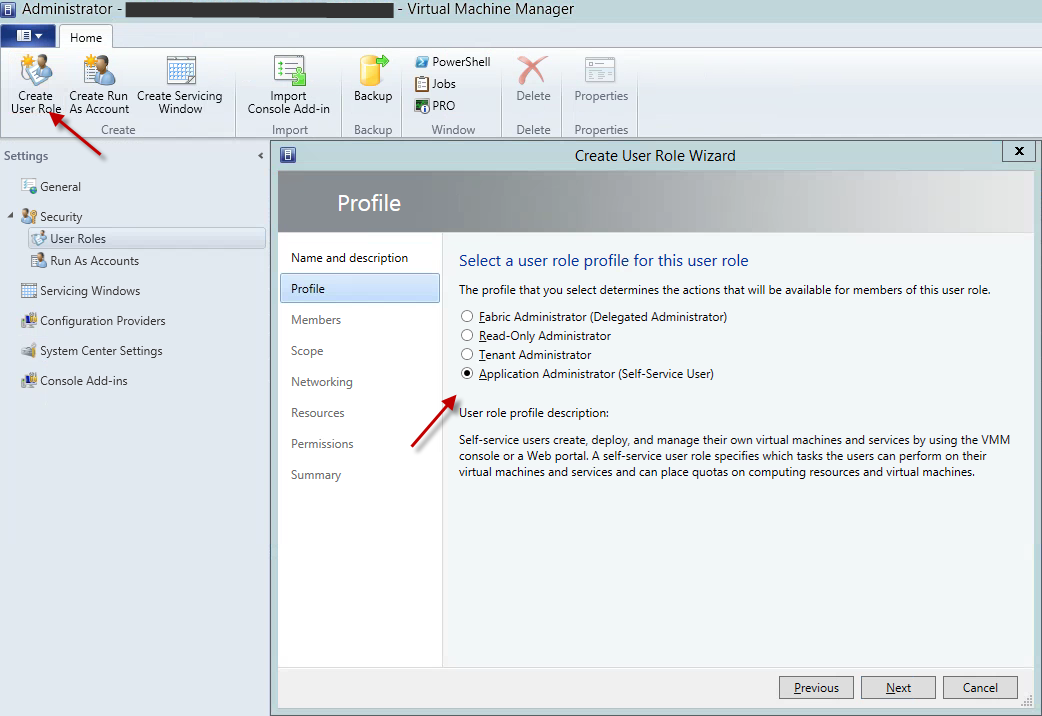
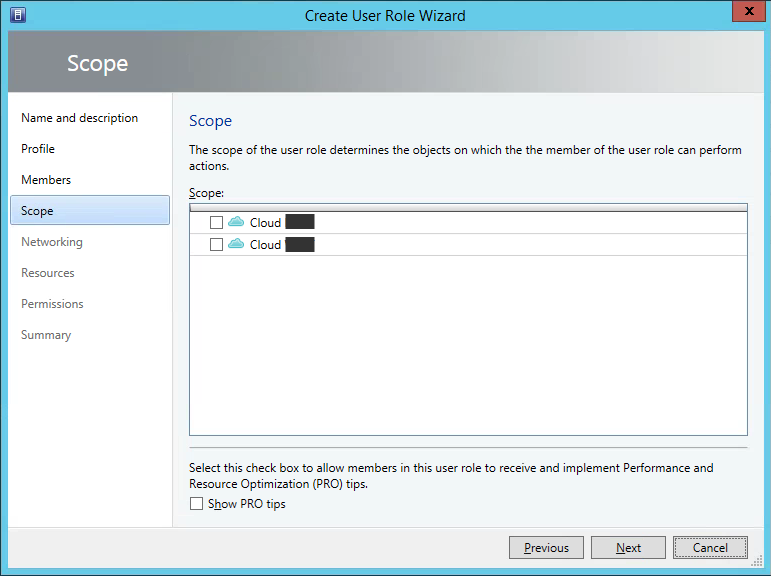
Requires to create a Tenant Administrator or Application Administrator in a Private Cloud.
1. Settings -> Create User Role:
2. Attach the role to a Private Cloud and delegate what objects can be administrated.
11. Hyper-V vs VMWare vSphere:
Drawbacks with Hyper-V compared to VMWare vSphere:
It is not possible to list what virtual machines are on a storage device via the GUI.
A virtual guest has to be powered off so that a NIC can be added to it.
The IP-addresses of the hosts are not shown in VMM. Powershell has to be used.
The handeling of access rights is not as granulated and straight forward to handle as in VMWare.
VMWare vSphere has more GUI options for doing various administrative tasks easily.
Hyper-V and SCVMM do not have a full equivalent to VMware's Storage DRS.
Live migrations of storage in SCVMM seems to way too often not to be able to clean up after itself, resulting in orphaned files.
Benefits with Hyper-V in regards to VMWare:
Licenses and costs
Hyper-V has a practical networking model(see 'System Center VMM Networking' below)
12. More on Hyper-V and VMM:
|
Source: System Center Virtual Machine Manager 2012 R2
Tagged as: Hyper-V, HowTo, Scripts |
| Router Setup - Howto | |
|---|
When configuring Linux as an router, there are two main aspects to consider. Those are enabling the routing at the linux server and determining the routes between the networks. The routes between the networks
describe what path to take, or where to send the network packets next to get the packets on their way to the destination. The routes between the networks are either manually configured static routes or
dynamically configured. Static routes are configured by entering the route information in the terminal prompt manually. Dynamically
configured routes are communicated between routers with a routing protocol such as RIP, OSPF, IGRP, EGRP, IS-IS or BGP. Applications used for configuring Linux to handle dynamic routing protocols as those mentioned are for
example routed, gated and quagga. The advantage of dynamically configured routing is that dynamic changes in the network will not bring a network path between two points down as logn as other paths exist. If a path is broken, another route will be communicated
between the routers by using the routing protocol. Another tool used in routing is the iptables firewall often used in the Linux system. With this firewall you can control traffic as it flows through the router,
denying or allowing it, re-routing it, manipulating it in other ways or NAT'ing it.
The following steps describe the enabling of routing for forwarding network packets in Linux:
># echo "1" > /proc/sys/net/ipv4/ip_forward
However, after reboot, this setting will be reset and forwarding turned off again.
In most systems this setting can be set permanently by editing /etc/sysctl.conf, where the line to be added should be:
net.ipv4.ip_forward=1
The configuration is then loaded into the running system by the terminal command:
># sysctl -p.
Listing and adding static routes:
># route
Kernel IP routing table
| Destination | Gateway | Genmask | Flags | Metric | Ref | Use | Iface
| | 10.0.0.0 | * | 255.255.255.0 | U | 0 | 0 | 0 | eth1
| | 192.168.1.0 | * | 255.255.255.0 | U | 0 | 0 | 0 | eth2
| | 172.16.11.0 | * | 255.255.255.0 | U | 0 | 0 | 0 | tap0
| | default | 10.0.0.1 | 0.0.0.0 | UG | 0 | 0 | 0 | eth1
|
># route add -net 192.168.55.0 netmask 255.255.255.0 gw 192.168.1.254 dev eth2
># route
Kernel IP routing table
| Destination | Gateway | Genmask | Flags | Metric | Ref | Use | Iface
| | 192.168.55.0 | 192.168.1.254 | 255.255.255.0 | UG | 0 | 0 | 0 | eth2
| | 10.0.0.0 | * | 255.255.255.0 | U | 0 | 0 | 0 | eth1
| | 192.168.1.0 | * | 255.255.255.0 | U | 0 | 0 | 0 | eth2
| | 172.16.11.0 | * | 255.255.255.0 | U | 0 | 0 | 0 | tap0
| | default | 10.0.0.1 | 0.0.0.0 | UG | 0 | 0 | 0 | eth1
|
Examples of iptables:
The following makes sure that nothing on port 22(usually SSH) gets more than 4 attempts to connect to the port every 60 seconds. This prevents, or at least hinders, brute force attacks.
iptables -N SSH_CHECK
iptables -A INPUT -p tcp --dport 22 -m state --state NEW -j SSH_CHECK
iptables -A SSH_CHECK -m recent --set --name SSH
iptables -A SSH_CHECK -m recent --update --seconds 60 --hitcount 4 --name SSH -j DROP
Source: LPIC-2 Study Guide. ISBN: 978-1-118-00015-1
Tagged as: Linux, Routers, HowTo |
| How to Clean up a Windows System Drive | |
|---|
|
-23rd February 2013
This is a list of steps that can be taken to clean up a system drive and thus save space. Make sure you have set up your folder view to show all hidden files and not hide system files. In addition to this list you might want to try ccleaner from Piriform. Ccleaner can be scripted as well.
1. Do you use shadow copies on the system drive? Do you need them? If not you can delete them with the following command: vssadmin delete shadows /for=%SystemDrive% /all /quiet
2. How much space is the shadow storage taking on your system drive? You can resize it here with the following command: vssadmin Resize ShadowStorage /For=%SystemDrive% /On=%SystemDrive% /MaxSize=4GB
3. Are there memory dumps stored on your system? You can safely delete them. If not specifically specified otherwise, you will find them at:
%SystemRoot%\MEMORY.DMP
%SystemRoot%\Minidump\*.*
4. Do you run IIS on your server or computer? You can compress the log files at %SystemDrive%\inetpub\logs\LogFiles using NTFS compression.
5. You can safely delete the following:
%SystemRoot%\installer\$PatchCache$
%SystemRoot%\$blabla$
%SystemDrive%\$Recycle.Bin
6. The following can be compressed with NTFS compression:
%SystemDrive%\PerfLogs
%SystemDrive%\MSOCache
7. If you are using Windows 7 or Windows Server 2008R2 you might want to try the command dism.exe /online /cleanup-image /spsuperseded to clean up the winsxs folder.
On Windows Vista or Windows Server 2008 Service Pack 2 the tool that does the same job is Compcln.exe.
On Windows Vista or Windows Server 2008 Service Pack 1 the tool that does the same job is VSP1CLN.EXE.
8. Finally - you can use cleanmgr.exe to clean up a whole lot more. If you want to script it, you can set it up first with the command cleanmgr.exe /sageset:101
After choosing what you want to clean up in the dialog box that appears, you cun run the same cleanupjob any time you want with the command cleanmgr.exe /sagerun:101
The setup for the cleaning job is stored in the registry in several keys under the following path:
HKEY_LOCAL_MACHINE\SOFTWARE\Microsoft\Windows\CurrentVersion\Explorer\VolumeCaches.
In our example, if we chose to clean up Active Setup Temp Folders, the key "StateFlags0101"=dword:00000002 will be created under
..\VolumeCaches\Active Setup Temp Folders indicating this as a part of the 101 cleanup job.
Thus if you wanted, you could set up a clean up job and export the keys from the registry that you want to constitute the same cleanup job on other computers without you having to go through the graphical user interface every time you want to create that same job. This makes a great opportunity for automating with scripts in large server environments.
|
This is not an attempt of a complete list.
Feel free to inform me if you have further suggestions.
Source: Information gathered over time.
Tagged as: Commands, Tools, HowTo |
| SQL 2008 How to trunc a log file | |
|---|
|
-23rd July 2013
How to truncate a log file with TSQL:
Every once in a while log files can grow too large and need to be truncated and/or shrinked in order to save valuable disk space. The steps below will guide you, given that you know the database name and log name. These can be found via the database properties and then selecting "Files."
Normally, taking transaction log backups will truncate the transaction log. The space used on the disk will not shrink, but more space inside the log file is freed to be available for future use. Transaction logs should be handled as a part of the backup routine. To actually shrink the log file, the steps below will make that happen.
1. The following code will set TestDb to simple recovery mode, then shrink it, and finally set it back to full recovery mode:
USE [TestDb]
GO
ALTER DATABASE [TestDb] SET RECOVERY SIMPLE WITH NO_WAIT
DBCC SHRINKFILE(TestDbLog, 1)
ALTER DATABASE [TestDb] SET RECOVERY FULL WITH NO_WAIT
GO
|
2a. To list the placement of all instance databases for viewing, then the following SQL query might be of use:
|
SELECT DB_NAME(dbid),* FROM sys.sysaltfiles;
|
2b. Alternatively, this query wich also lists all the instance log file locations might be of use:
|
SELECT name, physical_name AS current_file_location FROM sys.master_files;
|
|
|
Source: N/A
Tagged as: SQL 2008, Scripts, HowTo |
| Change and verify the NTP client in Windows | |
|---|
|
In the command prompt running as administrator or in a bat file,
set the NTP client to fetch its time from for instance the following list of time servers(the example here is with Norwegian time servers):
			@echo off
			w32tm /config /manualpeerlist:0.no.pool.ntp.org,3.no.pool.ntp.org,2.no.pool.ntp.org /syncfromflags:manual /reliable:yes /update
			net stop w32time && net start w32time
			w32tm /resync
Optionally verify the configuration with the following set of commands:
			w32tm /query /configuration
			w32tm /query /status
Sources: Microsoft
Tagged as: Tools, Commands, HowTo |
| How to write C# code against UCS Central | |
|---|
|
-3rd of June 2014
This blog attempt will in short terms to try to describe how to write C# code against UCS Central. Visual Studio 2012 was used to write the code displayed here. It is assumed that you know programming already, and that you are able to fit these pieces of information to your own solution. Not every class and bit of code is shown here, only what is esssential to get the concept across.
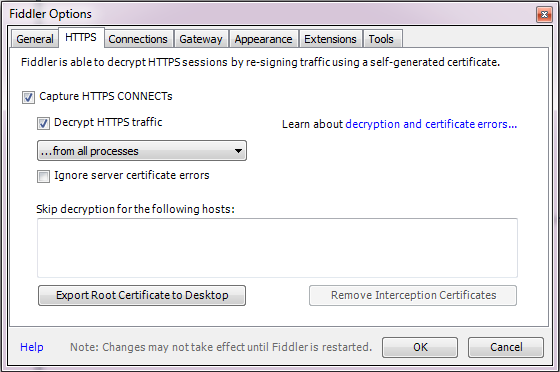
When I first needed to use the UCS Centrals API for automating tasks against it, I had no access to any API documentation. UCS Central uses a web GUI to talk to its backend API through an HTTPS session. Using Fiddler to monitor what calls are being made to the API from the web page, you can record so that you can later tweak and recreate these calls from C# to do what you need to do even with missing documentation.
1. What is UCS Central and what are we trying to do?
The Cisco Unified Computing system is a system where profiles representining setups of server systems are deployed on to bare metal computer systems. All hardware specifics are fetched from pools or definitions in the UCS system and assigned to these profiles that in turn can be assigned and reassigned to different hardware servers/rack blades/bare metal servers. Take a look at the following video representation from Cisco for a good explanation and illustration of the concept.
The whole system is arranged into domains that are each administered by UCS Managers. These domains and theyr managers are then in turn administered by a central solution called the UCS Central. The documentation for the UCS Managers command line interface, API solutions and PowerShell support is at the time of writing very good. From what I can find at the time being, this is not the case for UCS Central, which leads us to this blog article.
We will be using Fiddler to get the information we need to talk to the UCS REST API, and then C# to code the talking. To have a real system to talk to and experiment with, I will be using Cisco UCS Platform Emulator and then Cisco UCS Central on top of that. These two are set up in a private VMWare lab for this emulation.
|

|
2. Using Fiddler
|
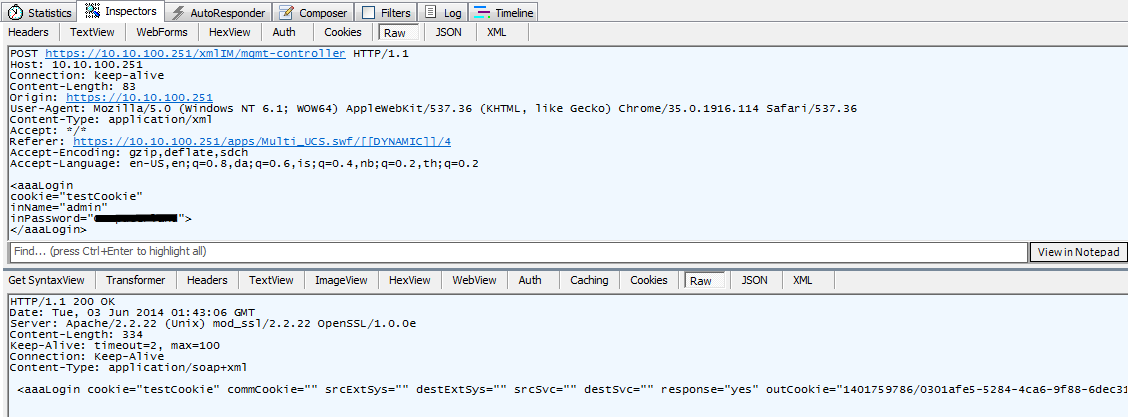
Fiddler can be fetched at http://www.telerik.com/download/fiddler and is our first step to get the information we need. Go ahead and download it, then take a look at this guide for more about Fiddler. In our setup we want to capture information going over HTTPS, so we will set the options for Fiddler to handle that traffic (figure 1 on the right). To exemplify the usage of Fiddler we log in to UCS Central and watch what calls are being made in Fiddler (figure 2 on the right). Here we can see the XML being sent to the API (the upper box), and the headers being used. We also see the reply we get (the lower box) with headers. We will be using both to make a login and check the reply. Here is what we are sending:
And we can see in the reply the outCookie that we will be using in further interaction with the UCS Central REST API to identify our session (figure 2 on the right).
|
|

|
3. Using the result from Fiddler
From experimenting with Fiddler we know we will be sending the following XML to the API as shown below. The first example does the login which in turn gives us the outCookie as an xml answer that we use in our next step. The other is for our next step to create a VLAN via UCS Central using the outCookie from step 1 to identify our authenticated session.
3.1 The login:
3.2 The creation of a VLAN named 999-XXX-TESTXX with VLAN ID 999:
In our C# code, we first need a piece of code that will send the request to the API and then another piece of code that will interpret the reply. The SendWebRequest class will be doing the sending and the XmlReaderLocal class will do the reply. The XmlReaderLocal class has actually been made to read an xml file which is not what is returned to us from the UCS Central API. I have because of that created a temporary file creator where there is code to create a a temporary file where the XML reply is stored so that the XmlReaderLocal class can read it. The code for the temporary file creator is not included here, but is used in section four 'The half-ready code.' You will have to write your own temporary file creator the way you see fits.
3.3 The SendWebRequest class to send our request:
					  class SendWebRequest {
					      private string __apiUrl;
					      private string __stringData;

					      public SendWebRequest(string apiUrl, string stringData) {
					         __apiUrl = apiUrl;
					         __stringData = stringData;
					      }
					      public HttpWebResponse execute() {
					         CookieContainer cookieJar = new CookieContainer();
					         HttpWebRequest firstRequest = (HttpWebRequest)WebRequest.Create(__apiUrl);

					         ASCIIEncoding encoding = new ASCIIEncoding();
					         byte[] data = encoding.GetBytes(__stringData);

					         firstRequest.CookieContainer = cookieJar;
					         firstRequest.KeepAlive = true;
					         firstRequest.Method = "POST";
					         firstRequest.ContentType = "application/xml";
					         firstRequest.ContentLength = data.Length;
					         firstRequest.Accept = "*/*";
					         firstRequest.Referer = "https://" + __apiUrl.Split('/')[2] + "/apps/Multi_UCS.swf/[[DYNAMIC]]/4";
					         firstRequest.UserAgent = "Mozilla/5.0 (Windows NT 6.1; WOW64) AppleWebKit/537.36 (KHTML, like Gecko) Chrome/35.0.1916.114 Safari/537.36";
					         firstRequest.Host = __apiUrl.Split('/')[2];

					         System.Net.ServicePointManager.ServerCertificateValidationCallback +=
					            delegate(object sender, System.Security.Cryptography.X509Certificates.X509Certificate certificate,
					                                    System.Security.Cryptography.X509Certificates.X509Chain chain,
					                                    System.Net.Security.SslPolicyErrors sslPolicyErrors) {
					                                       return true; // **** Always accept SSL Certificate
					                                    };

					         Stream newStream = firstRequest.GetRequestStream();
					         newStream.Write(data, 0, data.Length);
					         newStream.Close();
					         return (HttpWebResponse)firstRequest.GetResponse();
					      }
					   }
3.4 The XmlReaderLocal class to read the reply from UCS central and the AttributeCollection class to reply our answer:
Note: I see there are some syntax errors presented in the code by the syntax highlighter. Be sure to check this when you use the code.
public class AttributeCollection {
  public string NodeName { get; set; }
  public Dictionary Attributes { get; set;}

  public AttributeCollection(string nodeName) {
     this.NodeName = nodeName;
     Attributes = new Dictionary();
  }
}
public class XmlReaderLocal {
  XmlTextReader reader;
  String xmlFil;
  public XmlReaderLocal(String xmlFil) {
     this.xmlFil = xmlFil;
  }
  ///
  ///  Read all attributes occurrences of one named node taken as input
  ///
  public AttributeCollection ReadFirstNodeAttributes(String nodename) {
     reader = new XmlTextReader(xmlFil);
     AttributeCollection attrCollection = new AttributeCollection(reader.Name);
     while (reader.Read()) {
        switch (reader.NodeType) {
           case XmlNodeType.Element:
              if (reader.Name.ToString() == nodename) {
                 if (reader.HasAttributes) {
                    //Console.WriteLine("Attributes of <" + reader.Name + ">");
                    while (reader.MoveToNextAttribute()) {
                       attrCollection.Attributes.Add(reader.Name, reader.Value);
                    }
                    reader.MoveToElement();
                    reader.Close();
                 }
              }
              break;
           case XmlNodeType.Text:
              break;
           case XmlNodeType.EndElement:
              break;
        }
     }
     reader.Dispose();
     return attrCollection.Attributes.Count > 0 ? attrCollection : null;
  }
}
|
4. The half-ready code
Note: I see there are some syntax errors presented in the code by the syntax highlighter. Be sure to check this when you use the code. This seems to be some sort of bug in the highlighter.
Here is where we will use our code and knowledge that we have this far. First we demonstrate a login procedure, and then we demonstrate the creation of the VLAN we want to create. Have in mind that this code is not complete and is only intended to show a strain of thought. Simplified versions of the functions GetCookieString and SetUCSVLAN are displayed below, but the whole class is omitted and some depending classes are omitted. You will have to interpret your way through this code and the comments, then implement your own solution for these missing pieces. The strain of thought is still thought to be displayed for tutorial purposes in this article, and thus giving the value intended.
4.1 Authenticate with UCS Central:
						String errorStatus = "None";
						string outCookie = "";

						//This class holds the GetCookieString method that authenticates with UCS Central and gets the Cookie String we need for our next step:
						AuthenticateWithUCS awucs = new AuthenticateWithUCS();
						Dictionary returnAttributes = awucs.GetCookieString(uCSServer, username, password);
						status = returnAttributes.ContainsKey("status") ? returnAttributes["status"] : "None";
						errorStatus = returnAttributes.ContainsKey("errorStatus") ? returnAttributes["errorStatus"] : "None";
						outCookie = returnAttributes.ContainsKey("outCookie") ? returnAttributes["outCookie"] : "None";

						Console.WriteLine(Environment.NewLine + "**After authentication: ");
						Console.WriteLine("JobStatus: " + status);
						Console.WriteLine("ErrorStatus: " + errorStatus);
						Console.WriteLine("outCookie: " + outCookie);
4.2 Create VLAN in UCS Central:
						//This class holds the SetUCSVLAN method that creates a VLAN in UCS Central and reads the reply:
						CreateUCSVLAN cucsvlan = new CreateUCSVLAN();
			            returnAttributes = cucsvlan.SetUCSVLAN(uCSServer, vlanID, vlanName, outCookie);
			            status = returnAttributes.ContainsKey("status") ? returnAttributes["status"] : "None";
			            errorStatus = returnAttributes.ContainsKey("errorStatus") ? returnAttributes["errorStatus"] : "None";
			            var ucsStatus = returnAttributes.ContainsKey("ucsStatus") ? returnAttributes["ucsStatus"] : "None";

			            Console.WriteLine(Environment.NewLine + "**After VLAN Creation: ");
			            Console.WriteLine("JobStatus: " + status);
			            Console.WriteLine("ErrorStatus: " + errorStatus);
			            Console.WriteLine("ucsStatus: " + ucsStatus);
4.3 GetCookieString example code:
				public Dictionary GetCookieString(string uCSServer, string username, string password) {
					Dictionary returnAttributes = new Dictionary();
					var statusArray = Enum.GetValues(typeof(Status));
					Status status = (Status)statusArray.GetValue(2);
					string errorStatus = "None";
					string outCookie = "";
					string ucsStatus = "None";

					string loginUrl = "https://" + uCSServer + "/xmlIM/mgmt-controller";
					string stringData = "";

					try {
						//This is the SendWebRequest class in section 3.3 above:
						SendWebRequest swr = new SendWebRequest(loginUrl, stringData);
						//The ReadUCSWebResponse class is not shown in this article, but its usage is obvious:
						ReadUCSWebResponse rUcsWebRes = new ReadUCSWebResponse(swr, status, errorStatus, ucsStatus, "aaaLogin", "aaaLogin", "GetCookieString", "outCookie");
						Dictionary parseAttributes = rUcsWebRes.execute();
						status = parseAttributes.ContainsKey("status") ? (Status)Enum.Parse(typeof(Status), parseAttributes["status"]) : Status.error;
						errorStatus = parseAttributes.ContainsKey("errorStatus") ? parseAttributes["errorStatus"] : "None";
						outCookie = parseAttributes.ContainsKey("ucsStatus") ? parseAttributes["ucsStatus"] : "None";
					} catch (Exception ex) {
						status = (Status)statusArray.GetValue(6);
						errorStatus = "103 in GetCookieString(): " + ex.Message;
					}

					returnAttributes.Add("errorStatus", errorStatus);
					returnAttributes.Add("status", status.ToString());
					returnAttributes.Add("outCookie", outCookie);
					return returnAttributes;
			    }
4.4 SetUCSVLAN example code:
					public Dictionary SetUCSVLAN(string uCSServer, string vlanid, string vlanName, string cookieString) {
				         Dictionary returnAttributes = new Dictionary();
				         var statusArray = Enum.GetValues(typeof(Status));
				         Status status = (Status)statusArray.GetValue(2);
				         string errorStatus = "None";
				         string ucsStatus = "None";

				         string accessUrl = "https://" + uCSServer + "/xmlIM/resource-mgr";
				         string stringData =
				            "" +
				               "" +
				                  "" +
				                     "" +
				                  "" +
				               "" +
				            "";
				         try {
				         	//This is the SendWebRequest class in section 3.3 above:
				            SendWebRequest swr = new SendWebRequest(accessUrl, stringData);
				            //The ReadUCSWebResponse class is not shown in this article, but its usage is obvious:
				            ReadUCSWebResponse rUcsWebRes = new ReadUCSWebResponse(swr, status, errorStatus, ucsStatus, "fabricVlan", "configConfMos", "SetUCSVLAN", "status");
				            Dictionary parseAttributes = rUcsWebRes.execute();
				            status = parseAttributes.ContainsKey("status") ? (Status)Enum.Parse(typeof(Status), parseAttributes["status"]) : Status.error;
				            errorStatus = parseAttributes.ContainsKey("errorStatus") ? parseAttributes["errorStatus"] : "None";
				            ucsStatus = parseAttributes.ContainsKey("ucsStatus") ? parseAttributes["ucsStatus"] : "None";
				         } catch (Exception ex) {
				            status = (Status)statusArray.GetValue(6);
				            errorStatus = "103 in SetUCSVLAN(): " + ex.Message;
				         }
				         returnAttributes.Add("errorStatus", errorStatus);
				         returnAttributes.Add("status", status.ToString());
				         returnAttributes.Add("ucsStatus", ucsStatus);
				         return returnAttributes;
				    }
|
As mentioned earlier, not every bit of code is included here, but this should get you started. Note that some of the C# code does get displayed with syntax errors that are probably due to bugs in the syntax highlighter that is used on this web page.
Source: Fiddler and the imagination.
Tagged as: Scripts, Tools, HowTo |
| Report last logged in users on VDI | |
|---|
|
-18th October 2014
To create a report over all VDI users last login and reconnect time, you can use the following correlated query against the ViewEvent database of the VDI environment. This might be useful
if you are trying to get an overview of actual VDI usage in case they are still left running and not used/re-used.
The SQL query for the VDI report:
		SELECT a.[ModuleAndEventText]
			  ,a.[Time]
			  ,a.[EventType]
			  ,a.[Source]
			  ,a.[Severity]
			  ,a.[Node]
			  ,a.[UserSID]
			  ,a.[DesktopId]
			  ,a.[MachineId]
			  FROM [ViewEvent].[dbo].[VE_event] AS a
		WHERE a.[Time] =
			  (SELECT MAX(b.[Time]) FROM [ViewEvent].[dbo].[VE_event] AS b WHERE b.[ModuleAndEventText] = a.[ModuleAndEventText])
		AND
			  (a.[EventType] = 'BROKER_USERLOGGEDIN' OR a.[EventType] = 'AGENT_RECONNECTED')
		ORDER BY a.[ModuleAndEventText], a.[Time];
After this query is executed, the result can be copied and pasted into an excel spreadsheet, and in turn formatted nicely for presentation.
Source: My job
Tagged as: VMWare, Scripts, HowTo |
| Copying Windows 7 to a new drive, using Linux | |
|---|
-26th of December 2014
Blog article coming..
Awaiting update..
dd if=/dev/sda of=/dev/sdb bs=446 count=1
|

|
|
Source: Manual pages
Tagged as: Linux, Tools, HowTo |
| Centos 7 Template checklist for SCVMM 2012R2 | |
|---|
|
-2nd of April 2015
In this blog article, we will list the steps needed to be done inside a Centos 7 OS to make it a VM ready to be a template in SCVMM 2012R2.
The article describes a VM template setup intended for a environment using SpaceWalk for patching as a centralized solution.
If your enviroment does not use SpaceWalk, you might consider using it or take whatever ideas from this article to use in your system. In case that is not preferred, feel free to not include the steps that
you are not in need of including.
Naming:
First off, the Template host name will be CENTOS64, this is due to the scripts that we will use later for initializing the new virtual machine when it boots. The scripts check among other things that the hostname has been changed from the initial template hostname before they proceed.
This hostname will change to the VM name when the VM is deployed from the template.
Getting started:
This guide assumes you are logged in as root or that you have sudo rights to act as root. After installing a minimal install of Centos 7, make sure the necessary packages needed for basic management and interaction with Hyper-V are set up. You might also need other tools for basic system management. Below is an example.
		yum install hyperv-daemons
		yum install python-pyasn1
		yum install wget telnet net-tools bind-utils curl lsof
Don't forget to update the system with the newest release patch releases:
yum update
Installing virtualization specifics:
Also remember that the SCVMM agent needs to be installed on the virtual machine. It is needed for a successful deploy of a vm from the template.
Make sure LIS works / is installed. This should be included in Centos 7 as a part of initial setup (perhaps not if you choose a minimal install of the OS?). See the links below on how to do this.
Set up the OS:
1. Set up the preferred colors for the shell:
		echo "export PS1=$'\\[\E[1m\E[31m\\]\\h:\\w # \\[\E(B\E[m\\]'" >> /root/.bashrc
		echo "export PS1=$'\\[\E[1m\E[32m\\]\\h:\\w # \\[\E(B\E[m\\]'" >> /etc/profile.d/colorprompt.sh
2. Make sure that root login is not permitted in /etc/ssh/sshd_config and that we are using Protocol 2.
3. Put the SpaceWalk Server name and IP into /etc/hosts:
12.34.56.78 the-spacewalkserverhostname
4. Install the SpaceWalk client, but don't register it to a SpaceWalk server:
5. Create /etc/init.d/registerSpacewalk.sh as shown in the following link(can be linked to from /etc/rc.local to start at startup):
Change the text "the-spacewalkserver" in the script with the name you used in /etc/hosts for your SpaceWalk server.
If you are using a deployment subnet, remember to enter it into the script. You don't want the SpaceWalk client to register with the SpaceWalk server in the wrong subnet. See below.
$NETADDR =~ ^192\.168\.100\.[0-9]
Will become the following if 10.12.228.0/24 is your deployment subnet:
$NETADDR =~ ^10\.12\.228\.[0-9]
As explained, if the subnet used in the deployment VLAN is 10.12.228.0/24. This will ensure that the VM being deployed from the template won't register to the SpaceWalk server on boot if the VM is still in the deployment subnet.
In this case of deployment setup, it is thought that the VM is set into a temporary deployment subnet automatically while scripts are running to talk to and customize the VM. If you have no such setup
in your environment, you can remove the if structure regarding this check from the script.
When the script is created, make it runable and add it as a startup service:
		chmod +x /etc/init.d/registerSpacewalk.sh
		chkconfig --add registerSpacewalk.sh
Preferably you could create the script somewhere else, and add it to /etc/rc.local. This will make sure it will run after all other startup scripts have run, and you won't need to add it as a service as done above.
The script and this setup will make sure that the deployed VM from this template will register itself automatically to the given SpaceWalk server you specify.
For this to happen, the VM must be able to talk to the SpaceWalk server over the network and resolve whatever name you use in the script via /etc/hosts.
Set up the yum repository config files:
Make sure all configuration files under /etc/yum.repos.d except the SpaceWalk configuration files have enabled=0 under every section within these. We don't want to use other repo's then our SpaceWalk repo.
Create a template cleanup script:
You will ned a script to clean up the OS and ready it for template deployment. For example place it under /root/make-template.sh. See below for the script code.
	#!/bin/bash

	rm -rf /etc/ssh/ssh_host*
	rm -rf /etc/udev/rules.d/70-persistent-net.rules
	rm -rf /etc/touchme
	#/root/compileProgressbar.sh

	#rm -rf /etc/sysconfig/network-scripts/ifcfg-eth0
	#TODO: Generate this file on boot with correct mac.

	chmod -x /root/make-template.sh

	/sbin/service rsyslog stop
	/sbin/service auditd stop

	/bin/package-cleanup --oldkernels --count=1

	/usr/bin/yum clean all

	/usr/sbin/logrotate -f /etc/logrotate.conf
	/bin/rm -f /var/log/*-???????? /var/log/*.gz
	/bin/rm -f /var/log/dmesg.old
	/bin/rm -rf /var/log/anaconda

	/bin/cat /dev/null > /var/log/audit/audit.log
	/bin/cat /dev/null > /var/log/wtmp
	/bin/cat /dev/null > /var/log/lastlog
	/bin/cat /dev/null > /var/log/grubby

	/bin/rm -f /etc/udev/rules.d/70*

	/bin/sed -i '/^(HWADDR|UUID)=/d' /etc/sysconfig/network-scripts/ifcfg-eth0

	/bin/rm -rf /tmp/*
	/bin/rm -rf /var/tmp/*

	/bin/rm -f /etc/ssh/*key*

	/bin/rm -f ~root/.bash_history
	unset HISTFILE

	/bin/rm -rf ~root/.ssh/
	/bin/rm -f ~root/anaconda-ks.cfg

	echo "Shutdown this virtual machine and convert it to template in Hyper-V."
Remember to make the script executable to be able to run it:
chmod +x make-template.sh
This script should be run right before you turn off your VM to convert it to a template. Make sure that you clone your VM before you convert it, so that you have a working copy you can use.
When all this is done, you convert the cloned VM to a template and import it into a VMM Library where it will be ready for deployment. The process on how to do this will not be described here, but can be found in
various Microsoft technet documentation.
Source: SCVMM 2012 R2 and Linux experience
Tagged as: Linux, Hyper-V, HowTo |
|