|
VMWare
| Configuring and Checking HA Slot Size |  |
|---|
|
-20th of January 2013
The HA slot size determines the amount of VMs that can fail over to a host using High Availability. When all slots are used, the host is considered occupied in regard to the resources the slot size determines as minimum for the guests on it.
The HA slot size is calculated as the largest CPU reservation and the highest memory reservation of any given guest. This number divided by the total amount of resources available on the host, picking out the lowest outcome from either the CPU or memory division becomes the amount of slots that the host gets configured with.
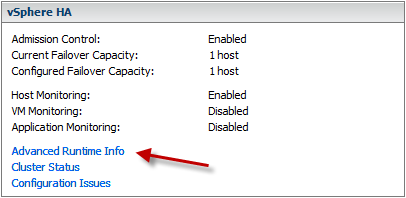
If admission control is enabled on the cluster, VMWare will honor the amount of slots available on a host and not power on any guests if the slots are all full. To determine the amount of slots available for a cluster, select the cluster in the Hosts and Clusters overview, then select the Summary tab, then the Advanced Runtime Info link.
To set a custom slot size you can either manually set a reservation to one of the guests that is larger then the other reservations on the host, or you can use the advanced configuration options das.slotMemInMB and das.slotCpuInMHz that are set under Advanced Options under vSphere HA Cluster settings.
|
|
Source: VMWare 5.1
Tagged as: VMWare, HowTo |
| Deep Security Virtual Patching | |
|---|
|
-29th of June 2013
Virtual Patching
In Deep Security IPS is what makes up Virtual Patching.
See page 74 in the Deep Security Administration guide. DPI will inspect the traffic to the guest system and use IPS to block any
traffic that might be exploiting known vulnerabilities that are fixed in patches not yet applied to the guest system.
1. In the Deep Security Console, go to computers.
2. Choose a test machine and double click it.
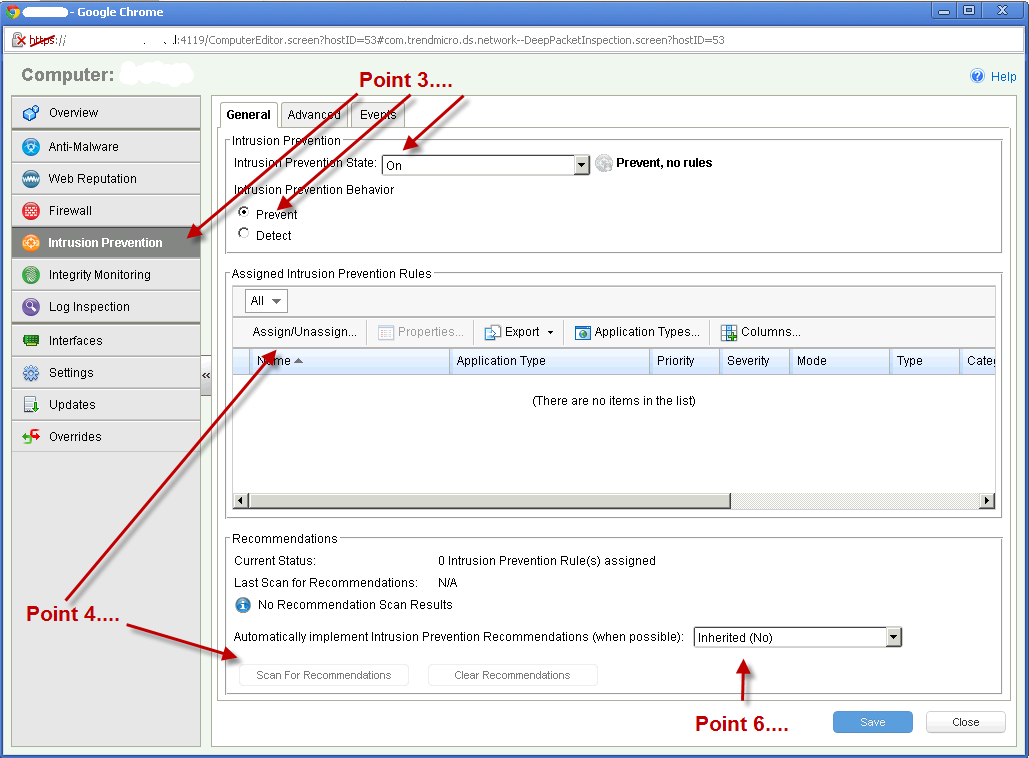
3. Choose 'Intrusion prevention' and choose ON, then decide if you want 'Detect' or 'Prevent'.
4. Choose to add rules manually (Assign/Unassign button) or choose to get recommendations (then press the button 'Scan for Recommendataions').
5. If you choose the manual method, then just check off the rules you want and right click so that you can choose 'Assign rules -> to all interfaces'
6. If you choose 'Scan for Recommendations' you can either choose to let the rules automatically be added or see what is recommended.
7. Usually it is adviceable to choose under Assign/Unassign -> 'Recommended for assignment.'
8. Then right click 'select all' - right click and 'Assign rules -> to all interfaces.'
Please see the illustration on the right.
For further information, please see the administration manual.
|
|
Source: Deep Security 9 Administration Manual
Tagged as: VMWare, HowTo, Network |
| ESXi Scripted USB Install | |
|---|
|
-31st of December 2015
Getting started
This article will contain a technical description of creating, and auto-creating scripted ESXi installs from USB. The USB drive we will be using for the install will be partitioned into three partitions labeled INSTALL, CONFIG and SETUP.
The first partition (INSTALL) will be a FAT32 partition and contain the ESXi installer files, the scripts to automate the installer, syslinux bootloader and a tftp client to download configuration we need to automatically set up our ESXi host.
The second parttion (CONFIG) will be a FAT16 partition that contains patches that we will use to patch our installation automatically (ESXi only mounts FAT16 partitions locally), log files from the installation will be stored here, and a configuration file downloaded from our TFTP server will be placed here.
The third and last partition (SETUP) will be a NTFS partition that will contain any script files or setup installers that we might need for later usage when working with our ESXi server that we have auto-installed.
The setup procdure will be described as performed in Linux, by using BASH scripts. This can also be done in Windows, but will require other technical expertise to acquire this, and is not described here. The whole automation is performed for VMware ESXi 5.5. Be aware that usage of the scripts shown here and the information given here, is at own risk. The writer assumes that the reader has the necessary skills to perform this safely, without the loss of data.
|
1. Downloading the TFTP client source code and compiling it for use
To make our TFTP client work in an ESXi environment, we need to compile it statically in an OS environment that is as similar to an ESXi as we can get it.
Even though ESXi is not Linux, the closest we will get is with Centos 6.x. In this example we will use Centos 6.7 for i386 architecture for compiling the code. Compiling the code statically makes linked libraries included
in the compiled result, which makes us able to run the compiled code on the ESXi even if a needed code library might be missing there. This is true to a certain degree. Some TFTP clients depend heavily on
code frameworks and other libraries, that don't get included in the compiled code even when we compile the code statically. This is why we want to find a light-weight TFTP client that depends mostly on its own code
and uses only standard C-libraries as much as possible. In the search of such an client, I have picked a TFTP client writte by Ian Foster.
To improve the client as I wanted, I rewrote it as shown here. The improvements made to the client are described in the readme and the comments in the code.
Clone the code from Ian Foster, and replace tftpclient.c with my altered code found here.
After installing and setting up Cento 6.x and downloading the TFTP client code on to it, you will need to install the builder tools needed to compile the TFTP client:
yum install build-essential gcc make
Then head on over to the folder where you have placed the TFTP source code and compile it:
make CFLAGS="-static" EXEEXT="-static"
Now you will have the compiled tftp client (a file without a filename extension) in the same folder as where you compiled the code. We now need to create a compressed tar ball and convert that into a t00 file that we will include in the ESXi installer to be installed with the rest of the system. Please see the example script below. Read through it, it does contain more actions then you need. I kept these there for inspiration of possible technical solutions. Edit the scrpt for your own needs.
					#! /bin/bash

					mkdir -p /tmp/ovf/files
					mkdir -p /tmp/ovf/tools
					mkdir -p /tmp/ovf/bin
					mkdir -p /tmp/ovf/bin/tftp

					rm -rf /tmp/tftp
					mkdir -p /tmp/tftp
					cd /tmp/tftp
					#We have our compiled TFTP code in tftp-compiled.tar.gz, copy it here:
					cp /usr/arbitrarylocation/tftp-compiled.tar.gz .
					tar xzvf tftp-compiled.tar.gz
					rsync -au /tmp/tftp/* /tmp/ovf/bin/tftp/

					#We are including ovf-tool with our ESXi installer:
					rsync -au /usr/lib/vmware-ovftool/* /tmp/ovf/tools/
					sed -i 's/bash/sh/' /tmp/ovf/tools/ovftool

					#We are including a private and public key for use with automatic SSH authentication:
					cp /usr/arbitrarylocation/deployment_rsa /tmp/ovf/files/deployment_rsa
					cp /usr/arbitrarylocation/esxi/deployment_rsa.pub /tmp/ovf/files/deployment_rsa.pub

					#Now create the t00 file:
					cd /tmp
					tar cf ovf.tar ovf
					gzip -9 ovf.tar
Here /mnt/usb/ovf-00.t00 is the file we are going to include in our VMware ESXi installer. We will later copy that file to the INSTALL partition that we have made, and later we will refer to it via boot.cfg. This same file also refers to ks.cfg, which will be our kickstart installer script to setup the ESXi.
|
2. Partitioning the disk and installing Syslinux on the INSTALL(boot) partition
The following BASH script will partition your USB disk for you. Be aware that will will wipe everythig on it. To run it, paste the code in a textfile and make it executeable:
chmod 755 nameOfScript.sh
The script to do the partitioning is as follows:
					#!/bin/bash
					DISKPARTITION=$1

					if [ -z "$DISKPARTITION" ]; then
						echo -e "\e[31mError: Invalid arguments $0 \e[0m"
						echo -e "Example usage: $0 sdc"
						echo -e "First argument is disk to partition."
						exit 1
					fi
					if mount | grep -E '(^| )/mnt/usb( |$)' > /dev/null; then
						umount /mnt/usb
					fi

					echo -e "\e[35m **Wiping out all partitions on /dev/$DISKPARTITION .. \e[0m"
					dd if=/dev/zero of=/dev/$DISKPARTITION  bs=512  count=1
					echo -e "\e[35m **Creating three new partitions on $DISKPARTITION \e[0m"
					echo -e "d\nn\np\n1\n2048\n+1GB\nn\np\n2\n\n+1GB\nn\np\n3\n\n\nt\n1\nb\nt\n2\n6\nt\n3\n7\nw\n" | fdisk /dev/$DISKPARTITION > /dev/null

					echo -e "\e[35m **Formatting partitions .. \e[0m"
					/sbin/mkfs.vfat -F 32 -n INSTALL /dev/${DISKPARTITION}1
					/sbin/mkfs.vfat -F 16 -n CONFIG /dev/${DISKPARTITION}2
					mkfs.ntfs -L SETUP -f /dev/${DISKPARTITION}3
Next we need to install our bootloader, Syslinux to our USB disk. This will make it bootable. Please note that the version of VMware ESXi you are using might only support certain versions of Syslinux. In this example, Syslinux 4.05 was used for usage with ESXi 5.5.
					#!/bin/bash
					DISKPARTITION=$1
					if [ -z "$DISKPARTITION" ]; then
						echo -e "\e[31mError: Did not receive argument for disk partition in $0 \e[0m"
						echo -e "Example usage: $0 sdc"
						exit 1
					fi
					echo -e "\e[35m **Removing any possible GPT data on /dev/$DISKPARTITION.. \e[0m"
					sgdisk --zap /dev/$DISKPARTITION
					echo -e "\e[35m **Installing syslinux to /dev/${DISKPARTITION}1.. \e[0m"
					syslinux -i /dev/${DISKPARTITION}1
					echo -e "\e[35m **Copying in mbr to /dev/$DISKPARTITION.. \e[0m"
					dd conv=notrunc bs=440 if=/usr/lib/syslinux/mbr.bin of=/dev/$DISKPARTITION
					echo -e "\e[35m **Setting bootflag on parted /dev/$DISKPARTITION.. \e[0m"
					parted /dev/$DISKPARTITION set 1 boot on
|
3. Set up scripts and configuration files for an automated bootable installation
The following script will copy in all files from the VMware ESXi ISO, provided that it is available under /dev/cdrom (a mounted iso in a virtual machine, for instance). When this is done, we create syslinux.cfg to tell Syslinux how to and what to boot.
					#!/bin/bash
					echo -e "\e[35m **Starting section where we copy in from ESXi ISO to ESXI USB.. \e[0m"
					DISKPARTITION=$1
					if [ -z "$DISKPARTITION" ]; then
						echo -e "\e[31mError: Did not receive argument for disk partition in $0 \e[0m"
						echo -e "Example usage: $0 sdc"
						exit 1
					fi

					if [ ! -z "$DISKPARTITION" ]; then
						if [ ! -d "/mnt/usb" ]; then
							mkdir -p /mnt/usb
						fi
						if mount | grep -E '(^| )/mnt/usb( |$)' > /dev/null; then
							umount /mnt/usb
						fi
						mount -t vfat /dev/${DISKPARTITION}1 /mnt/usb
						if mount | grep -E '(^| )/mnt/usb( |$)' > /dev/null; then
							echo -e "\e[35m **Usb successfully mounted, starting copy..\e[0m"
							if mount | grep /mnt/cdrom > /dev/null; then
								umount /mnt/cdrom
							fi
							mount /dev/cdrom /mnt/cdrom
							rsync -au /mnt/cdrom/ /mnt/usb/
							echo -e "\e[35m **Copy done, setting up syslinux.cfg..\e[0m"
							cp /mnt/cdrom/isolinux.cfg /mnt/usb/syslinux.cfg
							sed -i 's|menu.c32|mboot.c32|' /mnt/usb/syslinux.cfg
							#Place the t00 file we created earlier, on the INSTALL partition:
							mv /tmp/ovf.tar.gz /mnt/usb/ovf-00.t00
							chmod 777 /mnt/usb/ovf-00.t00
						fi
						if mount | grep -E '(^| )/mnt/usb( |$)' > /dev/null; then
							umount /mnt/usb
						fi
						if mount | grep /mnt/cdrom > /dev/null; then
							umount /mnt/cdrom
						fi
					fi
Here below is a script that places our custom BOOT.CFG and KS.CFG at the usb installation media. BOOT.CFG is pointed to by syslinux.cfg and contains information about the installer we are going to use, what files it will load and with what settings. It is in BOOT.CFG we will place the name of the t00 package we created with our TFTP client after copying the file to the USB disk. BOOT.CFG also points to KS.CFG which is the script that performs the ESXi installation, uses the TFTP client we compiled and sets up the ESXi server.
					#!/bin/bash
					echo -e "\e[35m **Copying ESXi kickstart files.. \e[0m"
					DISKPARTITION=$1

					if [ -z "$DISKPARTITION" ]; then
						echo -e "\e[31mError: invalid arguments in $0 \e[0m"
						echo -e "Example usage: $0 sdc"
						exit 1
					fi
					if mount | grep -E '(^| )/mnt/usb( |$)' > /dev/null; then
						umount /mnt/usb
					fi
					mount -t vfat /dev/${DISKPARTITION}1 /mnt/usb

					echo -e "\e[35m       HP setup files are being copied..\e[0m"
					cp /usr/arbitraryLocation/BOOT.CFG /mnt/usb/BOOT.CFG
					cp /usr/arbitraryLocation/KS.CFG /mnt/usb/KS.CFG
The following example of BOOT.CFG is from the HP custom ESXi 5.5 ISO. We have added our t00 file to the modules list, specified our kickstart script, and added initial IP-address configuration to the host. This configuration is then repeated in KS.CFG, and is the configuration first needed to talk to the TFTP server on our network to fetch a text file with information regarding the final IP-address configuration of the host. You should not copy the BOOT.CFG file below, but use it as an example on how to configure your own BOOT.CFG from the ISO you are automating your installation. The modules list might be different for different versions of ESXi, or different vendor builds.
					bootstate=0
					title=Automated ESXi Installer
					kernel=/tboot.b00
					kernelopt=runweasel ks=usb:/KS.CFG bootProto=static addvmportgroup=0 netdevice=vmnic0 ip=172.10.12.12 netmask=255.255.0.0
						gateway=172.10.15.20 hostname=ESXiHost1 vlanid=100 nameserver=8.8.8.8
					modules=/b.b00 --- /jumpstrt.gz --- /useropts.gz --- /k.b00 --- /chardevs.b00 --- /a.b00 --- /user.b00 --- /sb.v00 --- /s.v00
						--- /misc_cni.v00 --- /net_bnx2.v00 --- /net_bnx2.v01 --- /net_cnic.v00 --- /net_tg3.v00 --- /scsi_bnx.v00 --- /scsi_bnx.v01
						--- /scsi_bfa.v00 --- /elxnet.v00 --- /ima_be2i.v00 --- /lpfc.v00 --- /scsi_be2.v00 --- /char_hpc.v00 --- /char_hpi.v00
						--- /hp_ams.v00 --- /hp_build.v00 --- /hp_conre.v00 --- /hp_esxi_.v00 --- /hp_smx_p.v00 --- /hpbootcf.v00 --- /hpnmi.v00
						--- /hponcfg.v00
						--- /hpssacli.v00 --- /hptestev.v00 --- /scsi_hpd.v00 --- /scsi_hps.v00 --- /scsi_hpv.v00 --- /net_igb.v00 --- /net_ixgb.v00
						--- /scsi_mpt.v00 --- /net_mlx4.v00 --- /net_mlx4.v01 --- /net_mst.v00 --- /ima_qla4.v00 --- /net_nx_n.v00 --- /net_qlcn.v00
						--- /qlnative.v00 --- /scsi_qla.v00 --- /ata_pata.v00 --- /ata_pata.v01 --- /ata_pata.v02 --- /ata_pata.v03 --- /ata_pata.v04
						--- /ata_pata.v05 --- /ata_pata.v06 --- /ata_pata.v07 --- /block_cc.v00 --- /ehci_ehc.v00 --- /weaselin.t00 --- /esx_dvfi.v00
						--- /xlibs.v00 --- /ipmi_ipm.v00 --- /ipmi_ipm.v01 --- /ipmi_ipm.v02 --- /lsi_mr3.v00 --- /lsi_msgp.v00 --- /misc_dri.v00
						--- /mtip32xx.v00
						--- /net_be2n.v00 --- /net_e100.v00 --- /net_e100.v01 --- /net_enic.v00 --- /net_forc.v00 --- /net_vmxn.v00 --- /ohci_usb.v00
						--- /rste.v00 --- /sata_ahc.v00 --- /sata_ata.v00 --- /sata_sat.v00 --- /sata_sat.v01 --- /sata_sat.v02 --- /sata_sat.v03
						--- /sata_sat.v04 --- /scsi_aac.v00 --- /scsi_adp.v00 --- /scsi_aic.v00 --- /scsi_fni.v00 --- /scsi_ips.v00 --- /scsi_lpf.v00
						--- /scsi_meg.v00 --- /scsi_meg.v01 --- /scsi_meg.v02 --- /scsi_mpt.v01 --- /scsi_mpt.v02 --- /scsi_qla.v01 --- /uhci_usb.v00
						--- /tools.t00 --- /xorg.v00 --- /ovf-00.t00 --- /imgdb.tgz --- /imgpayld.tgz
					build=
					updated=0
Below is the last script for the automation. It partitions the disks of a HP GEN 8 server (different commands might be correct for a different server, test your own setup for the setup you need), sets the password, the initial IP configuration, decides what path our CONFIG partition is using, copies over patches and logs, performs the patching, downloads IP configuration from TFTP, sets the final IP configuration, and also assigns a license to the ESXi host. As you may imagine, a lot more can be done with these scripts. For instance creating standard switches and port groups with esxcli commands, amongst other things. The localcli command is used instead of esxcli when the ESXi server is not fully started yet.
					###############PRE INSTALL SECTION##############################################################
					accepteula
					clearpart --firstdisk='HP iLO' --overwritevmfs
					clearpart --firstdisk=HP --overwritevmfs
					partition datastore1 --onfirstdisk=HP
					install --firstdisk='HP iLO' --novmfsondisk --overwritevmfs
					rootpw passord1
					network --bootproto=static --addvmportgroup=0 --device=vmnic0 --ip=172.10.12.12 --netmask=255.255.0.0
						--gateway=172.10.15.20 --hostname=ESXiHost1 --vlanid=100 --nameserver=8.8.8.8

					###############POST INSTALL SECTION#############################################################
					%post --interpreter=busybox --ignorefailure=true
					POSTLOG="/vmfs/volumes/datastore1/postInstallKickStartLog.log"
					PATCHFILE="ESXI550-201505002.ZIP"

					echo "# Copying the ovf tool and custom tftp client to the correct location.." >> $POSTLOG 2>> $POSTLOG
					cp -R /ovf /vmfs/volumes/datastore1/ >> $POSTLOG 2>> $POSTLOG

					echo "#Stopping usbarbitrator and rescaning for storage.." >> $POSTLOG 2>> $POSTLOG
					/etc/init.d/usbarbitrator stop >> $POSTLOG 2>> $POSTLOG

					echo "#Disabling the firewall, neeed for TFTP client to work.." >> $POSTLOG 2>> $POSTLOG
					localcli network firewall set --enabled false  >> $POSTLOG 2>> $POSTLOG

					if [ -d "/vmfs/volumes/NO NAME/" ]; then
						USBDIRECTORY="/vmfs/volumes/NO NAME"
					else
						USBDIRECTORY="/vmfs/volumes/CONFIG"
					fi

					echo "Decided to use $USBDIRECTORY as path to the USB Device" >> $POSTLOG 2>> $POSTLOG

					echo "#Getting the config file from the TFTP server to datastore.." >> $POSTLOG 2>> $POSTLOG
					cd /vmfs/volumes/datastore1/ovf
					/vmfs/volumes/datastore1/ovf/bin/tftp/tftpclient -h 172.10.15.20 -p 69 -r servers.txt >> $POSTLOG 2>> $POSTLOG

					echo "#Getting the config file from the tftp server to FAT16 storage.." >> $POSTLOG 2>> $POSTLOG
					cd "$USBDIRECTORY/"
					/vmfs/volumes/datastore1/ovf/bin/tftp/tftpclient -h 172.10.15.20 -p 69 -r servers.txt >> $POSTLOG 2>> $POSTLOG

					echo "#Copying in servers.txt from USB to datastore, to make the version saved on USB disk the one with presedence.." >> $POSTLOG 2>> $POSTLOG
					echo "#If this fails, we hope that the previous download from the TFTP server to datastore will have done the trick.." >> $POSTLOG 2>> $POSTLOG
					cp "$USBDIRECTORY/SERVERS.TXT" /vmfs/volumes/datastore1/ovf/SERVERS.TXT >> $POSTLOG 2>> $POSTLOG

					echo "#Copying in patch to datastore.." >> $POSTLOG 2>> $POSTLOG
					cp "$USBDIRECTORY/PATCHES/$PATCHFILE" /vmfs/volumes/datastore1/ovf/files/$PATCHFILE >> $POSTLOG 2>> $POSTLOG

					echo "#Copying in weasel.log to USB disk and datastore1.." >> $POSTLOG 2>> $POSTLOG
					cp /var/log/weasel.log "$USBDIRECTORY/LOGS/weasel.log" >> $POSTLOG 2>> $POSTLOG
					cp /var/log/weasel.log /vmfs/volumes/datastore1/weasel.log >> $POSTLOG 2>> $POSTLOG

					echo "#Copying in POSTLOG to USB disk.." >> $POSTLOG 2>> $POSTLOG
					cp $POSTLOG "$USBDIRECTORY/LOGS/postInstallKickStartLog.log" >> $POSTLOG 2>> $POSTLOG
					cp /tmp/*.txt "$USBDIRECTORY/LOGS/" >> $POSTLOG 2>> $POSTLOG
					cp /var/log/*.log "$USBDIRECTORY/LOGS/" >> $POSTLOG 2>> $POSTLOG

					echo "#Rebooting the host..." >> $POSTLOG 2>> $POSTLOG
					reboot

					###############FIRSTBOOT SECTION##############################################################
					%firstboot --interpreter=busybox
					sleep 30
					echo "# Ensure hostd is ready" >> $FIRSTBOOTLOG 2>> $FIRSTBOOTLOG
					while ! vim-cmd hostsvc/runtimeinfo; do
					sleep 10
					done

					echo "#Stopping usbarbitrator and rescaning for storage.." >> $FIRSTBOOTLOG 2>> $FIRSTBOOTLOG
					/etc/init.d/usbarbitrator stop >> $FIRSTBOOTLOG 2>> $FIRSTBOOTLOG

					FIRSTBOOTLOG="/vmfs/volumes/datastore1/firstBootKickStartLog.log"
					PATCHFILE="ESXI550-201505002.ZIP"

					echo "#Enabling & starting the ESXi Shell.." >> $FIRSTBOOTLOG 2>> $FIRSTBOOTLOG
					vim-cmd hostsvc/enable_esx_shell >> $FIRSTBOOTLOG 2>> $FIRSTBOOTLOG
					vim-cmd hostsvc/start_esx_shell  >> $FIRSTBOOTLOG 2>> $FIRSTBOOTLOG

					if [ -d "/vmfs/volumes/NO NAME/" ]; then
						USBDIRECTORY="/vmfs/volumes/NO NAME"
					else
						USBDIRECTORY="/vmfs/volumes/CONFIG"
					fi

					echo "Decided to use $USBDIRECTORY as path to the USB Device" >> $FIRSTBOOTLOG 2>> $FIRSTBOOTLOG

					echo "#Assigning license.." >> $FIRSTBOOTLOG 2>> $FIRSTBOOTLOG
					vim-cmd vimsvc/license --set 00000-520EQ-00000-01DR0-00000  >> $FIRSTBOOTLOG 2>> $FIRSTBOOTLOG

					echo "#Gathering information from configuration file.." >> $FIRSTBOOTLOG 2>> $FIRSTBOOTLOG
					ESXiHostname=`more /vmfs/volumes/datastore1/ovf/servers.txt | grep esx1 | cut -d';' -f1`
					ESXiIpAddress=`more /vmfs/volumes/datastore1/ovf/servers.txt | grep esx1 | cut -d';' -f2`
					ESXiSubnet=`more /vmfs/volumes/datastore1/ovf/servers.txt | grep esx1 | cut -d';' -f3`
					ESXiGateway=`more /vmfs/volumes/datastore1/ovf/servers.txt | grep esx1 | cut -d';' -f4`
					ESXiSubnetID=`more /vmfs/volumes/datastore1/ovf/servers.txt | grep esx1 | cut -d';' -f5`
					ESXiVLAN=`more /vmfs/volumes/datastore1/ovf/servers.txt | grep esx1 | cut -d';' -f6`

					echo "Acquired ESXiHostname: $ESXiHostname" >> $FIRSTBOOTLOG 2>> $FIRSTBOOTLOG
					echo "Acquired ESXiIpAddress: $ESXiIpAddress" >> $FIRSTBOOTLOG 2>> $FIRSTBOOTLOG
					echo "Acquired ESXiSubnet: $ESXiSubnet" >> $FIRSTBOOTLOG 2>> $FIRSTBOOTLOG
					echo "Acquired ESXiGateway: $ESXiGateway" >> $FIRSTBOOTLOG 2>> $FIRSTBOOTLOG
					echo "Acquired ESXiSubnetID: $ESXiSubnetID" >> $FIRSTBOOTLOG 2>> $FIRSTBOOTLOG
					echo "Acquired ESXiVLAN: $ESXiVLAN" >> $FIRSTBOOTLOG 2>> $FIRSTBOOTLOG

					echo "#Setting the IP address configuration on the host.." >> $FIRSTBOOTLOG 2>> $FIRSTBOOTLOG
					esxcli system hostname set --host=$ESXiHostname  >> $FIRSTBOOTLOG 2>> $FIRSTBOOTLOG
					esxcli network ip interface ipv4 set --interface-name vmk0 --type static --ipv4 $ESXiIpAddress --netmask $ESXiSubnet  >> $FIRSTBOOTLOG 2>> $FIRSTBOOTLOG
					esxcli network vswitch standard portgroup set -p "Management Network" --vlan-id $ESXiVLAN  >> $FIRSTBOOTLOG 2>> $FIRSTBOOTLOG
					esxcli network ip set --ipv6-enabled false >> $FIRSTBOOTLOG 2>> $FIRSTBOOTLOG

					echo "#Patching the host.."  >> $FIRSTBOOTLOG 2>> $FIRSTBOOTLOG
					esxcli software vib install -d "/vmfs/volumes/datastore1/ovf/files/$PATCHFILE" >> $FIRSTBOOTLOG 2>> $FIRSTBOOTLOG

					echo "#Cleaning up the patch source when we are done.."
					rm -f /vmfs/volumes/datastore1/ovf/files/$PATCHFILE

					echo "#Backup ESXi configuration to persist changes" >> $FIRSTBOOTLOG 2>> $FIRSTBOOTLOG
					/sbin/auto-backup.sh >> $FIRSTBOOTLOG 2>> $FIRSTBOOTLOG

					echo "#Copy %first boot script logs to persisted datastore" >> $FIRSTBOOTLOG 2>> $FIRSTBOOTLOG
					cp /var/log/hostd.log "/vmfs/volumes/datastore1/firstboot-hostd.log" >> $FIRSTBOOTLOG 2>> $FIRSTBOOTLOG
					cp /var/log/esxi_install.log "/vmfs/volumes/datastore1/firstboot-esxi_install.log" >> $FIRSTBOOTLOG 2>> $FIRSTBOOTLOG

					echo "#Attempting to copy %first boot script logs to USB if the USB disk is available.." >> $FIRSTBOOTLOG 2>> $FIRSTBOOTLOG
					cp /var/log/hostd.log "$USBDIRECTORY/LOGS/firstboot-hostd.log" >> $FIRSTBOOTLOG 2>> $FIRSTBOOTLOG
					cp /var/log/esxi_install.log "$USBDIRECTORY/LOGS/firstboot-esxi_install.log" >> $FIRSTBOOTLOG 2>> $FIRSTBOOTLOG

					echo "#Attempting to copy FIRSTBOOTLOG to USB if the USB disk is available.." >> $FIRSTBOOTLOG 2>> $FIRSTBOOTLOG
					cp $FIRSTBOOTLOG "$USBDIRECTORY/LOGS/firstBootKickStartLog.log" >> $FIRSTBOOTLOG 2>> $FIRSTBOOTLOG

					echo "#Host configuration done! Rebooting.." >> $FIRSTBOOTLOG 2>> $FIRSTBOOTLOG
					sleep 180
					reboot -n -f  >> $FIRSTBOOTLOG 2>> $FIRSTBOOTLOG
|
4. Copy in any tools needed to the SETUP partition
The setup patition may contain any ovf images you would need to deploy on your host.
These may be ovf-tools, PowerCli, Powershell scripts or other tools needed for the last touch of the host that you just deployed automatcally.
This partition is a NTFS partition that fills up the rest of the USB disk. Populating this partition with content would be up to the administrator that is going to use it.
|
All these sections will sum up an automated USB based deployment. Please comment your experiences with this setup below.
Source: VMware and github.
Tagged as: VMWare, Scripts, Routers |
| General links on Raw Device mapping(RDM) | |
|---|
|
-19th of October 2013
When re-checking information about Raw Device Mappings, I found some links that I liked and thought to gather here and share. Guess these are easy to find on for instance Google,
but here they are served and ready without the need of further searching. If you are already acquainted with VMware vSphere, then the YouTube video embedded below will summarize an "how-to" pretty quickly.
Source: VMware.com and YouTube(obviously).
Tagged as: VMWare |
| How to shrink a disk | |
|---|
|
-19th of October 2013
This small collection of notes will act as a guide to shrink a thin disk in VMWare vSphere, and also as a guide on shrinking thick disks.
Case; reclaim the space usage of a thin provisioned disk:
1. Find the host that the VM with the disk you want to shrink is located on.
2. If the disk is thick, you have to convert it to a thin disk, which is possible in the process of storage vMotion before you continue.
3. Enable SSH on the host via its Configuration Tab -> Security Profile -> Properties in the services section when connected to the host or vCenter with the vSphere Client.
4. Log on the host with SSH (Putty is a good tool for such).
5. Navigate to the location of the virtual machine. In my case it is located under the path /vmfs/volumes/525ba385-79c0fb05-ea04-ac162d78a13c/ROUTER1
6. Find the vmdk (virtual disk file) that you want to shrink by issuing the 'ls' command. In my case it is ROUTER1-flat.vmdk.
7. Make sure the guest VM is turned off and then issue the command:
# vmkfstools --punchzero ROUTER1-flat.vmdk
vmfsDisk: 1, rdmDisk: 0, blockSize: 1048576
Hole Punching: 100% done.
|
Note: you may need to issue the sDelete command in the guest operating system before you issue the command above. See this article for more details.
Case; Shrink a thick provisioned disk:
1. To shrink a thick provisioned disk, you first have to shrink the filesystem on the disk to a size slightly smaller then what you plan the vmdk file to be.
This is important! If you do not resize the filesystem first, the end result will be unusable. You can do this with for instance Gparted which can be booted from live.
2. After this is done you have to edit the descriptor file for the disk via ssh on the host with the new size - in my case ROUTER1.vmdk:
RW 26214400 "VMFS ROUTER1-flat.vmdk"
The number 26214400 is 26214400 * 512 = 13421772800 bytes = 12.5 GB. If you want a 10GB disk, the the number to write there is 10737418240 bytes / 512 = 20971520.
3. Save the file and issue the following command:
# vmkfstools -i ROUTER1.vmdk ROUTER1_2.vmdk
Destination disk format: VMFS thick
Cloning disk ‘ROUTER1.vmdk’…
Clone: 100% done.
|
NB! Use this technique at your own risk!
4. Detach the first disk from the virtual machine and then attach the new clone with the new size. Then boot the VM.
5. Thats it! Now you can check the new file size by issuing the command 'ls -al' or browsing to the datastore with the vSphere Client.
Source: VMWare 5.1
Tagged as: VMWare, HowTo |
| Monitoring Virtual Machine Performance | |
|---|
|
-13th of January 2013
If you need to simulate CPU load on a VM, this can be done with CPUBusy.vbs.
1. First of all, open the vSphere Client and connect to your vCenter Server:
2. Choose a VM in the inventory list under 'Home>Inventory>Hosts and Clusters' and click the Performance tab.
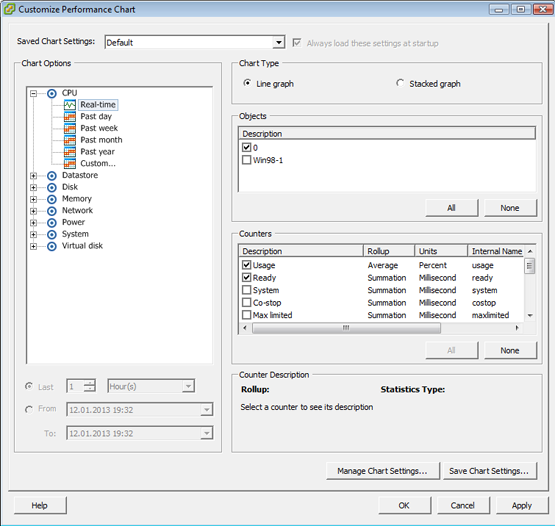
3. Choose Advanced, then CPU and then Chart Options.
4. Set up your chart as you like, here usage and CPU ready time have been chosen for real time data:
5. Click OK
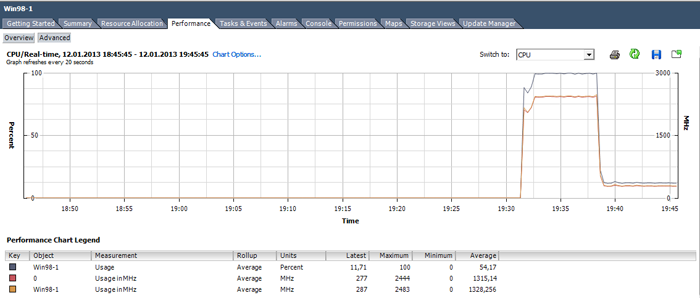
6. View the performance data unfold on the graph:
Source: VMWare 5.1
Tagged as: VMWare, HowTo |
| Report last logged in users on VDI | |
|---|
|
-18th October 2014
To create a report over all VDI users last login and reconnect time, you can use the following correlated query against the ViewEvent database of the VDI environment. This might be useful
if you are trying to get an overview of actual VDI usage in case they are still left running and not used/re-used.
The SQL query for the VDI report:
		SELECT a.[ModuleAndEventText]
			  ,a.[Time]
			  ,a.[EventType]
			  ,a.[Source]
			  ,a.[Severity]
			  ,a.[Node]
			  ,a.[UserSID]
			  ,a.[DesktopId]
			  ,a.[MachineId]
			  FROM [ViewEvent].[dbo].[VE_event] AS a
		WHERE a.[Time] =
			  (SELECT MAX(b.[Time]) FROM [ViewEvent].[dbo].[VE_event] AS b WHERE b.[ModuleAndEventText] = a.[ModuleAndEventText])
		AND
			  (a.[EventType] = 'BROKER_USERLOGGEDIN' OR a.[EventType] = 'AGENT_RECONNECTED')
		ORDER BY a.[ModuleAndEventText], a.[Time];
After this query is executed, the result can be copied and pasted into an excel spreadsheet, and in turn formatted nicely for presentation.
Source: My job
Tagged as: VMWare, Scripts, HowTo |
|