|
Microsoft
| Active Directory Forests and Domains |  |
|---|
|
-13th of August 2009
This text will contain notes and links to sources for further reading. It touches the subject of forest and domain structures for Active Directory, considerations for planning, and considerations for managing and administrating delegation in the domain. These notes are created to make a simple overview of these topics. Further reading is recommended for a deeper study.
1. When considering the active directory structure's forests and domains for a company, the following considerations should be considered:
*Organizational structural requirements
*Operation requirements
*Legal Requirements
*Limited connectivity requirements
A understanding of these requirements are essential to the forest and domain structure of Active Directory.
->More about this subject.
|

|
2. Isolation and autonomy requirements are also important aspects when considering forest and domain structures. This aspect breakes into four different categories:
*Service Autonomy - non-exclusive service control
*Data Autonomy - non-exclusive data control
*Service Isolation - exclusive service control for intended individuals
*Data Isolation - exclusive data control for intended individuals
With these four areas of consideration, follows the question of how many forests that are required.
->More about this subject.
|
3. When the above information is collected and considered, the forest model will be the next thing to evaluate. We have three forest models defined by Microsoft as listed here:
*Organizational forest model - service autonomy, service isolation and data isolation
*Resource forest model - service and resource isolation
*Restricted access forest model - data isolation
In deciding the forest model, many aspects should be considered.
->More about this subject.
|
4. In addition, when considering administrative delegation, a list of areas of focus when planning for Active Directory should be as follows:
*Organizational structure requirements
*Operational requirements
*Legal requirements
*Administrative requirements
*Organization size
*Consideration of service management
*Consideration of data management
*Consideration of the geographical infrastructure
*Consideration of the business infrastructure
*Consideration of the technical infrastructure
Relevant information is noted here, but for a deeper understanding it is recommended to follow the links in the text to more sources that cover the subjects.
|
5. Eventually we get to evaluate the domain model and the number of domains that are required. For the domain model, we have defined by Microsoft two models:
*Single domain model
*Regional domain model
In these domain models, the number of domains to implement is a question that will rise. Whether to upgrade or deploy new domains, and decide to have a dedicated forest root domain or a regional forest root domain. Forest and domain functional levels also have to be considered.
->More about this subject.
|
Source: Windows Server Enterprise Administration. ISBN: 9780735625099
Tagged as: Active Directory |
| Active Directory Trust Relationships | |
|---|
|
-26th of October 2013
| Configure DNS before setting up trusts. |
|---|
For the two forests to be able to trust each other, they have to be able to resolve each others domain names. Here follows a quick simplified quide on how to set this up.
1. Open up DNS manager in the first domain controller in the first domain(sccmlab.local here).
2. Right click forward lookup zones and choose new zone.
3. In the wizard that appears("Welcome to The New Zone Wizard"):
a) choose Stub Zone for Zone Type
b) the dns suffix for the other domain to trust under the Zone Name page (ad4.local here)
c) and the IP-address of the Master DNS Server(192.168.1.10 here).
4. Select the "Use The Above List Of Servers To Create A Local List of Master Servers" check box when that option appears.
|
On the other domain controller in the other domain(ad4.local here):
1. Open up DNS manager.
2. Right click the Conditional Forwarders folder, and choose New Conditional Forwarder.
3. In the wizard that appears;
a) type the domain name of the first domain in the DNS Domain box(here sccmlab.local)
b) add the IP of the DNS Server/AD Controller where this is applicable
c) then select "Store this Conditional Forwarder in Active Directory, And Replicate It As Follows." Choose "All DNS Servers in Forest" and then click OK.
|
| Create a Trust Relationship |
|---|
1. Open up Active Directory Domains and Trusts in the first domain controller in the first domain(here sccmlab.local).
2. Right click sccmlab.local and choose properties. Then click the Trusts tab, New Trust, Next, in the Name Box enter "AD4.local."
3. Select Forest Trust, click Next,
a) select "Two-way" and click next,
b) select "Both this domain and the specified domain" and click next,
c) fill in the credentials to authenticate to the other domain and click next,
d) select "Forest-wide authentication" and click next,
e) select "Forest-wide authentication" again and click next,
f) continue the wizard until you can choose "Yes, Confirm the outgoing trust" and click next,
g) select "Yes, Confirm the incoming trust" and click next,
h) then click Finish.
i) You can now see the new trust in the sccmlab.local Properties box.
4. You can now see the new trust in the ad4.local Properties box in Active Directory Domains and Trusts on the ad4.local domain controller as well.
|
Source: Configuring Windows Server 2008 Active Directory. ISBN: 978-0-470-22509-7
Tagged as: Active Directory, HowTo |
| Change and verify the NTP client in Windows | |
|---|
|
In the command prompt running as administrator or in a bat file,
set the NTP client to fetch its time from for instance the following list of time servers(the example here is with Norwegian time servers):
			@echo off
			w32tm /config /manualpeerlist:0.no.pool.ntp.org,3.no.pool.ntp.org,2.no.pool.ntp.org /syncfromflags:manual /reliable:yes /update
			net stop w32time && net start w32time
			w32tm /resync
Optionally verify the configuration with the following set of commands:
			w32tm /query /configuration
			w32tm /query /status
Sources: Microsoft
Tagged as: Tools, Commands, HowTo |
| How to Clean up a Windows System Drive | |
|---|
|
-23rd February 2013
This is a list of steps that can be taken to clean up a system drive and thus save space. Make sure you have set up your folder view to show all hidden files and not hide system files. In addition to this list you might want to try ccleaner from Piriform. Ccleaner can be scripted as well.
1. Do you use shadow copies on the system drive? Do you need them? If not you can delete them with the following command: vssadmin delete shadows /for=%SystemDrive% /all /quiet
2. How much space is the shadow storage taking on your system drive? You can resize it here with the following command: vssadmin Resize ShadowStorage /For=%SystemDrive% /On=%SystemDrive% /MaxSize=4GB
3. Are there memory dumps stored on your system? You can safely delete them. If not specifically specified otherwise, you will find them at:
%SystemRoot%\MEMORY.DMP
%SystemRoot%\Minidump\*.*
4. Do you run IIS on your server or computer? You can compress the log files at %SystemDrive%\inetpub\logs\LogFiles using NTFS compression.
5. You can safely delete the following:
%SystemRoot%\installer\$PatchCache$
%SystemRoot%\$blabla$
%SystemDrive%\$Recycle.Bin
6. The following can be compressed with NTFS compression:
%SystemDrive%\PerfLogs
%SystemDrive%\MSOCache
7. If you are using Windows 7 or Windows Server 2008R2 you might want to try the command dism.exe /online /cleanup-image /spsuperseded to clean up the winsxs folder.
On Windows Vista or Windows Server 2008 Service Pack 2 the tool that does the same job is Compcln.exe.
On Windows Vista or Windows Server 2008 Service Pack 1 the tool that does the same job is VSP1CLN.EXE.
8. Finally - you can use cleanmgr.exe to clean up a whole lot more. If you want to script it, you can set it up first with the command cleanmgr.exe /sageset:101
After choosing what you want to clean up in the dialog box that appears, you cun run the same cleanupjob any time you want with the command cleanmgr.exe /sagerun:101
The setup for the cleaning job is stored in the registry in several keys under the following path:
HKEY_LOCAL_MACHINE\SOFTWARE\Microsoft\Windows\CurrentVersion\Explorer\VolumeCaches.
In our example, if we chose to clean up Active Setup Temp Folders, the key "StateFlags0101"=dword:00000002 will be created under
..\VolumeCaches\Active Setup Temp Folders indicating this as a part of the 101 cleanup job.
Thus if you wanted, you could set up a clean up job and export the keys from the registry that you want to constitute the same cleanup job on other computers without you having to go through the graphical user interface every time you want to create that same job. This makes a great opportunity for automating with scripts in large server environments.
|
This is not an attempt of a complete list.
Feel free to inform me if you have further suggestions.
Source: Information gathered over time.
Tagged as: Commands, Tools, HowTo |
| Mapping of local printers on Windows terminal servers through Citrix | |
|---|
|
-24th February 2013
This article will not show you how to set up policies of any kind. It will not show you how to use many of the tools mentioned. A certain level of knowledge is required to benefit from this article. Any information missing to you here might be found through Google and other articles.
Troubleshooting mapping of local printers when connecting to a Windows terminal server through Citrix:
1. Make sure that the service "Citrix Print Manager Service" is running on the terminal servers hosting the published desktop or published application that the user is connecting to. If this service has a tendency to crash you can set it to start every time it fails in its properties. But this should not be an excuse to not troublehoot why it fails.
2. Make sure the driver for the printer is installed on the terminal server. It must match exactly to the driver that the client uses. If it is not you should in Citrix policies enable "Use universal print driver only if requested driver is not available." This will ensure that the printers real driver will be used if it is available, but in case it is not, the universal print driver will be used instead.
3. Consider the Citrix Policy "Direct connections to print servers." If this is enabled, printing attempts will be attempted to be directed directly to the print server if it can. However, if you have trouble getting a printer local to a client to work, you should try to disable this policy and thus forcing printing to go through the client at every print attempt.
4. Consider the Citrix Policy "Auto Create Client Printers." Normally you could set this policy to auto create only the clients default printer, but when troubleshooting a network printer local to the client you can try to set this policy to "Auto Create All Clients Printers."
5. For further troubleshooting, use printcfg.exe to see what printers the client can see. Also see the event viewer for logged events regarding printer mapping when the client logged on.
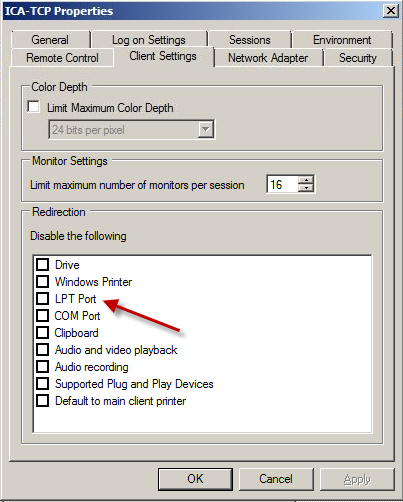
6. Review the ICA-TCP Properties. To find the ICA protocol properties on the terminal server press Start -> Run -> Type tsconfig.msc and press enter. Right click ICA-TCP and choose properties. Choose 'Client Settings' to set up settings for the connecting client. Try enabling LPT port if the printer local to the client is connected through an LPT port.
7. Check that your policies are not getting overridden by other policies. If you are in Xenapp 6 or later, policies can be defined both in Citrix and in Active Directory. Also check for Citrix policies in the Data Store. Make sure there are not policies in these three places that conflict. Best practice is to keep all Citrix policies in one place. It might be worth while to check for any local security policies as well. Traditionally GPRESULT and RSoP have been used to view group policy results, but these will not by default show Citrix policies. The only way to get the resultant set of policy including the Citrix policies is to use the RSoP-node from the GPMC of a XenApp 6 server.
|
|
|
Source: Getting started with Citrix Xenapp 6. ISBN 978-1-849681-28-5
Tagged as: Citrix |
| SQL 2008 Discovering Database Deadlocks | |
|---|
|
-12th January 2013
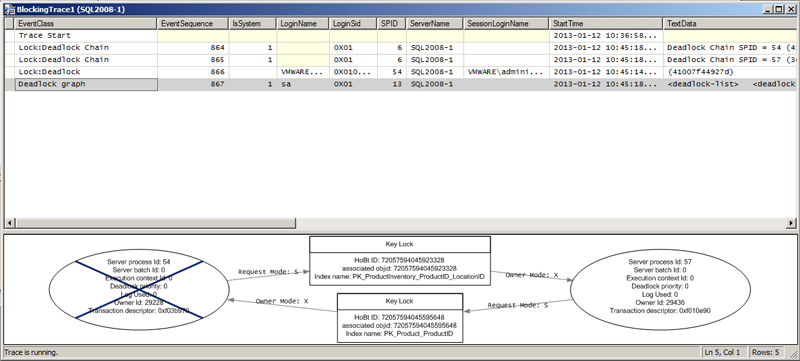
Discovering database deadlocks and how to fix them:
First of all, it is worth mentioning that SQL 2008 monitors locks in the database and resolves them automatically. If you however would like to investigate locking further, detect theyr presence, or suspect a lock for not being properly handeled by MS SQL, then the following steps can be taken:
1. Open a new query window and execute the following query:
SELECT session_id, blocking_session_id
FROM sys.dm_exec_requests
WHERE blocking_session_id > 0
|
2. If a lock is found, the results should look something similar to the following:
3. To identify the processes and the user running them, execute:
sp_who2 'processnumber'
For instance: sp_who2 52 |
The result may yield:
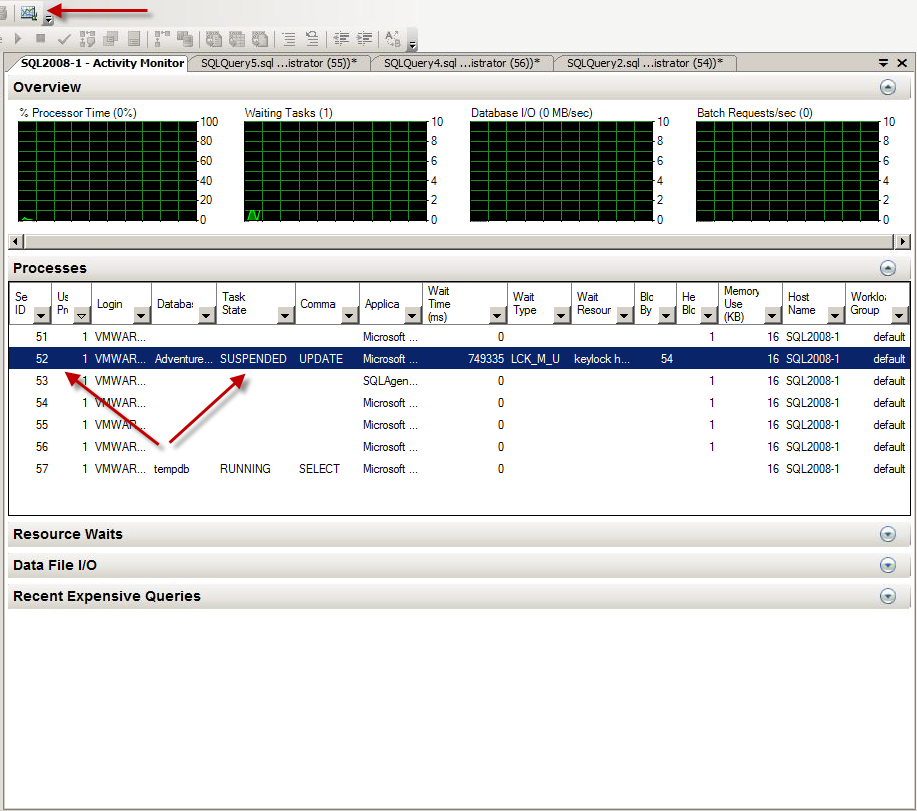
4. The conflicting process can also be found in Activity Monitor:
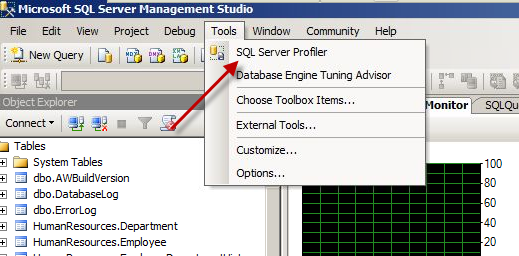
5. SQL Profiler can also be used to detect a deadlock:
5a. Start Profiler and select a new trace:
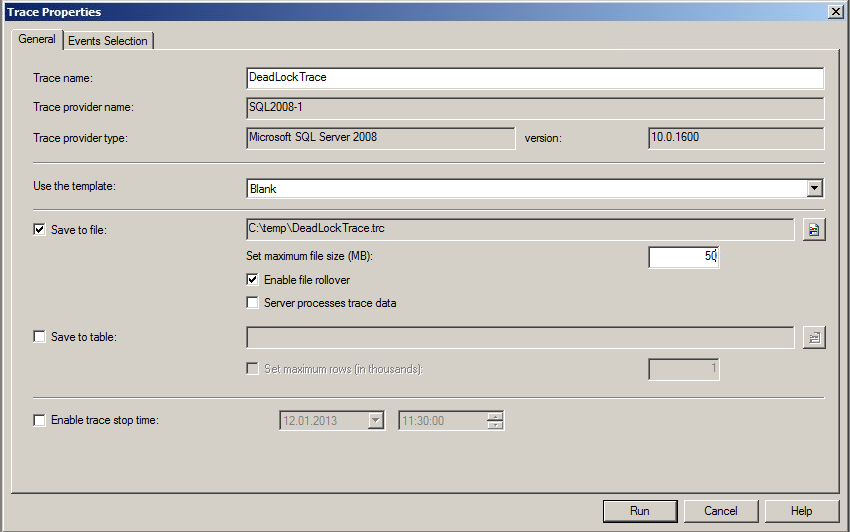
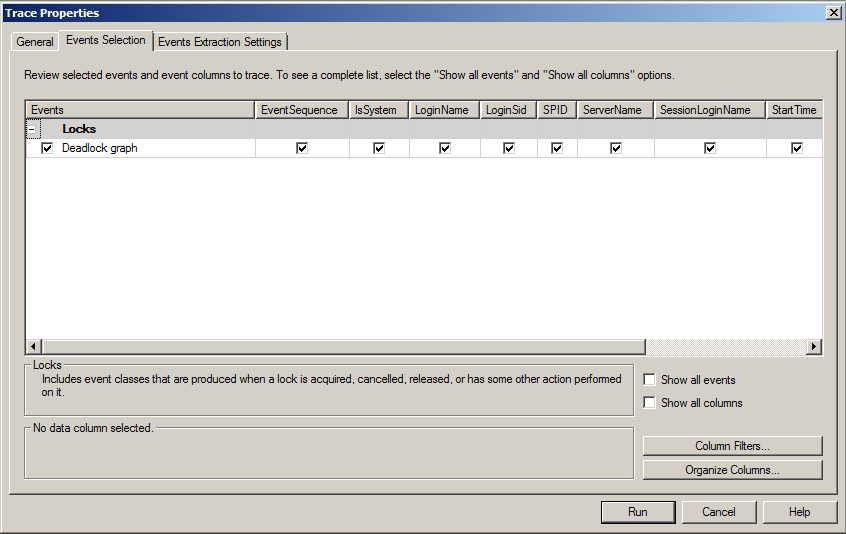
5b. Setup the trace as shown pictured below(both the 'General' tab and the 'Events Selection' tab):
5c. Press Run
5d. View the deadlock in SQL profiler:
6. The processes can be dealt with by issuing the kill kommand in the query window:
Kill 'processnumber'
For instance: kill 52 |
For more information on deadlocking, this article might be of interest.
Sources: SQL 2008 Administration. ISBN: 978-0-470-55420-3
Microsoft SQL Server 2008 - Implementation and Maintenance. ISBN-13: 978-0-7356-2605-8
Tagged as: SQL 2008, HowTo |
| SQL 2008 How to reset lost SA account password | |
|---|
|
-19th of October 2013
Here is an easy to follow guide on how to reset a lost SA account password in Microsoft SQL Server:
1. Stop SQL Service: on the command line type: net stop MSSQLServer
2. Start the SQL Server in Management mode: on the command line type: net start MSSQLServer /m
3. Open the SQL Server management studio, cancel the login dialog
4. Open new sql server engine query window: from the menu, Click file->new->Database engine query
5. Enable SA account if not enabled: in the query window type: Alter login sa enable
6. Set the password of the sa account: alter login sa with password='my password'
7. Stop the SQL server from the command line: net stop MSSQlServer
8. Start SQL Service from the command line: net start mssqlserver
9. Start the SQL Management studio and connect to the server using sa account
10. Add you domain administrator as sysadmin
11. Disable the sa account when you finish
Source: Useful stuff
Tagged as: SQL 2008, HowTo |
| SQL 2008 Performing an SQL Server Performance Trace | |
|---|
					/****************************************************/
					/* Created by: SQL Server 2008 R2 Profiler          */
					/****************************************************/

					-- Create a Queue
					declare @rc int
					declare @TraceID int
					declare @maxfilesize bigint
					set @maxfilesize = 500

					-- Please replace the text InsertFileNameHere, with an appropriate
					-- filename prefixed by a path, e.g., c:\MyFolder\MyTrace. The .trc extension
					-- will be appended to the filename automatically. If you are writing from
					-- remote server to local drive, please use UNC path and make sure server has
					-- write access to your network share

					exec @rc = sp_trace_create @TraceID output, 0, N'F:\MSSQL\InsertFileNameHere', @maxfilesize, NULL
					if (@rc != 0) goto error

					-- Client side File and Table cannot be scripted

					-- Set the events
					declare @on bit
					set @on = 1
					exec sp_trace_setevent @TraceID, 10, 1, @on
					exec sp_trace_setevent @TraceID, 10, 3, @on
					exec sp_trace_setevent @TraceID, 10, 11, @on
					exec sp_trace_setevent @TraceID, 10, 35, @on
					exec sp_trace_setevent @TraceID, 10, 12, @on
					exec sp_trace_setevent @TraceID, 10, 13, @on
					exec sp_trace_setevent @TraceID, 45, 1, @on
					exec sp_trace_setevent @TraceID, 45, 3, @on
					exec sp_trace_setevent @TraceID, 45, 11, @on
					exec sp_trace_setevent @TraceID, 45, 35, @on
					exec sp_trace_setevent @TraceID, 45, 12, @on
					exec sp_trace_setevent @TraceID, 45, 28, @on
					exec sp_trace_setevent @TraceID, 45, 13, @on
					exec sp_trace_setevent @TraceID, 12, 1, @on
					exec sp_trace_setevent @TraceID, 12, 3, @on
					exec sp_trace_setevent @TraceID, 12, 11, @on
					exec sp_trace_setevent @TraceID, 12, 35, @on
					exec sp_trace_setevent @TraceID, 12, 12, @on
					exec sp_trace_setevent @TraceID, 12, 13, @on


					-- Set the Filters
					declare @intfilter int
					declare @bigintfilter bigint

					set @bigintfilter = 50000
					exec sp_trace_setfilter @TraceID, 13, 0, 4, @bigintfilter

					exec sp_trace_setfilter @TraceID, 35, 0, 6, N'tmsng'
					-- Set the trace status to start
					exec sp_trace_setstatus @TraceID, 1

					-- display trace id for future references
					select TraceID=@TraceID
					goto finish

					error:
					select ErrorCode=@rc

					finish:
					go
|
					-- To stop the trace, here with Id 2:
					exec sp_trace_setstatus 2, 0
					-- To find traceID if is unknown:
					-- SELECT traceid FROM fn_trace_getinfo(default)
					--				where traceid > 1
|
				-- To deleta a trace race:
				exec sp_trace_setstatus 2, 2
				-- To delete the trace you first have to stop it.
				-- This will close the trace file being written to.
|
				-- As an alternative to the above commands the
				-- 		following code will also work:
				declare @tracenr int
				SELECT @tracenr = MAX(traceid)
					FROM fn_trace_getinfo(default) where traceid > 1
				exec sp_trace_setstatus @tracenr, 0
				exec sp_trace_setstatus @tracenr, 2
|
Firstly we need start our trace and store the results in a file that we can analyze later. Use the script on the left hand side created by SQL Server 2008 R2 Profiler and change the path and filename in 'InsertFileNameHere' to a real path on your system. You can run it in SQL Server Management Studio, this will start the trace that collects the data we need. See comments in the script for further instructions.
Let the trace run for a day or two, or at least a few hours where you know the system is under strain. To stop the trace use the stored procedure shown in the first box at the top of this column on the right hand side. The trace Id was returned to you when you started the trace, but if you have forgotten or missed it, you will find a query to find it for you in the same box at the top of this column.
When you are all done, it might be a good idea to clean up after yourself and delete the trace you created from the system. You will find commands to do that in the second box fron the top in this column. Alternatively you can use the code in the third box from the top of this column to make your day.
Now that you have your data collected in the trace file you created, you can start Database Engine Tuning Advisor and load the trace in there for analysis. Specify the file name and the database you want to evaluate as shown in figure 1, and start the analysis with the "Start Analysis" button.
Figure 1:
|
This blog article will be updated later with more information on Database Engine Tuning Advisor and how to use it with what you have seen so far. In the meanwhile, you are off to a start with this small guide. The next steps should be intuitive. For a closer look take a look at Ken Lassesen's guide and jump down to the "Apply the Recommendations" section. You have already performed all the rest above that section when reading and following this guide, thus simplifying the process of doing this greatly.
|
Sources: Gurus at my work
Tagged as: Scripts, SQL 2008 |
| SQL 2008 Policy Based Management | |
|---|
|
-13th of August 2011
Overview of Policy Based Management:
By using PBM in SQL 2008 you can enforce automatic evaluation, automatic enforcement, surface area configuration and centralize the management of these aspects. There by increasing effecticity and administration.
Policy based Management in SQL 2008 server is based on three components:
| Facet | - What technical area will the policy apply to?
| | Condition | - What condition of the facet do we test for?
| | Policy | - The policy that evaluates the condition of the facet and enforces what it is configured for.
|
The policy is then applied to a target wich has to be specifically defined.
More about SQL Server 2008 Policy based management.
Source: SQL 2008 Administration. ISBN: 978-0-470-55420-3
Tagged as: SQL 2008 |
| SQL 2008 Troubleshooting and Diagnosing Service Failures | |
|---|
|
-19th January 2013
Troubleshooting and Diagnosing Service Failures:
In order to troubleshoot service failures, a clear picture of what prerequisites a successfully running service needs to be made.
1. The SQL Server service account's password should not be changed directly but through SQL Server Configuration Manager. The service master key is encrypted by the service account and password, and both are only updated via the Configuration Manager.
2. Make sure the service is in the right startup mode. It should always be set to manual for clustered installations. Service start failures should be troubleshooted firstly via Event Viewer and the SQL server error logs. The location of the SQL Server error logs can be found by running the following TSQL in a query window:
|
SELECT SERVERPROPERTY(‘ErrorLogFileName’);
|
It should output something like the following:
C:\Program Files\Microsoft SQL Server\MSSQL.1\MSSQL\LOG\ERRORLOG
|
3. The SQL server service account specified to run the service must not be locked out, deleted, disabled, expired or the service set with a wrong password.
4. The SQL server service account must have read and write access to folders that hold data/log files and system databases, R/W permissions to SQL server registry keys, have Log on As Service authority, and Sysadmin authority inside the SQL Server instance.
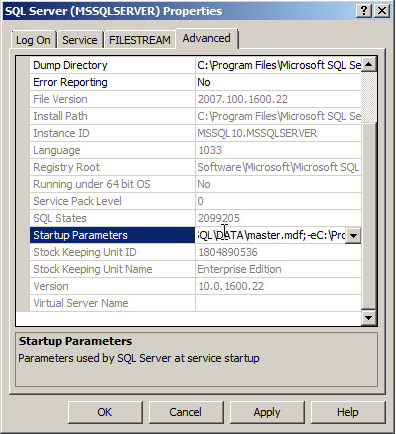
5. The storage system holding the system databases must be online, the folder holding the system database exist and path to it has to be correct. Check the service in configuration manager to see what startup parameters it is configured with. This will tell you where the system databases are placed, an thus where to check paths and permissions.
6. The Master database for the instance must not be corrupt. It can be repaired via the SQL server setup -> Maintenance Page -> Repair Wizard. The Master database can be checked with the TSQL command DBCC CHECKDB.
|
|
PS. If your instance is up and running and you want to list the placement of all its databases for troubleshooting theyr location, then the following SQL Query might be of use:
|
SELECT DB_NAME(dbid),* FROM sys.sysaltfiles;
|
Sources: SQL 2008 Administration. ISBN: 978-0-470-55420-3
Tagged as: SQL 2008, HowTo |
| SQL 2008 Useful TSQL queries | |
|---|
|
-19th of October 2013
Below is a collection of TSQL queries that I find useful. The list will be updated when seen appropriate.
| List all files in all databases in current instance: |
|---|
SELECT name, physical_name AS current_file_location
FROM sys.master_files;
|
| Find what database a given mdf file belongs to: |
|---|
SELECT name FROM master..sysdatabases
WHERE filename LIKE '%your_mdf_file%';
|
| Find the size of a given database: |
|---|
SELECT DB_NAME(database_id) AS DatabaseName,
Name AS Logical_Name,
Physical_Name, (size*8)/1024 SizeMB
FROM sys.master_files
WHERE DB_NAME(database_id) = 'AdventureWorks'
GO
|
|
| Find how long the current instance has been up: |
|---|
SELECT login_time FROM sys.dm_exec_sessions
WHERE session_id = 1;
|
| Find what database a given mdf file belongs to: |
|---|
SELECT name FROM master..sysdatabases
WHERE filename LIKE '%your_mdf_file%';
|
| Kill the most CPU intensive process: |
|---|
SELECT * FROM sys.dm_exec_requests
ORDER BY cpu_time DESC;
The process on the top of the list has session_id 9,
thus we kill session_id 9.
KILL 9;
|
|
Source: Useful stuff
Tagged as: SQL 2008, Scripts |
| SQL 2016 High-Availability | |
|---|
|
-18th July 2016
The Case:
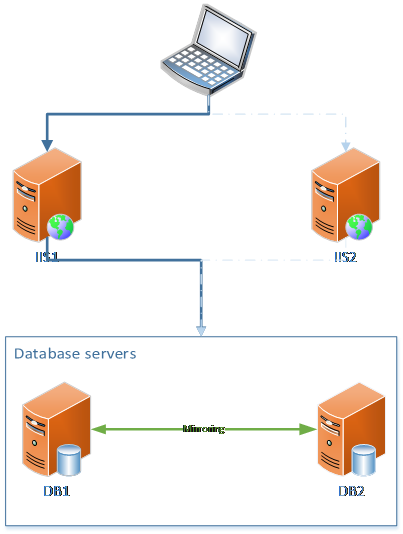
The solution that was wished for was a database solution mirroring with automatic failover at the database backend (transparent to the IIS servers and the clients) where two IIS servers serve the frontend to the clients. IIS availability and failover is handled by round robin names in the clients hosts file. The client internet browsers will automatically select the IIS server that responds if one of the addresses in the hosts file is not responding. There is no need f or a reverse proxy in this situation, so no reverse proxy considerations are made. Application Request Routing with IIS could be such a reverse proxy solution that would handle availablity for IIS and the browser clients, but round robin names in the clients hosts files were chosen instead.
Furthermore, Windows Server cannot be used in this scenarion since license costs have to be held down and there are already Windows 7 machines in place that can be used in stead.
The depicted case would look like something similar to this, where the client has chosen one available IIS server and the IIS servers address the database mirroring solution as a single point regardless of what database server is active or what database server is the warm standby;
 The available technologies that SQL server ships with for the replication of data between two databases or servers are as follows;
- Database mirroring
- Log shipping
- Always On Failover Cluster
- Always On Availability Group
- Merge replication
- Transactional replication
- Snapshot replication
None of these technologies are available in SQL Server Express version.
For reference: https://msdn.microsoft.com/en-us/library/cc645993%28v=sql.120%29.aspx?f=255&MSPPError=-2147217396
All of these technologies are available on SQL Server Standard, which is paid license software.
SQL Server Standard is possible to install on Windows 7. In this case it was necessary, since server infrastructure was not available.
For reference: https://msdn.microsoft.com/en-us/library/ms143506(v=sql.120).aspx
In regards to what technology is best suited for our case, a short list below will go through the technologies listed above;
Snapshot replication
- Replicates snapshots of data from a publisher (database) via a distributor over to a subscriber (database).
- Does not alone support automatic failover or HA solution
Conclusion: Has to be used together with WSFC (Windows Server Failover Clustering) in order to provide an automatic failover solution. This requires Windows Server.
Transactional replication
- Replicates transaction from publisher (database) via a distributor over to a subscriber (database).
- Can filter what is being replicated
- Does not alone support automatic failover or HA solution
Conclusion: Has to be used together with WSFC (Windows Server Failover Clustering) in order to provide an automatic failover solution. This requires Windows Server.
Merge replication
- Replicates changes from either subscriber or publisher via a merge agent where conflicts are handled by rules set up by the programmer or administrator.
- Can filter what is being replicated
- Does not alone support automatic failover or HA solution, but can receive updates at one server and merge them to the second server when the second server comes back up.
Conclusion: Handling rules for merging data from two different databases might be sufficient for correct data handling in our scenarion.
Setup would be similar to this, not very different from the first illustration:
|
Log shipping
- Automatic transaction log transfer to replica database where the transactions are restored from the copied log and saved.
- Does not support automatic failover, only manual failover.
Conclusion: Has to be used together with WSFC (Windows Server Failover Clustering) in order to provide an automatic failover solution. This requires Windows Server.
Always On Availability Group
- Requires Windows Server Failover Clustering (requires Windows Server).
- Supports automatic failover
- Fails over databases
Conclusion: WSFC (Windows Server Failover Clustering) requires Windows Server.
Always On Failover Cluster
- Requires Windows Server Failover Clustering (requires Windows Server).
- Supports automatic failover
- Fails over SQL Server Instances
Conclusion: WSFC (Windows Server Failover Clustering) requires Windows Server.
Database Mirroring
- Will not be included in future releases of SQL server, and therefore it is recommended by Microsoft to not use Mirroring for compatibility with future SQL server releases.
- Replicates data from a primary database (principal database) to a secondary database (mirror database).
- Supports automatic failover if installed in high-safety mode with a witness SQL server instance (can be SQL Server Express).
Conclusion: This feature will be depreciated in future SQL server releases, but for the purpose of this project might fit right in.
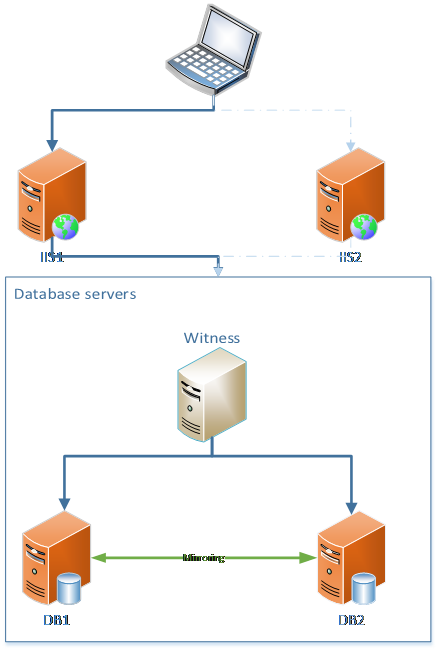
Based on the information written above, and aiming to use a configurable and not a coded solution, it seems we should use Database Mirroring with a witness server.
This requires the following;
- 2 x SQL Server Standard installed on each their Windows 7 (DB1 and DB2).
- 1 x SQL Server Express installed on a undetermined place to act as a witness for automatic failover.
- Configure Synchronous Database Mirroring in High-Safety mode with automatic failover by using the above software.
The backside of this is that this technology will be discontinued. Possibly, one could use SymmetricDS with SQL Express or just use MySQL instead.
Further references are:
Sources: Microsoft
Tagged as: SQL 2016 |
|