|
Linux
| Copying Windows 7 to a new drive, using Linux |  |
|---|
-26th of December 2014
Blog article coming..
Awaiting update..
dd if=/dev/sda of=/dev/sdb bs=446 count=1
|

|
|
Source: Manual pages
Tagged as: Linux, Tools, HowTo |
| Expand logical volume - LVM | |
|---|
-18th of October 2013
This article will briefly describe how to expand a logical volume that is part of a LVM.
Note: ># represents the command prompt and is not actually a part of the commands shown below:
Before we start the following needs to be summarized:
a. A partition on a disk is made a 'Physical Volume.'
b. This 'Physical Volume.' will then be added to a 'Volume Group.'
c. In the end we have a 'Logical Volume' that the 'Volume Group' is a part of, and that is mounted to the file system.
|
Notes:
This howto can be performed on most Linux distributions. It will have to be done by issuing the commands in order on a terminal command prompt. You will most likely need root privileges, either by sudo or by logging in as root. How to use the terminal, sudo or login as root will not be explained here.
For extending swap space, use the guide below and see here.
|
So here we go:
1. Add the disk to the physical computer or virtual machine(if that is the case).
2. Boot the machine. Some say a rescan will be enough, I had to boot.
3. List the disk with: fdisk -l
Disk /dev/sdc: 8589 MB, 8589934592 bytes
255 heads, 63 sectors/track, 1044 cylinders
Units = cylinders of 16065 * 512 = 8225280 bytes
Sector size (logical/physical): 512 bytes / 512 bytes
I/O size (minimum/optimal): 512 bytes / 512 bytes
Disk identifier: 0x00000000
|
4. Make a partition on this disk:
# fdisk /dev/sdc
> Then press 'n' to add a new partition.
> Then press 't' change the partition type. Choose 8e(Linux LVM).
> Then press 'w' to write the partition table.
5. List the disk again with: fdisk -l
Disk /dev/sdc: 8589 MB, 8589934592 bytes
255 heads, 63 sectors/track, 1044 cylinders
Units = cylinders of 16065 * 512 = 8225280 bytes
Sector size (logical/physical): 512 bytes / 512 bytes
I/O size (minimum/optimal): 512 bytes / 512 bytes
Disk identifier: 0xa0d940fd
Device Boot Start End Blocks Id System
/dev/sdc1 1 1044 8385898+ 8e Linux LVM
|
6. Make a Physical Volume out of /dev/sdc1:
# pvcreate /dev/sdc1
After this is done, I would want to know what Volume Group to place my Physical Volume. To find that, I would start by finding the name of the Logical Volume that is mounted on the filesystem, and see what Volume Group it is using. In my case the mount point /mnt/syslogs is full, so I type mount in the console to get a list of mounts on the filesystem and see what is mounted on /mnt/syslog:
/dev/mapper/vgLogDisks-lvSysLogs on /mnt/syslogs type ext4 (rw)
|
From this I know that the Logical Volume I am looking for is 'lvSysLogs.' I will then use the command lvdisplay to list information about logical volumes on the system. By this I find '/dev/vgLogDisks/lvSysLogs', with:
VG Name vgLogDisks
I can verify the existence of this group by using the command vgdisplay.
7. I will add our Physical Volume to vgLogDisks judging by the information above:
# vgextend vgLogDisks /dev/sdc1
Volume group "vgLogDisks" successfully extended
|
8. Our Logical Volume that makes out /mnt/syslog is still no larger despite its Volume Group getting a new disk. We therefore ectend our Logical Volume by the new disk:
# lvextend /dev/vgLogDisks/lvSysLogs /dev/sdc1
Extending logical volume lvSysLogs to 17.99 GiB
Logical volume lvSysLogs successfully resized
|
9. After this is done it is time to extend the filesystem to fit the Logical Volume:
# resize2fs /dev/vgLogDisks/lvSysLogs
resize2fs 1.41.12 (17-May-2010)
Filesystem at /dev/vgLogDisks/lvSysLogs is mounted on /mnt/syslogs; on-line resizing required
old desc_blocks = 1, new_desc_blocks = 2
Performing an on-line resize of /dev/vgLogDisks/lvSysLogs to 4715520 (4k) blocks.
The filesystem on /dev/vgLogDisks/lvSysLogs is now 4715520 blocks long.
|
10. Finally, we verify that the disk has all its new space:
# df
Filesystem 1K-blocks Used Available Use% Mounted on
/dev/mapper/vgSystem-lvRoot 10014648 1967016 7538912 21% /
tmpfs 1962520 0 1962520 0% /dev/shm
/dev/sda1 297485 67833 214292 25% /boot
/dev/mapper/vgSystem-lvLog 2064208 85584 1873768 5% /var/log
/dev/mapper/vgLogDisks-lvSysLogs 18565884 9709504 7913792 56% /mnt/syslogs
|
|
Sources: LPIC-2 Study Guide: ISBN: 978-1-118-00015-1
Tagged as: Linux, HowTo, Commands |
| Half-Life Dedicated Linux Server - Howto | |
|---|
-27th of January 2013
This short article describes how to set up an Half-Life Dedicated Server in Linux. I had trouble finding a full up to date guide on the internet, so I decided making one. I have experienced that others are better at finding these guides then I am. Nonetheless, the steps are written below.
Note: ># represents the command prompt and is not actually a part of the commands shown below:
Steps 1, 3, 4 and 5 may be skipped.
- 1) Download the Half-Life Dedicated Server for Linux. Download it to /tmp
- 2) As root execute:
>#adduser hlds
- 3) As root execute:
>#cd /tmp && tar -xvf hlds_l_3111_full.tar.gz && chmod u+r hlds_l_3111_full.bin && ./hlds_l_3111_full.bin
- 4) Accept and continue when prompted.
- 5) As root execute:
>#cp -R /tmp/hlds_l /home/hlds && chown -R hlds:users /home/hlds
- 6) As user hlds, execute:
>#export LD_LIBRARY_PATH=/home/hlds/:$LD_LIBRARY_PATH
This line should also be added to /home/hlds/.bashrc
- 7) As user hlds, execute:
>#cd ~ && wget http://storefront.steampowered.com/download/hldsupdatetool.bin && chmod +x hldsupdatetool.bin && ./hldsupdatetool.bin
- 8) Accept and continue when prompted.
- 9) As user hlds, execute and follow the instructions:
>#./steam -command update -game valve -dir . -verify_all
- 10) As user hlds, start the server by executing:
>#./hlds_run -game valve +ip youriphere +maxplayers 26 +map mapnamehere +coop 0 +deathmatch 1 +mp_timelimit 25 +mp_weaponstay 0
|
For more information, check the readme files that now are placed under /home/hlds. The file server.cfg under the valve folder should be updated before running the game. To set up a server with good performance, update server.cfg in accordance to this article. Finding a map name and your ip address(command 'ifconfig' as root or 'sudo ifconfig' on some systems) to use is not described in detail here. If the server is not directly connected to the internet, then you need to ensure that the router or NAT device wich it is behind has opened and forwarded specific ports used by the Half-life server to host the game. This is not explained here. The Half-Life server can be run as a service using screen. Example of using screen to run something as a service can be found here. I would guess such a script could be rewritten for the purpose of running an Half-Life Server on Linux as a service. You could even run multiple servers on different ports!
I might write such a script and publish it at scripts.team-holm.net. When that is done, the script will be linked to from here and this article updated.
The configuration for doing so is not included here, and running the game can be done with many other different options then mentioned in this article. Some can be foud at gamegate2k.
Edit 10.02.2013: Script for starting HLDS as a service can now be found in the script blog.
See also:
Sources: Here and everywhere
Tagged as: Linux, Games |
| How to Setup BDscan | |
|---|
-22nd of February 2013
Thought I would share my BDscan setup that I use on my Debian Linux computers.
Note: ># represents the command prompt and is not actually a part of the commands shown below:
1. First of all, set up your DEB repositories and install BDScan as is shown in the link.
2. Get a free license for BDScan. The license will last a year, after which you have to get a new one.
3. If you get an error stating segmentation fault when running BDScanner, execute the following line:
>#cat /opt/BitDefender-scanner/var/lib/scan/versions.dat.* |awk '/bdcore.so.linux/{print $3}'|while read bdcore_so;do touch /opt/BitDefender-scanner/var/lib/scan/$bdcore_so;bdscan --update;ln -s /opt/BitDefender-scanner/var/lib/scan/$bdcore_so /opt/BitDefender-scanner/var/lib/scan/bdcore.so;done
4. Set up a cron job that runs a scheduled job to scan your Linux system, as root:
>#vi /etc/cron.weekly/run-bdscan
5. Paste in the code in the box below and give root execute permissions:
>#chmod 744 /etc/cron.weekly/run-bdscan
|
Note: you will have to change the paths below to paths that
are relevant to your system.
#!/bin/bash
if [ -f /mnt/SDD1/bdscan.log ]; then
rm /mnt/SDD1/bdscan.log
fi
bdscan --update
bdscan --action=disinfect --log=/mnt/SDD1/bdscan.log /mnt/SDB2
bdscan --action=disinfect --log=/mnt/SDD1/bdscan.log /mnt/SDC1
bdscan --action=disinfect --log=/mnt/SDD1/bdscan.log /mnt/SDD1
if [ -f /mnt/SDD1/bdscan.log ]; then
grep infected /mnt/SDD1/bdscan.log >> /mnt/SDD1/infected.log
rm /mnt/SDD1/bdscan.log
fi
|
|
Several other options also exists when seting up a BitDefender scan in Linux. Consult the man pages for information:
>#man bdscan
bdscan [--action= disinfect | quarantine | delete | ignore] [--no-archive] [--no-mail] [--no-pack] [--no-recursive] [--follow-link] [--recur
sive-level=level] [--archive-level=level] [--ext[=ext1:ext2]] [--exclude-ext[=ext1:ext2]] [--suspect-copy] [--suspect-move] [--quarantine=quaran
tine_path] [--conf-file=conf_file] [--log[=file.log]] [--log-overwrite] [--no-list] [--no-warnings] [--verbose] [--update] [--virus-list] [--info]
[--version] [--help] [--encode=password] path-to-scan
In adition to this information, more can be found at the vendors website.
|
|
Sources: No real sources
Tagged as: Linux, HowTo, Tools |
| How to convert IMG to ISO | |
|---|
Thought I would share my notes on converting IMG files to ISO in Linux.
Note: ># represents the command prompt and is not
actually a part of the commands shown below:
Option 1. >#ccd2iso file.img file.iso
Option 2. >#mount -o loop <img file> <mountpoint>
>#mkisofs -dvd-video -o <iso output file> <mountpoint>
mkisofs is the same as genisoimage in Debian.
Option 3. Just rename the img file to an iso file :)
|
|
IMG and ISO file formats is usually a file image of a CD, DVD or BD. The entire contents of the disk is contained within the ISO or IMG file.
With various tools, an ISO can be set to contain any set of files to later be used as a image for the creation of CD's, DVD's or such. Both the
ISO and IMG files need to be mounted on a mountpoint or virtual drive to be read and used by the operating system. When mounted, they will act as a real CD, DVD or such to the operating system.
|

|
Sources: No real sources
Tagged as: Linux, HowTo, Commands |
| Linux Firewalls | |
|---|
-13th of January 2013
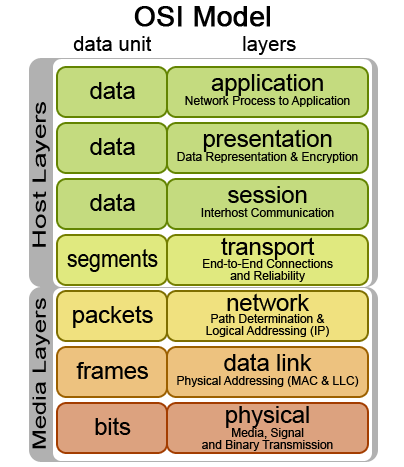
When evaluating a network packet, the firewall will read header information in the packet for the corresponding layer in the OSI Model
to evaluate this against the rules in a iptables chain. The iptables firewall is capable of handeling network information from all of the network layers, however it is not initially designed to do so. In the examples
that will be given below, there will be explained usage of the iptables firewall in conjunction with MAC addresses(Data Link layer), IP addresses(Network layer), and TCP/UDP ports(Transport layer).
When sending information over the network, the information is divided into packages that get encapsulated into protocols in the different layers of the OSI model. The packages are always divided into a size
specified by the Maximum Transmission Unit(MTU) of the sending interface. Typically this size is 1500 bytes, but can be up to 9000 bytes and then called Jumbo Frames.
If the package encounters equipment with a lower MTU than it was originally handeled by, the package will be further divided. Small packages create more protocol overhead but require less data to be re-transmitted if the package is lost.
Thus a small MTU is preferable for a network that is in some sort less reliable. A large MTU requires less overhead and thus more information can be transmitted faster. A large MTU is a good choice for networks that experience low
retransmissions and are considered fairly reliable.
This protocol overhead that is added to the packages that are to be transmitted has various information essential for the receiving part, or essential for the equipment used to send the package on its way to the destination.
This packet to be transferred typically starts its life at the application layer and traverses downwards to the physical layer where it is sent over the medium used for networking.
A series of packages typically make up a whole piece of information that is to be received by the receiver, and is put together at the receiving end. When transmitting information with the IP protocol,
it is possible to encapsulate it/transmit it over the TCP or UDP protocols on the Transport layer. Each of these represent two different transport mechanisms. TCP establishes a session
with a three-way-handshake and ensures that all packages belonging to
that session are tagged with sequence numbers and transmitted correctly over the wire. If packages are lost or mangled in the transport process, they are re-requested and re-transmitted.
TCP also ensures that the receiver can put the packages together in the correct order. TCP does however have a higher overhead then UDP, wich is a stateless protocol.
With UDP no attempt is made to establish a session, the packages are just put on the wire with a destination address hoping that the receiver will receive them and have
the necessary applications to handle and interpret the information received. This method of package transmission demands less overhead and is a good choice for realtime
communication that needs to arrive at its target fast, but not necessarily in the correct order or at all. Many popular network enhanced games use the UDP protocol when communicating
over the network.
| |
The Linux iptables firewall consists of a set of chains with firewall rules that a network packet gets evaluated by in the order that the chains are set up.
As illustrated on the picture to the right, a packet will traverse the PREROUTING chain before it is sent to either the INPUT chain or the FORWARD chain depending on if the packet is intended for this
particular host, or if it needs to be forwarded to another network that the receiving host is connected to.
To forward network traffic to other networks, the host needs to be configured as a router.
Examples of iptable rules set by a script or via the terminal:
1. iptables -A INPUT -p icmp -m icmp -m limit --limit 2/second -j ACCEPT
2. iptables -A INPUT -i lo -s 127.0.0.1 -j ACCEPT
3. iptables -A INPUT -m mac --mac-source 00:20:b0:4b:6f:1b -j ACCEPT
4. iptables -A INPUT -p tcp -i eth1 --dport 21 -j ACCEPT
5. iptables -A INPUT -p tcp -i eth1 --dport 20 -j ACCEPT
6. iptables -A INPUT -m state --state RELATED,ESTABLISHED -j ACCEPT
7. iptables -A INPUT -m state --state INVALID -j DROP
8. iptables -A INPUT -p tcp ! --syn -m state --state NEW -j DROP
9. iptables -A INPUT -p tcp --tcp-flags ALL ALL -j DROP
10. iptables -A INPUT -p tcp --tcp-flags ALL NONE -j DROP
11. iptables -A INPUT -p icmp -m icmp --icmp-type address-mask-request -j DROP
12. iptables -A INPUT -p icmp -m icmp --icmp-type timestamp-request -j DROP
|
Explanation to the rules listed above:
1. Limit the amount of ping packets(icmp) to the input chain to two per second, to avoid icmp flood attacks/DOS attack.
2. Allow the loopback interface to communicate with the host. This is often required by several applications that might be running on the host.
3. Allow sender with a specified mac source address to pass the INPUT chain. Note that mac addresses can be spoofed.
4. Allow packets over the INPUT chain arriving at TCP port 21 to pass. Often required by FTP servers.
5. Allow packets over the INPUT chain arriving at TCP port 20 to pass. Often required by FTP clients in active mode.
6. Allow packets over the INPUT chain that are a part of a related or already established communication transaction.
7. Drop packets that are considered invalid.
8. If a packet is considered new and not a part of a already established TCP session, and the syn flag is not set, then drop it.
9. If a packet has all the TCP flags set, it is considered invalid and dropped. TCP packets with all the flags set are suspected to be Christmastree packets.
10. If no TCP flags are set on the TCP packet, it is considered invalid and dropped.
11. ICMP(ping) packets that request address mask information are dropped.
12. ICMP(ping) packets that request timestamp information are dropped.
|
More information regarding various iptables rules that can be applied to iptable chains can be found at various sites on the internet and is recommended reading.
| |
The Linux iptables firewall is often used together with technologies like Snort, FWSnort and PSAD.
Snort is generally used to monitor and log network traffic to alone form a Intrusion Detection System(IDS).
However, when PSAD and FWSnort, or Snort is used together in conjunction with iptables, it forms an Intrusion Prevension System(IPS).
A graphical interface to these systems can be set up with several GUI systems, like BASE or OSSIM.
Better yet, the commandline interface that the iptables firewall has, makes it easily scriptable and thus tweakable through various script languages(e.g. Perl, BASH, Python).
Iptables with its capabillities reaching alot further then mentioned here therefore gets to be a nerds dream in a tweakable Linux world.
Sources: Linux Firewalls. ISBN: 978-1-59327-141-1
Drift av lokalnettverk. ISBN: 82-519-2075-2
Tagged as: Linux, Network |
| NXServer Notes | |
|---|
-22th of February 2013
Some few notes on setting up NXServer. For those of you who do not know what NXServer is, it enables a Linux server to act as a graphical terminal server over SSH.
1. The server has to be able to communicate with 127.0.0.1:22. If port 22 is not used for the SSH daemon on the server, then the port in question is the port that the SSH daemon listens to. This is configured in the config files under /usr/NX/etc
2. The user that connects to the NXServer has to be enabled for nx with the command nxserver --adduser, the setup is checked with the command nxserver --checkuser.
3. The NX binaries are placed under the path /usr/NX/bin
|

|
Sources: nomachine.com
Tagged as: Linux |
| Netmap, Netcat, Nmap, Netstat and TCPDump | |
|---|
-20th of December 2013
NETCAT
Netcat as a server to setup port for testing a network connection:
nc -w 600 -k -l 2389
Netcat will listen for 600 seconds(-w) and then stay up after the client disconnects(-k). The client will listen on port 2389.
To test the connection to the netcat server, you can use telnet from a different machine on the same network:
telnet -e p 192.168.1.102 2389
press p
type quit
press enter
We can also test the connection with netcat as a client:
nc 192.168.1.102 2389
Send a file over with netcat using udp(-u):
>at the server: $ nc -u -l 2389 > outputfile
>at the client: cat testfile | nc -u localhost 2389
Netcat as a client via a gateway and spoofing its IP:
nc -s spoofed_ip -g <gateway> remote_host <port>
Note: Up to eight hop points may be specified using the -g flag.
Netcat as a port scanner:
nc -r -w1 -v -n -z 192.168.1.108 3305 – 3320
-r for random ports in range
-w1 for wait 1 second for a reply
-v for verbose output
-n for no name resolution
-z for send no data
Get all header replies from services listening on ports in range:
echo "" | nc -v -n -w1 192.168.1.108 3306 – 3307
Example reply: Host 'router.net.local' is not allowed to connect to this MySQL server
Netcat proxy to Google that sends responses on port 123456 back to client:
nc -l -p 12345 | nc www.google.com 80 | nc -l -p 12346
Show a web page on port 80:
while true; do nc -l -p 80 -q 1 < error.html; done
Send a partition over the network with netcat:
Receiving side:
nc -l -p 9000 | dd of=/dev/sda
Sending side:
dd if=/dev/sda | nc 192.168.0.1 9000
|
NMAP
NBTSCAN
NBTSCAN is the Linux version of NBTSTAT, and can handle ranges of addresses instead of just a single host.
nbtscan -hv 192.168.1.0/24
The tool will scan for netbios information on the host.
nbtscan 192.168.1.0/24
More NBTSCAN examples
NETSTAT
|
Source: Manual pages
Tagged as: Linux, Commands, Network |
| OpenVPN server on RaspberryPI 1 vs RaspberryPI 3 | |
|---|
-1st of November 2017
This article will briefly describe an experiment with performance on a Open VPN server running on Raspberry PI 1 vs running on Raspberry PI 3. Both hardware units are running Raspbian as the operating system.
Note: D:\ represents the command prompt and is not actually a part of the commands shown below.
Before we start the following needs to be summarized:
- The available download speed as seen from the OpenVPN router is 80 Mbps
- The available upload speed as seen from the OpenVPN router is 30 Mbps
- How to set up a OpenVPN server will not be described here.
- The OpenVPN server / client is not set up to compress and decompress traffic as this will load the CPU on the OpenVPN server more than I trust it to.
- There is only one client at a time in this scenario.
There are essentially two OpenVPN servers set up, one one RaspeberryPI 1 and one on RaspberryPI 3. They both route to the same network where the same
Windows 10 machine is running a server instance of iperf3. It can be started like so:
iperf3.exe -s
After the Iperf3 server process is startet at the Windows 10 machine, I will connect to the network remotely from a remote location in a neighboring city via OpenVPN, first using the Raspberry PI 1 based Open VPN router, then using the Raspberry PI 3 based Open VPN router.
Each time I run iperf3 as a client from my VPN klient, connecting to the iperf3 server through the given OpenVPN server at the time and measuring the network throughput I get.
So, lets start by connecting through Raspberry PI 1 first, then Raspberry PI 3.
|
Speeds as seen through OpenVPN via Raspberry PI 1.
          Microsoft Windows [Version 6.1.7601]
          Copyright (c) 2009 Microsoft Corporation.  All rights reserved.

          D:\Users\User\Downloads\iperf-3.1.3-win64>iperf3.exe -c 192.168.100.51 -t 10
          Connecting to host 192.168.100.51, port 5201
          [  4] local 172.16.11.123 port 28041 connected to 192.168.100.51 port 5201
          [ ID] Interval           Transfer     Bandwidth
          [  4]   0.00-1.00   sec  1.00 MBytes  8.39 Mbits/sec
          [  4]   1.00-2.00   sec   896 KBytes  7.34 Mbits/sec
          [  4]   2.00-3.00   sec   896 KBytes  7.34 Mbits/sec
          [  4]   3.00-4.00   sec   896 KBytes  7.34 Mbits/sec
          [  4]   4.00-5.00   sec   896 KBytes  7.34 Mbits/sec
          [  4]   5.00-6.00   sec   896 KBytes  7.34 Mbits/sec
          [  4]   6.00-7.00   sec   768 KBytes  6.29 Mbits/sec
          [  4]   7.00-8.00   sec   896 KBytes  7.34 Mbits/sec
          [  4]   8.00-9.00   sec  1.00 MBytes  8.39 Mbits/sec
          [  4]   9.00-10.00  sec   768 KBytes  6.29 Mbits/sec
          - - - - - - - - - - - - - - - - - - - - - - - - -
          [ ID] Interval           Transfer     Bandwidth
          [  4]   0.00-10.00  sec  8.75 MBytes  7.34 Mbits/sec                  sender
          [  4]   0.00-10.00  sec  8.66 MBytes  7.26 Mbits/sec                  receiver

          iperf Done.

          D:\Users\User\Downloads\iperf-3.1.3-win64>iperf3.exe -c 192.168.100.51 -t 10
          Connecting to host 192.168.100.51, port 5201
          [  4] local 172.16.11.123 port 1041 connected to 192.168.100.51 port 5201
          [ ID] Interval           Transfer     Bandwidth
          [  4]   0.00-1.00   sec  1.00 MBytes  8.39 Mbits/sec
          [  4]   1.00-2.00   sec  1.00 MBytes  8.38 Mbits/sec
          [  4]   2.00-3.00   sec   896 KBytes  7.35 Mbits/sec
          [  4]   3.00-4.00   sec   896 KBytes  7.34 Mbits/sec
          [  4]   4.00-5.00   sec  1.00 MBytes  8.39 Mbits/sec
          [  4]   5.00-6.00   sec  1.00 MBytes  8.39 Mbits/sec
          [  4]   6.00-7.00   sec   896 KBytes  7.34 Mbits/sec
          [  4]   7.00-8.00   sec  1.00 MBytes  8.39 Mbits/sec
          [  4]   8.00-9.00   sec  1.00 MBytes  8.39 Mbits/sec
          [  4]   9.00-10.00  sec   896 KBytes  7.34 Mbits/sec
          - - - - - - - - - - - - - - - - - - - - - - - - -
          [ ID] Interval           Transfer     Bandwidth
          [  4]   0.00-10.00  sec  9.50 MBytes  7.97 Mbits/sec                  sender
          [  4]   0.00-10.00  sec  9.41 MBytes  7.89 Mbits/sec                  receiver

          iperf Done.
|
Speeds as seen through OpenVPN via Raspberry PI 3.
          D:\Users\User\Downloads\iperf-3.1.3-win64>iperf3.exe -c 192.168.100.51 -t 10
          Connecting to host 192.168.100.51, port 5201
          [  4] local 172.16.11.123 port 1080 connected to 192.168.100.51 port 5201
          [ ID] Interval           Transfer     Bandwidth
          [  4]   0.00-1.00   sec  2.00 MBytes  16.8 Mbits/sec
          [  4]   1.00-2.00   sec  3.75 MBytes  31.5 Mbits/sec
          [  4]   2.00-3.00   sec  3.88 MBytes  32.5 Mbits/sec
          [  4]   3.00-4.00   sec  3.75 MBytes  31.5 Mbits/sec
          [  4]   4.00-5.00   sec  4.00 MBytes  33.6 Mbits/sec
          [  4]   5.00-6.00   sec  2.75 MBytes  23.1 Mbits/sec
          [  4]   6.00-7.00   sec  2.50 MBytes  21.0 Mbits/sec
          [  4]   7.00-8.00   sec  3.38 MBytes  28.3 Mbits/sec
          [  4]   8.00-9.00   sec  4.00 MBytes  33.6 Mbits/sec
          [  4]   9.00-10.00  sec  3.88 MBytes  32.5 Mbits/sec
          - - - - - - - - - - - - - - - - - - - - - - - - -
          [ ID] Interval           Transfer     Bandwidth
          [  4]   0.00-10.00  sec  33.9 MBytes  28.4 Mbits/sec                  sender
          [  4]   0.00-10.00  sec  33.8 MBytes  28.3 Mbits/sec                  receiver

          iperf Done.

          D:\Users\User\Downloads\iperf-3.1.3-win64>iperf3.exe -c 192.168.100.51 -t 10
          Connecting to host 192.168.100.51, port 5201
          [  4] local 172.16.11.123 port 1099 connected to 192.168.100.51 port 5201
          [ ID] Interval           Transfer     Bandwidth
          [  4]   0.00-1.00   sec  4.00 MBytes  33.6 Mbits/sec
          [  4]   1.00-2.00   sec  2.00 MBytes  16.8 Mbits/sec
          [  4]   2.00-3.00   sec  4.00 MBytes  33.6 Mbits/sec
          [  4]   3.00-4.00   sec  3.88 MBytes  32.5 Mbits/sec
          [  4]   4.00-5.00   sec  3.88 MBytes  32.5 Mbits/sec
          [  4]   5.00-6.00   sec  3.38 MBytes  28.3 Mbits/sec
          [  4]   6.00-7.00   sec  3.00 MBytes  25.2 Mbits/sec
          [  4]   7.00-8.00   sec  3.62 MBytes  30.4 Mbits/sec
          [  4]   8.00-9.00   sec  4.12 MBytes  34.6 Mbits/sec
          [  4]   9.00-10.00  sec  4.38 MBytes  36.7 Mbits/sec
          - - - - - - - - - - - - - - - - - - - - - - - - -
          [ ID] Interval           Transfer     Bandwidth
          [  4]   0.00-10.00  sec  36.2 MBytes  30.4 Mbits/sec                  sender
          [  4]   0.00-10.00  sec  36.2 MBytes  30.3 Mbits/sec                  receiver

          iperf Done.
|
Summary:
we can see, the Raspberry PI 3 offers much better speeds for a OpenVPN server.
Sources: None
Tagged as: Linux, Routers, Network |
| Router Setup - Howto | |
|---|
When configuring Linux as an router, there are two main aspects to consider. Those are enabling the routing at the linux server and determining the routes between the networks. The routes between the networks
describe what path to take, or where to send the network packets next to get the packets on their way to the destination. The routes between the networks are either manually configured static routes or
dynamically configured. Static routes are configured by entering the route information in the terminal prompt manually. Dynamically
configured routes are communicated between routers with a routing protocol such as RIP, OSPF, IGRP, EGRP, IS-IS or BGP. Applications used for configuring Linux to handle dynamic routing protocols as those mentioned are for
example routed, gated and quagga. The advantage of dynamically configured routing is that dynamic changes in the network will not bring a network path between two points down as logn as other paths exist. If a path is broken, another route will be communicated
between the routers by using the routing protocol. Another tool used in routing is the iptables firewall often used in the Linux system. With this firewall you can control traffic as it flows through the router,
denying or allowing it, re-routing it, manipulating it in other ways or NAT'ing it.
The following steps describe the enabling of routing for forwarding network packets in Linux:
># echo "1" > /proc/sys/net/ipv4/ip_forward
However, after reboot, this setting will be reset and forwarding turned off again.
In most systems this setting can be set permanently by editing /etc/sysctl.conf, where the line to be added should be:
net.ipv4.ip_forward=1
The configuration is then loaded into the running system by the terminal command:
># sysctl -p.
Listing and adding static routes:
># route
Kernel IP routing table
| Destination | Gateway | Genmask | Flags | Metric | Ref | Use | Iface
| | 10.0.0.0 | * | 255.255.255.0 | U | 0 | 0 | 0 | eth1
| | 192.168.1.0 | * | 255.255.255.0 | U | 0 | 0 | 0 | eth2
| | 172.16.11.0 | * | 255.255.255.0 | U | 0 | 0 | 0 | tap0
| | default | 10.0.0.1 | 0.0.0.0 | UG | 0 | 0 | 0 | eth1
|
># route add -net 192.168.55.0 netmask 255.255.255.0 gw 192.168.1.254 dev eth2
># route
Kernel IP routing table
| Destination | Gateway | Genmask | Flags | Metric | Ref | Use | Iface
| | 192.168.55.0 | 192.168.1.254 | 255.255.255.0 | UG | 0 | 0 | 0 | eth2
| | 10.0.0.0 | * | 255.255.255.0 | U | 0 | 0 | 0 | eth1
| | 192.168.1.0 | * | 255.255.255.0 | U | 0 | 0 | 0 | eth2
| | 172.16.11.0 | * | 255.255.255.0 | U | 0 | 0 | 0 | tap0
| | default | 10.0.0.1 | 0.0.0.0 | UG | 0 | 0 | 0 | eth1
|
Examples of iptables:
The following makes sure that nothing on port 22(usually SSH) gets more than 4 attempts to connect to the port every 60 seconds. This prevents, or at least hinders, brute force attacks.
iptables -N SSH_CHECK
iptables -A INPUT -p tcp --dport 22 -m state --state NEW -j SSH_CHECK
iptables -A SSH_CHECK -m recent --set --name SSH
iptables -A SSH_CHECK -m recent --update --seconds 60 --hitcount 4 --name SSH -j DROP
Source: LPIC-2 Study Guide. ISBN: 978-1-118-00015-1
Tagged as: Linux, Routers, HowTo |
| Sed, Cut and Awk | |
|---|
-20th of January 2013
These are over simplified examples, which are good for getting started with an simple overview.
The commands are executed in the Linux shell or terminal, and exemplify common ways to parse data.
Usages of sed:
sed 's/<find>/<replacement>/<option>'
Showing /etc/passwd in tab delimited style instead of semicolon delimited style:
more /etc/passwd | sed 's/\:/\t/g'
Disabling all yum repos in /etc/yum.repos.list:
						for i in /etc/yum.repos.d/*; do
							cat $i | sed 's/enable=1/enabled=0/g' > $i
						done
|
Usages of cut:
Issue the command 'man cut' for more information.
- Filtering only the first and sixth field, and delimiting with two tabs:
more /etc/passwd | cut -d: -f1,6 | sed 's/\:/\t\t/g'
List how much free memory is on the system:
echo 'Free megabytes of memory:' `free -m | tr -s ' ' | sed '/^Mem/!d' | cut -d" " -f4`
|
Usages of awk:
Awk is more than a command, it borders to a programming language. Examples given here are only teasers.
- Print all lines longer then 50 characters:
awk 'length($0) > 50' /etc/passwd
Print columns one and six using /etc/passwd and : as a delimiter, sum column 3 and 4:
awk -F":" '{print $1,$6 " - Sum of column 3 and 4, " $3 " + " $4 ": " $3 + $4}' /etc/passwd
Print all columns using stdin:
awk ' {print $0} '
|
Various relevant informational links:
Sources: Google, Høgskolen i Sør-Trøndelag.
Tagged as: Linux, Commands |
| Software RAID - Howto | |
|---|
|
-15th of August 2011
This short article describes how to set up an software RAID in Linux. The command that we will use is:
# mdadm [mode] raid-device [options] component-devices
1. To build a mirrored RAID 1, we will issue for instance this command:
# mdadm --create /dev/md0 --level=1 --raid-devices=2 /dev/sdb1 /dev/sdc1
2. After this is done, you have to create a filesystem on the raid array:
# mkfs -t ext4 /dev/md0
You can now mount the filesystem as you normally would(mount /dev/md0 /mnt/raidDisk or mount via /etc/fstab). Further more you can treat the RAID device as a normal disk, for instance using fdisk to subdivide the RAID further.
Source: LPIC-2 Study Guide. ISBN: 978-1-118-00015-1 Tagged as: Linux, HowTo |
| make targets - an overview | |
|---|
-15th of August 2014
This short article aims to give a quick overview of several of the make targets in Linux that I have found useful to know, and what they do. Simple examples follow underneath the list of targets.
From the man pages for the make command; "The purpose of the make utility is to determine automatically which pieces of a large program need to be recompiled, and issue the commands to recompile them."
Note: These targets are setup in the Makefile. The usage of these as shown below is what is the normal standard, but can deviate if the Makefile deviates.
- binrpm-pkg - Builds the kernel as compiled binary.
- rpm-pkg - Builds the kernel as rpm package.
- deb-pkg - Builds the kernel for Debian only.
- tar-pkg - Builds the kernel as uncompressed tarball.
- rargz-pkg - Builds the kernel as gzip compressed tarball.
- tarbz2-pkg - Builds the kernel as bzip2 compressed tarball.
- dep - Make all dependencies. The command 'make dep' ensures all dependencies are in place.
- modules - Compiles kernel modules.
- modules_install - Installs modules for the kernel.
- bzimage - Compiles and makes kernel as bzImage.
- <none> - When compiling application sources, issuing make without a target will simply compile the sources. In kernel compilation, the make command without any target normally is the same as 'make bzimage' and 'make modules'.
- install - Compiles and installs the application if we are compiling application sources. If compiling a kernel; creates a ramdisk, copies in kernel file to /boot and sets up System.map that keeps tracks of pointers to functions in the kernel.
- all - Is the same as 'make' without a make target (see description above) and then also make 'modules_install' if we are doing kernel compilation.
- mrproper - Cleans up old configuration, temporary files, modules and module dependencies. Removes everything make config creates.
- clean - Cleans up everything 'make all' created, but leaves the configuration if ./configure or 'make config' was run.
- distclean - Cleans anything ./configure created.
- oldconfig - Reads the existing .config file and prompts the user for options in the current kernel source that are not found in the file. This is useful when taking an existing configuration and moving it to a new kernel.
- silentconfig - Works exactly the same way as oldconfig does, but it does not print anything to the screen, unless it needs to ask a question about a new configuration option.
- config - Make configuration with text based user interaction. The options are prompted one after another. All options need to be answered, and out-of-order access to former options is not possible.
- menuconfig - Make configuration with graphical menu (only text input). You can navigate through the menu and change the options you want.
- xconfig - Make configuration with graphical menu using Qt4. Requires dev-qt/qtgui to be installed.
- gconfig - Make configuration with graphical menu using GTK+. Requires x11-libs/gtk+, dev-libs/glib and gnome-base/libglade to be installed.
|
|
Compilation of application sources:
|
Kernel Compilation:
|
./configure
make
make install
|
make menuconfig
make
make modules
make modules_install
make install
|
Various relevant informational links:
Sources: The whole of the World Wide Web
Tagged as: Linux, Commands |
|